
 Make no mistake about it: flashlight technology has improved leaps and bounds in these past few years, with the availability of powerful lithium-ion batteries, small circuits, and LED bulbs that last tens of thousands of hours and produce ridiculous amounts of bright white light, all while sipping juice from the power supply. Halogen and krypton incandescent bulbs, while still absolutely functional, have fallen by the wayside: they just don’t perform as well or last as long as modern LED bulbs.
By Drew, a contributing author of Survival Cache & SHTFBlog
However, some older flashlight designs are timeless and soldier on. For the purposes of this article, we’re looking squarely at the stalwart Mini Maglite, a tough, reliable little aluminum beast of a flashlight. At just 5 ¾” long and normally powered by a tiny incandescent bulb and a pair of AA batteries, you can still find these wonderfully rugged flashlights new in most hardware stores and Wal-Marts, soldiering on without any upgrades – the Mini Maglite you purchase at the store today is the exact same design you would have bought 20 years ago. Maglite has since upgraded the design with a modern LED bulb that has obvious benefits, but they cost almost four times as much as the krypton-running Mini-Maglite: at my most recent visit to a Target store, the incandescent Mini-Maglite (with two new AA Energizers and the nylon open topped belt holster we all know and love) was $7.98. The new Mini-Maglite PRO, with a modern 226 lumen output LED illumination system, ran $26.99.
Check Out: Surefire Flashlights
 However, I don’t know any outdoorsman worth his salt who doesn’t have at least one or two of the original Mini Maglites kicking around in a glove compartment, tacklebox, or the junk drawer of the kitchen – the flashlights might even still have the spare bulb in the tailcap if they’re lucky. Personally, I have four of them kicking around the house, mostly with the batteries long gone to power remote controls or a kid’s toys. My veteran Mini Maglites have kind of fallen to secondary use after the adoption of more modern flashlights – I now usually carry a Streamlight Microstream with me everywhere I go instead of the older Maglites. But my tackleboxes still have Mini Maglites rolling around the bottom (they’re wonderfully waterproof) with a couple spare batteries, and my wife’s car has one in the center console. These Mini-Maglites are all old friends that I’ve had and used forever – and I was delighted to find out I could upgrade them.
Betterment by Nite Ize
 Nite Ize, a company that hails from Boulder, Colorado, pays its bills by producing a wide array of products, ranging from magnetic dashboard cell phone holders to full-blown LED flashlights and glowsticks. Via some online surfing, I stumbled across Nite Ize and their Mini Maglite LED combo upgrade kit. Being the flashlight lover I am, I immediately geeked out over the prospect of pulling my beloved old Mini Maglites back into the daily use herd.
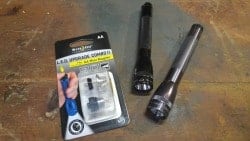
I searched on Amazon for the kits, and lo and behold, they were available, for dirt cheap. $7.57 per kit, to be exact. I figured for the price, I’d still be OK if I ordered one and found out they were less than stellar. I ordered a couple (my father wanted to try one out as well), and the pair of kits arrived on my doorstep a couple days later.
Initial impressions were pretty good; the packaging was nice, and the pictorial instructions were printed on a miniscule piece of orange paper. Included in the packaging were three items: a new LED lamp with two prongs on the back, a new revised reflector, and a push-button tailcap, made from plastic and machined anodized aluminum.
What The Nite Ize LED Upgrade Offers
 The Nite Ize LED Combo upgrade offers a few benefits over the original dual AA-powered Mini Maglite. Per the company’s website, the original incandescent bulb Mini Maglite offered a low-but-still-useful 14 lumens of yellow-tinted light. Run time with fresh batteries is about 5 hours. The only method of turning the flashlight on and off was to unscrew the head bezel slightly to activate the light; the beam could then be focused to the desired intensity – from flood to spotlight.
The Nite Ize LED Combo kit boosts the light output to a comparatively impressive 30 lumens – over double the output – and boosts battery life to 25 hours from the same pair of AA batteries. The white light beam can still be focused – a nice feature – and the flashlight can be activated one-handed via the thumb-activated tailcap switch.
An important note to consider: installation of this Nite Ize product WILL void the limited lifetime warranty offered by Maglite.
Upgrading the Mini Maglite: How It’s Done DIY
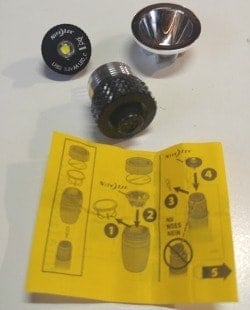 After a quick perusal of the brief smiley-face emblazoned instructions (also available online here), I attacked my old Mini Maglite. The Mini Maglite is a very simple flashlight; very few parts and all very straightforward to work with…I’ve made repairs on them in the past and had them completely apart; so rest assured – the upgrade is quite easy. First, I unscrewed the original tailcap (the back end, where the batteries are installed) and set it aside. You’ll want to hang onto the original tailcap; you’ll see why later. I replaced the original part with the new Nite Ize unit that sports a button switch: it’s a simple screw-in replacement. Easy enough. Next, I removed the front bezel (the end the light comes out) by unscrewing counterclockwise completely off the flashlight body. This exposes, at the front of the flashlight body, the tiny krypton bulb that comes standard in Mini Maglites. I grasped the bulb with my fingers, and pulled it forward, straight out of the two tiny holes it lives in.
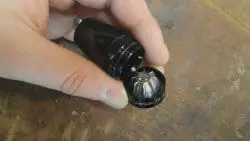
The new Nite Ize LED bulb has the similar two small contact wires like the krypton bulb; however, it also has a small black plastic disc that it lives on. This disc, which has the Nite Ize logo printed on it, along with “LRB2 3.0v AA LED” contains the circuitry needed to convert the power supplied from the batteries into retina-scorching white light. To install the LED bulb, carefully line the contact wires up with the holes you took the original incandescent bulb out of, and gently push the LED bulb into the barrel of the flashlight. It should sit all the way down; if the batteries are installed, it may have a tiny bit of “bounce” since the batteries it contacts ride on a spring in the tailcap.
 Once the bulb is installed, you can move to changing out the third piece of the puzzle: the reflector. The reflector is a small, brightly polished or coated piece of plastic that focuses the light of the flashlight into a beam. The reflector lives under a face cap at the outside (all the way forward) edge of the bezel. Muckle onto the front face cap with one hand, while holding onto the tapering back half of the bezel with the other. Unscrew the front face cap off the back end of the removed bezel. It should come right off (be careful not to lose the clear polycarbonate outer lens!), and you will be able to pop the original reflector out, and install the new Nite Ize unit right in its place. Screw the lens cap back onto the bezel, then re-install the bezel head unit onto the body of the flashlight. You’re (likely) done – it’s maybe a three-minute process if you’ve ever had a Mini-Maglite apart before.
Troubleshooting
 Okay, so you converted your old Mini-Maglite to this newfangled Nite Ize LED bulb setup and it doesn’t work. What now? Well, before you assume that it’s junk and broken and go kicking and screaming to Nite-Ize, there are a couple things you can try. First, and most obvious – put fresh batteries in the damn thing. Still not working? Okay, onwards to diagnostics!
First off, just like the original bulb, the bezel assembly needs to be unscrewed somewhat to actually activate the flashlight – just like every other AA Maglite. Give that a whirl. With the bezel at a position where the light would normally be on, try hitting the tailcap switch again. The unit should turn on.
If not, try removing the bezel assembly and checking the bulb installation. The LED bulb needs to have the two little contact wires installed in the proper holes; it does not work if it’s in backwards. Remove the bulb, spin it 180 degrees, and re-install the bulb and bezel. This should cure what ails your little flashlight – I had the same issue with one of my installs. You have a 50/50 shot – it’s a pretty good chance it’s backwards.
If your light STILL doesn’t work, try removing the tailcap switch and replacing it with the original Mini-Maglite fixed tailcap. Delightfully, the Nite Ize conversion is compatible with the original tailcap, meaning that you’re not required to use the push-button tailcap. If you have the original tailcap on, fresh batteries in the unit, and you’ve tried the bulb both ways, the culprit is quite likely the tailcap switch – if the old cap makes the flashlight work, you’ve got it narrowed down. This situation occurred with one of my kits. I emailed Nite Ize customer service, explained the situation and what I’d done to narrow down the possibilities, and a couple days later I had a new one in the mail that worked beautifully, no hassle or BS.
Wrapping It Up
 All in all, this is a really great upgrade for your aging (or new) incandescent bulb AA Mini Maglite collection. The improvement is more than worth the few dollars you’ll spend on the combo kit; and the kit will save itself in battery expenditure along in short order. I like that the kit retains the focus capability of the beam and removes some “dead” spots that the incandescent bulb configurations was famous for – but it does not completely remove the spots. The upgrade also retains the water resistance and shock impact ratings, which was always a selling point to me – the Mini Maglite is a rugged little flashlight for sure.
Check Out: 5 Survival Reality Show Screw Ups
The ability to “tailstand” – unscrewing the lens bezel completely, placing it lens-down on a flat surface, and inserting the operating flashlight tail-end into the back of the bezel like a candle – is also retained with this Nite Ize LED Combo kit. This has always been one of my favorite features of the Mini Maglite; you can use the flashlight to illuminate a whole area like a lantern, as opposed to just a directed beam. This feature is a Godsend when the power goes out and you don’t have candles – you can illuminate a room to play board games, read a book, etc. It’s a great capability to have, and makes the lights worth their weight in gold once the power grid is down.
The one thing I don’t like about this kit – the loss of the lanyard loop when you replace the original tailcap with the push-button switch – can be negated simply by replacing the original end cap; so don’t throw out the original parts! I can’t tell you how many times I’ve almost lost my flashlight while nighttime fishing on railroad trestles – the simple addition of a leather cord lanyard through the tailcap hole has saved my bacon more than once, so you can bet your behind I’ll be changing out the push button tailcap on most of my outdoor adventures. The choice and ability to function in either configuration sure is great, though.
If you’re starting from scratch and are looking for a quality, tough-as-hell LED flashlight for under or around $20 (if you buy those cheapo gas station register multi-LED lights you’re asking for trouble), a great way to go would be to buy a regular AA Mini-Maglite at your local Wal-Mart or on Amazon, then purchase one of these Nite Ize kits.
For those possessing the bigger “C” and “D” cell full-sized Maglites, Nite Ize makes upgrade LED bulbs for those lights as well.
 The brighter, white LED beam is much more useful than the order yellow incandescent beam, and this kit delivers the goods for a very small hit on the wallet. It’s a great upgrade to combat the unplanned obsolescence of a truly great, functional flashlight design. The company’s customer service is outstanding as well, and was a true delight to deal with. This upgrade to my old beloved Mini Maglites was worth every penny, and I’ll be buying more to upgrade the rest of the Maglite fleet. I can’t give you a better testimonial than that.
Visit Sponsors of SurvivalCache.com


from SurvivalCache http://survivalcache.com/survival-gear-review-nite-ize-combo-mini-maglite-led-upgrade-kit/
No comments:
Post a Comment