Tuesday 31 October 2017

Ready To Brawl | 5 Doomsday Defense Mods For Your ATV

These doomsday defense modifications can transform your ATV into a badass post-apocalyptic vehicle. Read on and find out the things you need to install on your quads to make them ready to brawl!

Doomsday Defense: Build the Ultimate Battle Quad

Almost every vehicle can be modified to be more useful when the inevitable doomsday occurs. However, one of the most popular picks for a post-apocalyptic vehicle is an ATV. They are quick, fuel efficient, and perfect for tackling tight, rough terrain. However, a regular ATV may not be enough to protect you from the perils of the last days. To fight your way out of a chaotic scenario and increase your odds of survival, here are some doomsday defense mods for your ATV.


1. Gun Mount

Gun Mount | Ready To Brawl | Doomsday Defense Mods For Your ATV
One of the most important doomsday defense modifications for your ATV is to install a gun mount. You want your guns to be accessible and ready to go anytime when doomsday arrives. Gun mounts will stabilize your weapon. That way, it won’t fall when you’re chasing a perpetrator or shooting at a crowd of zombies. You can build your own gun mount, or you can fit heavy-duty ATV V-Grips or gun racks to securely hold your guns.

2. Roll Cage

Roll Cage | Ready To Brawl | Doomsday Defense Mods For Your ATV
The primary function of a roll cage is for safety, but it also works great for other things. For instance, it can provide you more room to install your guns. In some cases, it’s even an ideal spot to mount your bazooka. Other than that, it serves as extra space if you want to add more lights, so you can more easily spot and shoot intruders in the dark.


We all grieve in different ways, but we all grieve. How to Deal With The 5 Stages Of Grief After TSHTF https://t.co/g6CLNmY0tp

— Survival Life (@SurvivalLF) September 28, 2017


3. Spikes and Horns

Spikes and Horns | Ready To Brawl | Doomsday Defense Mods For Your ATV
In a doomsday scenario, there could be bad guys or flesh-hungry cadavers that want to jump onto your ride. Adding spikes all over your quad can ward off your enemies, as well as any enemy vehicles. The easiest way to do it is to weld pieces of rebar to the rig. Furthermore, you can attach antlers or bullhorns at the front of your ATV. This will not only give the ride character, but it can also impale those who get in your way.

4. Steel Racks

Steel Racks | Ready To Brawl | Doomsday Defense Mods For Your ATV
You need a place to store spare gears and ammo. That’s where a rack comes in. Install a durable rack at the back of your ATV. However, make sure it is light enough, so it won’t bog down your vehicle’s power. Boosting your ATV’s carrying capacity is vital when doomsday comes, because you will need all the survival gear, ammo, and different kinds of weaponry you can get your hands on.

5. Non-Pneumatic Tires

Non-Pneumatic Tires | Ready To Brawl | Doomsday Defense Mods For Your ATV
Another cool thing you can add to your doomsday quad is non-pneumatic tires. These tires are built to withstand combat level damage without jeopardizing mobility and functionality. They work like ordinary tires that can absorb terrain and impacts, but you don’t have to worry about flats, cuts, rips or tears. With these tires, you can keep going for hundreds of miles, even if they’re hit by something as large as a railroad spike or a .50 caliber round.


Looking for more doomsday defense modification ideas? Watch this video from Mighty Car Mods and find out how to build a zombie-proof car!

Transportation is crucial in a SHTF situation. When you need to escape an impending terror attack or a siege of cannibal corpses, having the right kind of vehicle is necessary to reach a safer location. An ATV is arguably one of the best means of transportation during these times. However, there are still changes you need to do to outlast the challenges the day of reckoning throws at you. Modify your ATV to become a bad-to-the-bone doomsday defense vehicle, and you ensure your safety against anyone or anything that will get in the way of your survival.

Do you know other doomsday defense mods for an ATV? Share them with us in the comments below! 

UP NEXT: Brutal and Beastly: 13 BADASS Bug Out Vehicles!

Check out Ready To Brawl | 5 Doomsday Defense Mods For Your ATV at https://survivallife.com/doomsday-defense-atv/

Follow us on FacebookInstagramTwitterTumblr, and Pinterest

**Disclaimer: All content on this site is for informational purposes only. Please read our full disclaimer here**


from SurvivalLife https://survivallife.com/doomsday-defense-atv/

Monday 30 October 2017

Art of Concealment | How To Make A Camouflage Suit

A perfect camouflage suit will let you seamlessly blend with your surroundings. Even though you can buy camo and ghillie suits from supply stores, making your own will save you money and allow you to customize it.

Camouflage: This Ghillie Suit Will Keep You Hidden

The primary role of ghillie suits is to disguise you and keep you hidden in plain sight. Hardcore hunters, snipers, undercover surveillants, and airsoft enthusiasts use camouflage to make them invisible to their targets and allow them to move freely without difficulty. Also, wearing camouflage plays a major role in escaping dangerous and life-threatening situations. With all this in mind, if you want your own ghillie suit, put those hands to work and follow these steps to make a camo suit!

What You’ll Need:

  • Burlap (big enough to wrap your whole body)
  • Camouflage jacket and pants/coverall
  • Camouflage hat
  • Fabric Dyes (color should match your surroundings)
  • Netting (volleyball net or a fishing net)
  • Shoe glue

Step 1: Add the Netting

Step 1- Add the Netting | Art of Concealment | How To Make A Camouflage Suit
Lay the camouflage jacket, pants or coverall, and hat onto the netting. Once the suit is covered by the netting, attach the netting using the shoe glue and let it dry. Go to different spots and pull up the netting. If it goes further than two inches up, you have to add more shoe glue in there. Make sure the netting will stick well to your suit, especially on the edges. Further, make sure you still have access to the pockets you need to use. After, cut off the excess netting.

Step 2: Separate the Strands

Step 2- Separate the Strands | Art of Concealment | How To Make A Camouflage Suit
Preparing the burlap or jute fibers is the most time-consuming part of making a ghillie suit. Cut strips of burlap, then separate the strings one by one. Longer strands will go on the sleeves, while the shorter ones will overlap down the back.

Step 3: Dye the Burlap

Step 3- Dye the Burlap | Art of Concealment | How To Make A Camouflage Suit
After you have several mountains of jute, the next step is soaking it in fabric dye. Remember the color of the dye should match the environment you’ll work in. A combination of tan, dark and light green and brown will usually match well. Get a tub, fill it with water, and put in the fabric dye. Put the jute in the tub and soak it. Once the jute absorbs the dye, take it out of the tub and let it dry.

Step 4: Tie the Burlap

Step 4- Tie the Burlap | Art of Concealment | How To Make A Camouflage Suit
Now, it’s time to tie the strands of the burlap into the netting. Take about ten to fifteen strands, then fold them in half and push the loop under each square of the netting. Draw the hanging ends of the strands through the loops and pull them tight. Start from the bottom and work your way upwards. Make sure all the colors are spread out.

When all the jute are tied to the netting, your suit is done! Go out into the woods and test your new ghillie suit. By doing this, you will also figure out if there are changes and improvements you need to make.

Points to Remember

Without shelter, you won’t last long in the wild. Conquering the Cornerstones: Shelter – the 1st Pillar of Survival https://t.co/NKJgwqfN9L

— Survival Life (@SurvivalLF) October 4, 2017


Here are some points to remember when making an ideal ghillie suit.

  • If you cover too much of the front part of your suit, it will make crawling difficult.
  • More burlap means a heavier and hotter suit, but you also get more camouflage.
  • For you to blend in more with your surroundings, incorporate natural vegetation into your suit. A good ghillie suit has 65% natural vegetation and 35% burlap or jute.
  • Exposing your suit to water, dirt, and sunlight for long periods will make the individual fibers less noticeable, and your suit will become more camouflaged.
  • Use gloves, face paint, and boots with environmental colors for better concealment.

Looking for more camouflage suits? Watch this video from Ezvid Wiki and find out the best ghillie suits you can get on the market!

Wearing a camouflage suit will help you blend in with your surroundings. This will help you move freely without your target knowing you’re there, which is crucial in escaping a dangerous situation. Remember, the suit needs to be light and allow the air to circulate. Also, it should be made with quality materials to make sure it won’t fall apart when you’re in the field. You can add foliage such as twigs or leaves to enhance your suit, so you can blend in better with your surroundings.

Have you tried making your own camouflage suit? How is it working for you? Share your experiences with us in the comments below! 

UP NEXT: 5 Ways To Maximize Camouflage Concealment

Check out Art of Concealment | How To Make A Camouflage Suit at https://survivallife.com/camouflage-suit/

Follow us on FacebookInstagramTwitterTumblr, and Pinterest

**Disclaimer: All content on this site is for informational purposes only. Please read our full disclaimer here**


from SurvivalLife https://survivallife.com/camouflage-suit/

Winter Outdoor Gear For The Woman Survivalist Beginner

Winter Outdoor Gear For The Woman Survivalist Beginner

Here we are in the winter season of 2017 and the wilderness survivalist community is growing more than ever! With every year, the number of women in this field continues to grow. Women survivalists, whether they choose to go solo or join their significant other, are increasing in numbers. I must say, I’m impressed! If you are just getting into the wilderness survivalist scene and are going solo, my guess is you probably have questions. I certainly did when I hit the scene almost a decade ago. I learned through a lot of trial and error and I continue to learn every single day! In this article, I want to share the winter outdoor gear and other necessities to get you started. Of course, you can add items to this list. After all, the needs of every person (man or woman) will always vary.

Winter Outdoor Gear For The Woman Survivalist

The following list, however, is a great place to start:

  • Hiking Boots
  • Coat
  • Gloves/Hat/Scarf
  • Waterproof Gear
  • Backpack
  • Survival Knife
  • Sleeping Bag/Hammock
  • Fire Starting Kit
  • First Aid Kit
  • MRE’s
  • Whistle
  • Sunglasses

Let’s get started!

Hiking Boots

Hiking boots are a must when you are outdoors! A good hiking boot, in my opinion, should have these qualities:

  • Should go above your ankle for full support
  • Must have a quality rubber sole with good tread that can withstand any type of terrain
  • Should be water resistant
  • Should have comfortable yet supportive insoles

Tip: Replace your shoelaces with 550 strength paracord. Every survivalist should always carry paracord!

Coat

You want your coat to be warm, yet lightweight as possible and weather proof or water resistant. If you plan on being outdoors often, you’ll want to choose a dark color. Machine washable material is best.

Gloves/Hat/Scarf

These three items are a must for every outdoors person, especially in extreme winter elements. Hypothermia is a real threat, killing an estimated 1300 people a year!

Tip: Gloves with removable fingers will be appreciated when it comes time to tackle tasks such as starting a fire.

Winter Outdoor Gear For The Woman Survivalist Beginner

Waterproof Gear

Adding waterproof gear will be appreciated in the case of being caught in rain, snow, or ice…and in some climates in the United States, you may experience all three in just a day’s time! Adding a poncho (or two) to your gear will always come in handy!

Tip: A poncho will also serve as great cover in a temporary shelter.

Backpack

If you are just starting out, a lightweight backpack is your best option, in my opinion. If you hike for miles at a time, you’ll appreciate the lighter weight. I started out with a large, heavy duty pack. There is nothing wrong with that of course, however, just like a purse, we women want to fill it to it’s full capacity (which I did) and after about 2 miles of hiking, my back began to ache. When it comes to traveling on foot, go as lightweight as you can. Then, as time goes on, you can upgrade the size of your pack.

Also, make sure the material is weatherproof with at least two zipper compartments so you can keep your gear better organized. Finally, make sure it has external storage for a sleeping bag which I’ll go over in just a minute.

Survival Knife

A survival knife is one of the first survival items I ever bought for myself. A fixed 4 ½ inch blade with a belt sheath was my choice. After almost a decade later, it’s still in great shape and sharp as ever!

A knife used for survival is not a ‘on the whim’ type of purchase. For me, I shopped around for a while. I wanted to make sure my future knife was a good fit for me. People will advise you on knives (the brand, style, etc) but, the best way to know if a knife is the perfect fit for you is to just go shopping for one. Pay special attention to steel quality, blade shape, and the grip. Believe me, you’ll know the perfect knife for you as you go along.

Sleeping Bag/Hammock

Depending on who you ask, a sleeping bag is a necessary outdoor gear item for some but, not for others. I only include a sleeping bag if I’m going camping. It’s a matter of preference…how much you want to add to your pack.

A good alternative is a hammock. It takes up a lot less room! A hammock can also double as a gill net (fishing net).

Fire Starting Kit

We have written many articles here at Survival Life regarding fire starting kits. These are my favorite picks for beginners:

First Aid Kit

Another area of survival that we here at Survival Life take pride in is first aid kits. Here is a detailed article on first aid kits – one of my favorites on our website! First Aid Kit List

Click here for more great articles on how to make the perfect first aid kit for you!

MRE’s

A necessity to anyone’s pack is prepackaged snacks or MRE’s (meals ready to eat). Check out my article, Homemade MRE’s for Preppers, for a step by step guide on how you can make MRE’s right in your own kitchen!

Whistle

An item that I am NEVER without! It can be used to ward off predators while out in the wilderness (most wild animals hate loud noises), you can signal for help in the wilderness in case you get lost, and it can attract unwanted attention to a potential attacker (the last thing an attacker wants is unwanted attention in public).

Sunglasses

This is one of the most important items to add to your winter survival gear. If you are surrounded by snow, you can become snow blind without wearing proper eye gear. It’s a devastating condition that can be completely preventable. This is one of those instances where it paying a little extra for quality is worth it.

What outdoor gear is a must have for you in the wilderness? Share with us in the comment section below.

Check out Winter Outdoor Gear For The Woman Survivalist Beginner at https://survivallife.com/winter-outdoor-gear-woman-survivalist/

Follow us on FacebookInstagramTwitterTumblr, and Pinterest

Check out these articles on other great tips for the woman survivalist:

Bug Out Bags for Women

Survival Tips: Self Defense for Women

Nicole Apelian: A True Survivor


from SurvivalLife https://survivallife.com/winter-outdoor-gear-woman-survivalist/

Sunday 29 October 2017

Everyday Carry Gear (EDC) with Blade Tech Industries

Several factors come into play when choosing an everyday carry gear for you firearm. Whether openly carrying or carrying concealed these factors eventually affect every armed citizen. From discovering that one comfortable holster, for both open and concealed carry, to even comfortably carrying additional magazines, a lot of trial and error will be made. Unless the proper research is done beforehand. Even once a reliable holster is found for both a firearm and additional magazines choosing a durable belt will be the next hurdle.

Everyday Carry Gear | Blade Tech Industries Edition

Fortunately, Blade Tech Industries located in Puyallup, Washington is a one-stop shop for holsters, belts and firearms accessories no matter which platform of a sidearm or even primary rifle is being carried. With several holsters that offer an ambidextrous approach to carrying a firearm Blade Tech Industries offers the top of the line EDC (Every Day Carry) gear for their customers. Many Blade Tech holsters even offer an IWB (Inside Waistband) and OWB (Outside Waistband) option within the same holster allowing the armed citizen to openly carry and concealed carry when the occasion calls for it.


The Total Eclipse

The Total Eclipse | Everyday Carry Gear (EDC) with Blade Tech Industries
The Total Eclipse holster by Blade Tech Industries is an ambidextrous holster providing reliability for both left and right handed shooters. By simply reversing the belt loops the Total Eclipse holster can be placed comfortably on either side of the hip. The Blade Tech Total Eclipse holster also comes with additional adjustable and removable belt loops to allow the wearer an outside the waistband or inside the waistband carry option. Simply put the Total Eclipse holster offers every wearer, regardless of left/right hand dominant, a six-in-one carry system that accommodates both open and concealed carry positions. The Total Eclipse holster is also capable of a straight drop position or an FBI cant for individual preferences.

With many different style holsters available, very few actually offer an IWB (Inside Waistband) or an OWB (Outside Waistband) option within the same holster. This allows for wearers to focus on one holster for both open carry and concealed carry days. The various belt attachments also offer the wearer the option of sliding their carry belt through the loops located on the holster itself or simply hooking the holster on over the belt while already on. Both options offer a snug and comfortable retention when withdrawing the firearm from an open or concealed carry position. The Total Eclipse holster by Blade Tech Industries is by far one of the most comfortable and versatile holsters available on the market.

Single and Double Magazine Holsters

Single and Double Magazine Holsters | Everyday Carry Gear (EDC) with Blade Tech Industries
Blade Tech Industries offers a variety of single and double magazine holsters for individuals who carry backup magazines to their sidearm. However, one of their most popular styles of magazine holsters is the Eclipse Style single and double magazine holsters by Blade Tech Industries. The Eclipse Style holsters feature a Quick E-Loop that allows the wearer to quickly and comfortably attach and remove additional magazine holsters while their belt is already being worn. This feature is great for responsible citizens, law enforcement and of course military personnel.

Single and Double Magazine Holsters | Everyday Carry Gear (EDC) with Blade Tech Industries
While worn the Eclipse Style holsters contour well with the body regardless of positioning and movement. On the field, the Eclipse Style single magazine holsters, as well as the Eclipse Style double magazine holsters, do not cause any obstruction or interference when undergoing sidearm drills.  In fact, during firearms exercises, such as FBI Pistol Qualifications courses, where 50 rounds or more are required these Eclipse Style holsters by Blade Tech Industries make for a great addition as they can be easily attached and removed per firearms training course.

Choosing A Reinforced Belt

Choosing A Reinforced Belt | Everyday Carry Gear (EDC) with Blade Tech Industries
Wear and tear tend to occur on the belt when carrying a firearm in a proper holster as well as additional magazines every day. To counter this is it is recommended to upgrade to a belt that is better than a standard leather belt. For example, the Blade Tech Industries EDC (Every Day Carry) Belt has a durable nylon reinforced BioThane construction that ensures durability for the wearer regardless of firearm type. The EDC Belt by Blade Tech Industries provides flexibility as well as mobility with a tensile strength of upwards of 4,500 pounds. The belt is specifically designed to carry additional magazines, handcuffs and all types of sidearms comfortably.

If choosing to open carry or carry concealed on a daily basis it is important to differentiate between belts designed for consistent stress and for style. Many common mistakes for individuals who carry a firearm are that they will purchase an expensive leather belt that was not originally intended for stress just for style. Instead, choose between belts with the sole purpose of carrying a firearm. This way money will be saved from not destroying a perfectly good everyday carry belt. As well as peace of mind is kept by choosing a reputable belt.


Here’s a review of Blade Tech Industries products! Including the Total Eclipse Holster, EDC Belt and Single and Double Magazine Pouches:

Have you tried any of these everyday carry gear by Blade Tech? Let us know in the comments section below.

Up Next: Bulletproof Your Everyday Carry

Check out Everyday Carry Gear (EDC) with Blade Tech Industries at https://survivallife.com/everyday-carry-gear-blade-tech/

Follow us on FacebookInstagramTwitterPinterest, and Tumblr!


from SurvivalLife https://survivallife.com/everyday-carry-gear-blade-tech/

Saturday 28 October 2017

Why You Should Restore Your Body After Spending Time In The Field

Why You Should Restore Your Body After Spending Time In The Field

It wasn’t that long ago that merely bringing up the word, survivalist, would get you awkward glances from most people within earshot -of that ridiculous word. Even at social gatherings, I would have family members and friends poke fun at me whenever anything resembling the word preparedness was uttered. I would smile and laugh along with them, knowing that it was all done in good fun. But as the years passed, many of these same people, that were full jokes, are now taking their emergency preparedness training seriously. I’m quite sure of this because I’m generally the first person that they seek out when they make their decision to get started. One of the most important things I stress is the importance of physical training and with that, the need to restore your body afterwards.

Restore Your Body After Spending Time In The Field

I must admit that I’m proud of the preparedness community on a whole. We never veered under pressure and kept our focus as we continued on with the mission. Many newcomers have joined the ranks which greatly adds to the readily available information. There are more websites, gear reviews, blogs, equipment, courses and classes than ever before. I realize that on the contrary, there is also a lot more garbage that we need to sift through. In addition, we need to make sure that the information that we are gathering is coming from a credible source.

When it comes to buying gear, I see many in the preparedness community shell out small fortunes on equipment. They want what is best for themselves as well as their loved ones. The tides have also changed and the gear is not only being bought and staged, but it is finally getting used! Still… There are still those that are satisfied by just being gear collectors with zero practice application. Luckily, the majority of the community is realizing that without investing time in proper training with their new gear, they are just glorified gear collectors; With a false sense of security.

The preparedness community has certainly stepped up their gear lists and skill sets. However, there is a main piece of gear, I would say the most crucial one, that continually gets neglected by those focused on survival. That item would be…

Their Bodies!

Physical preparedness seems to take a backseat to nearly every other aspect of getting prepared. Unfortunately, without health and the ability to move efficiently… All other skill sets, for the most part, are rendered useless.

There are various aspects to being physically prepared for when the SHTF. To keep it simple, you need to have strength and you need to have endurance. When it comes to strength, think of the ability to put on your fully packed go bag and be able to comfortably move around with it. When it comes to endurance, think of the ability to travel far distances with that heavy backpack. There is a third part to being physically prepared and that is the ability to restore the body.

Even if you are not on a current protocol to enhance your strength and endurance, being able to restore your body is still a crucial aspect of your preparedness. We basically put our bodies out of whack on a daily basis. We sit for long periods of time and have basically become chair shaped over the years. Our spinal alignment is off and our core has become much weaker than it was designed to be. When you add in weekly hikes, sporting activities or even playing with children… Restoring the body needs to be an area of focus.

When I reference restoring the body, I want your to picture a car, any car, for this example. When we drive around we hit bumps, pot holes, rocks and who knows what else. This begins to shift crucial components of that car, into areas that they do not belong in. To remedy the situation, we bring our car to the auto mechanic. They align the wheels, as well as other components, and put them back into the locations that they intended to reside. Think of the wheel alignment on your car as an analogy for restoring your body.

There are various methods, both old and new, used to restore the body. Yoga is quite popular and rightfully so. It has helped to restore the body for thousands of years, so we know that it works. There are also various forms of joint mobility. That is where you move your joints in all planes of motion in order to restore connective tissue. This also helps to alleviate toxins from, and bring nutrition into, the connective tissue. Some use active stretching in order to aid them in realigning the body. Whatever your preference may be, the key here is to stick with it and restore on a daily basis.

I want to share a few of the reasons why I feel that you should take time to restore your body.

Let’s get started:

Put Your Body Back Together:

When we are out in the field, there are countless tasks to perform. The adventure may start by hiking out with a heavy backpack for a few miles. That task alone requires some serious restoration… But that is only the beginning. We are now at basecamp and we need to setup our shelters. Then there are the general tasks such as:

  • Setup Tarps
  • Gather Firewood
  • Setup Campfire Ring
  • Cutting Wood Safe Area/Set Up Axe
  • Setup Latrine
  • Build Fire
  • Setup Cook Stations
  • Setup Mess Area
  • Cook
  • Dining Area
  • Cleanup

Just think… That’s a hell of a lot of work and you haven’t even gotten to your mission!

All of these tasks require you moving in multiple directions and at times, awkwardly. It’s as if parts of your body have been ripped off and attached in other places.

Restoration is key to get your body put back together. Utilizing a sequence of movements will help to get the body functioning as one machine, as opposed to a bunch of individual parts.

Body Alignment:

As we move in the field, we need to be aware of how our body is aligned. If you arch your back, this could lead to injury. If you round your back, this can also lead to injury. It is important to keep your body aligned and a big part of that is your spine. We need to maintain a straight line from the top of our heads to our tailbones. Even if we are folded at the waist or carrying heavy items, maintaining a long spine is imperative.

Why You Should Restore Your Body After Spending Time In The Field

Regardless of the restoration method that you choose, spinal alignment will be a huge focus. The more that you practice these restoration methods, the more aware that you will be about your body alignment. While out in the field, be sure to practice re-aligning your body on a continual bases. Sometimes, a simple backbend for a few seconds, is all that is required.

Mental Clarity:

Restoration routines, protocols and sequences have a great impact on the body as well as the mind. When you think about it, by restoring the body we are in fact, healing it. Somehow, this whole process of restoration helps us to get a deeper introspective of ourselves as well as our current situation. This bit of mental clarity can become a great asset in any crisis.

Why You Should Restore Your Body After Spending Time In The Field

Prevent Injury:

If you do not take the time to restore your body, you will not be performing at your peak. You will be less efficient with each passing task. Over time, pain and injury will make their presence known. In daily life and especially in an emergency scenario, injuries want to be avoided at all costs. One of the quickest ways to fail at a mission is to become injured.You will not be very helpful to yourself and will certainly become a burden on your group.

Why You Should Restore Your Body After Spending Time In The Field

Operate At Maximum Potential:

Just like a professional racer needs a finely tuned vehicle, in order to perform at their best, we need to fine tune our bodies. Performing restoration exercises on a daily basis is a great way to address this. In order for us to operate at our maximum potential, we need remove as many restrictions as possible. Not only does restoring the body put things back in place, but it also fixes other impediments. The more leaks that we can patch through our restoration exercises, the more potential that we get for performing efficient work.

Why You Should Restore Your Body After Spending Time In The Field

Develop Combative Attributes:

The restoration methods that I mentioned previously, all stem from or have martial art application. As you work through various protocols that are focused on restoration, you will be developing movements that directly correlate with a combative application. Just the mere fact of being properly aligned and restored can help you to bode much better in a self defense situation. Once you delve into your restoration practice, you will begin to understand its self defense correlation. You can then exploit it or just know that it is there when you are ready to embrace it.

Why You Should Restore Your Body After Spending Time In The Field

Bottom Line:

When it comes to picking the best method for restoration, there is never a one size fits all. My approach was and is to delve into as much information as I could find. I then incorporate that information into my restoration routines. After a fair amount of time, I evaluate what I liked, what helped me and what was a waste. Naturally, I integrate what I like and discard the rest. Just like most skills in life, it is a continual process of testing and refining.

The best way to get the most out of your restoration practice, while out in the field, is to practice it every day at home. With daily practice, restoring your body becomes a natural, subconscious, process. You may not even be aware that you are doing it. Just like cracking your knuckles… It just seems to happen on its own.

If you have a physical fitness program that you are following, be sure to restore after each session. If your job requires physical activity, daily restoration is required. Work is work whether it is in the field, in a warehouse or at home. If you have no other physical activity going on, restoration may be even more critical for you. The less we move, the more restrictions that we develop. Daily restoration will help to remove those restrictions and aid in stopping others from developing.

If you do not restore, especially after strenuous movement… you will be prematurely aging the most important vehicle that you will ever possess; Your Body.

Up Next: Survival Fishing | Unconventional Methods To Catch Fish


from SurvivalLife https://survivallife.com/restore-your-body-prepping/

Friday 27 October 2017

Department of Defense to Run National Blackout Drill starting on November 4th

On November 4th, the Department of Defense will run a communications exercise preparing for a massive coronal mass ejection event that would take down power and communication grids. [...]

The post Department of Defense to Run National Blackout Drill starting on November 4th appeared first on Off Grid Survival - Wilderness & Urban Survival Skills.


from Off Grid Survival – Wilderness & Urban Survival Skills https://offgridsurvival.com/department-defense-run-national-blackout-drill-starting-november-4th/

Yellowstone Supervolcano: Updated Information And Warnings

Yellowstone Supervolcano: Updated Information And Warnings

The volcano of Yellowstone National Park has made headlines with research that presents a possibility that this supervolcano may erupt much sooner than expected.

Yellowstone Supervolcano

According to one Fox News report: Arizona State University researchers have analyzed minerals around the supervolcano at Yellowstone National Park and have come to a startling conclusion. It could blow much faster than previously expected, potentially wiping out life as we know it.

According to National Geographic, the researchers, Hannah Shamloo and Christy Till, analyzed minerals in fossilized ash from the most recent eruption. What they discovered surprised them – the changes in temperature and composition only took a few decades, much faster than the centuries previously thought.

“We expected that there might be processes happening over thousands of years preceding the eruption,” said Till said in an interview with the New York Times.

Yellowstone Supervolcano: Updated Information And Warnings

The supervolcano last erupted about 630,000 years ago, according to National Geographic. Prior to that, it was 1.3 million years ago, per a report from ZME Science.

If another eruption were to take place, the researchers found that the supervolcano would spare almost nothing in its wrath. It would shoot 2,500 times more material than Mount St. Helen did in 1980 and could cover most of the contiguous U.S. in ash, possibly putting the planet into a volcanic winter.

Despite the concerns, researchers state that more research needs to be done before a definite conclusion can be drawn.

Researchers state that in June 2017 the supervolcano was hit with 464 earthquakes. They go on to state, however, that these earthquake swarms aren’t anything to be alarmed about.

NASA is currently working on a proposed solution to save mankind and life as we know it if an eruption were to occur. Click here to read more on NASA’s proposed plan.

Must Know Safety Tips In The Case Of A Volcanic Eruption

As with any other natural disaster, it is important to know what to do before, during, and after a volcanic eruption. To bring you the most detailed information possible on safety precautions, I took to the internet to bring you the best…and I came across this gem! (source)

Before an Eruption:

  • Be prepared to take shelter or evacuate and review your plans with family members.
  • Pick a safe place to meet.
  • Put together an emergency supply kit.

If you evacuate:

  • Tune in the radio or television for volcano updates. If told to evacuate do so. It can be dangerous to wait out an eruption.
  • Listen for disaster sirens and warning signals.
  • Take only essential items. Be sure to pack at least a one-week supply of prescription medications.
  • Fill your vehicle’s gas tank.
  • If no vehicle is available, make arrangements with friends or family for transportation, or follow authorities’ instructions on where to obtain transportation.
  • Turn off the gas, electricity and water.
  • Disconnect appliances to reduce likelihood of electrical shock when power is restored.
  • Follow designation evacuation routes and expect heavy traffic and delays.


If you take shelter:

  • Keep listening to your radio or watch television until you are told all is safe or you are told to evacuate. Local authorities may evacuate specific areas at greatest risk in your community.
  • Close and lock all windows and outside doors.
  • Place damp towels at door thresholds and other draft sources. Tape draughty windows.
  • Turn off all heating and air conditioning systems and fans.
  • Close fireplace and furnace dampers.
  • Organize your emergency supplies and make sure all household members know where the supplies are located.
  • Fill your clean water containers.
  • Fill sinks and bathtubs with water as an extra supply for washing.
  • Make sure the radio is working.
  • Go to an interior room without windows that is above ground level.
  • Ensure pets and livestock have clean food, water and shelter.
  • Store all vehicles and machinery in a garage or other shelter.
  • Call your emergency contact – a friend or family member who does not live near the volcano – and have the phone available if you need to report a life-threatening condition. Remember that communication services may be overwhelmed or damaged during an emergency.


During an Eruption:

  • Don’t panic – stay calm.
  • Follow evacuation orders, if issued by authorities.
  • Stay indoors.
  • Avoid areas downwind and river valleys downstream of the volcano.
  • If outside, seek shelter (e.g. car or building).
  • Keep doors, windows, dampers and ventilation closed until the ash settles.
  • Use a respiratory mask, handkerchief or cloth over your nose and mouth.
  • Do not tie up phone lines with non-emergency calls.
  • Listen to your local radio for information on the eruption and cleanup plans.
  • If there is ash in your water, let it settle and then use the clear water.  Water contaminated by ash will usually make drinking water unpalatable before it presents a health risk.
  • You may eat vegetables from the garden, but wash them first.
  • Remember to help your neighbors who may require special assistance – infants, elderly people and people with access and functional needs.


After an Eruption:

  • Go to a designated public shelter if you feel it is unsafe to remain in your home.
  • Stay indoors until the ash has settled, unless there is a danger of the roof collapsing.
  • Keep all heating and air conditioning units and fans turned off, and windows, doors, and fireplace and woodstove dampers closed.
  • Clear heavy ash from flat or low-pitched roofs and rain gutters.
  • Let family members know you are safe.
  • Listen to the radio, watch TV or check the Internet often for official updates and information about air quality, drinking water and road conditions.
  • Avoid running vehicle engines. Volcanic ash can clog engines, damage moving parts and stall vehicles.
  • Avoid driving in heavy ash fall unless absolutely required. If you need to drive, keep speed down to 50 km per hour or slower.
  • Protect yourself from ash by wearing long-sleeved shirts and pants, using goggles and a respiratory mask

What are your thoughts on the new research found on this supervolcano? Share your thoughts with us in the comment section below.

Check out our previous article on tips for surviving natural disasters: Surviving Natural Disasters: Safe Points in the Household


from SurvivalLife https://survivallife.com/yellowstone-supervolcano/

Thursday 26 October 2017

How to Keep Your Gun Dry in a Flood

How to Keep Your Gun Dry in a Flood

Since it takes an entire lifetime to build up a personal collection of firearms, the very last thing you want is for you to lose those firearms in the event of a flood (such as from a hurricane, for example). In this article you will learn how to keep your gun dry in a flood.

Keep Your Gun Dry in a Flood

Not only are guns very expensive, but some of they may hold precious value to you, especially heirloom guns that were passed down to you from family members.

The good news is that with careful planning, you can protect your guns from flooding or a tropical storm.

Let’s find out how you can now:

How to Keep Your Gun Dry in a Flood

Keeping a Log of Firearms

The very first thing you need to do is keep a collections log of each of the firearms in your possession.  You can download a free Personal Firearms Record from the ATF, which will make it super easy to keep track of your guns.

As an alternative, you can simply keep track of your guns in a weather resistant notebook.  Preferably you should keep at least one high quality photo of each gun, and then write down the manufacturer/brand, the model, the caliber, and the serial number.

These steps will make it easy for you to recover your guns should they become lost, and they will also make it easier for people to return them to you as well.

Protecting Your Guns from Flooding

But how can you keep your actual guns safe?  You can store your revolvers and semi-automatic pistols in a plastic vacuum sealed bag.  Also keep a personal contact information card inside each bag as well, so anybody who recovers the guns will know how to return them to.

Now take each sealed bag and store them in a water tight surplus ammo can.  You must make sure that each can is sealed and high quality so they will not leak.

For rifles and shotguns, you need to place them in garbage bags that are tied with multiple knots. Now store those inside plastic containers or plastic garbage cans, and make sure they are sealed.  Add three layers of duct tape or gorilla tape to the seal of the container so it will stake intact.

Also make sure that you store each of your guns unloaded, in the event that they are found by kids or burglars/thieves.

Avoid ‘protecting’ your guns inside a gun safe in the event of flooding.  They are not as waterproof as they are billed, because there are commonly gaps in the seals and O-rings that will begin to take on water when exposed to water and flooding.

Conclusion

You don’t have to keep your guns protected in this manner at all times.  You can keep your guns stored all the time in a gun safe if you want to.

But you also need to stay up-to-date on the news, and if you do indeed believe that flooding is imminent, then you should immediately follow the above steps to protect your guns from the water.

Up Next: 4 Best Caliber Options for Turkey Hunting


from SurvivalLife https://survivallife.com/how-to-keep-your-gun-dry-in-a-flood/

Efficient Butchering: 3 Tips from a Lifelong Hunter

Butchering your own kill is the only way to make sure you get the most bang for your buck with your meat. But how do you make sure you’re doing it right?

Efficient Butchering Tips to Maximize Your Kill

I have been butchering my own kills since I was a teenager. When I worked at a bar and grill at the age of 15, I was expected to butcher a whole side of beef for all the meat we could render. Now that I am an avid hunter, I always look to get the most out of every kill. It is a point of pride that we butcher our own meat. That being said, there are some simple tricks that can help anybody make the most of their kill.


1. Anatomy

Anatomy | Efficient Butchering: Tips from a Lifelong Hunter
Part of being efficient in butchering is knowing the anatomy of mammals. You need to understand that muscles come in groups. You need to know the internal organs common in any mammal as this knowledge will give you a feel of how to handle one.

The first step in butchering any mammal is to gut the carcass. This means you will open up the belly and pull out the internal organs. It is important that you do this carefully because spilling the intestine or stomach can ruin your meat. Using a knife with a gut hook is a good idea for this process. Most people start between the legs and open up the belly up past the sternum. This opens up all kinds of opportunities for more meat.

From the internal organs, you can eat the liver, kidneys, and heart. The liver and kidneys are a bit of an acquired taste, but the heart is a pure delicacy. My son and wife wait every year for me to bring home deer heart from my hunting ventures. You can also cut just below the jaw to remove the tongue for a tasty meal.

2. Quartering

Quartering | How to Efficiently Butcher: Tips from a Lifelong Hunter
Once you gut and skin an animal, it brings around the task of quartering the animal. This is a big area where hunters waste meat.

The most important point of focus for quartering an animal is to cut close to the bone. This requires a flexible knife that can work around the joints and tissues of the animal. It is also important that you bring home parts like the ribs that can be used for several dishes. You have to use every piece of meat. We even use the hides when possible.

3. Butchering

 Butchering | Efficient Butchering: Tips from a Lifelong Hunter
As you cut meat away from the bone, you have to be practical. When dealing with ribs, it is often smarter to cut the meat away from the bone versus freezing the meat with the bones. When cutting up the shoulders, it is smart to use a saw to cut through bone versus cutting the meat away from the bone. Your goal is to trim every ounce of meat away from bone that you can, but bone-in roasts are fine too.


Watch this video about a traditional old-style butcher by Food Farmer Earth:

In the end, your priority must be to use every piece of the animal. Using these tips (and with a little practice), you should be able to make the most out of your kill. Hopefully, you could also encourage yourself to be efficient in your butchering skills so this tradition can continue.

What do you think about these efficient butchering tips? Share your thoughts in the comments below!

Up Next: Beginner’s Guide To Having an Outdoor Herb Garden | Survival Gardening

Check out Efficient Butchering: 3 Tips from a Lifelong Hunter at https://survivallife.com/efficient-butchering-tips-hunter/

Follow us on FacebookInstagramTwitter, Tumblr, and Pinterest! 


from SurvivalLife https://survivallife.com/efficient-butchering-tips-hunter/

Wednesday 25 October 2017

The Plague: W.H.O. Issues Black death Travel warning in NINE countries

Black Death, the same Medieval disease that wiped out ONE THIRD of Europe's population in the 13th and 14th centuries, has killed more than 100 people in Madagascar and infected another 1,200 since August. [...]

The post The Plague: W.H.O. Issues Black death Travel warning in NINE countries appeared first on Off Grid Survival - Wilderness & Urban Survival Skills.


from Off Grid Survival – Wilderness & Urban Survival Skills https://offgridsurvival.com/plague-issues-black-death-travel-warning-nine-countries/

Bug Out Truck Upgrades: Accessories For Your 4X4

4 Best Caliber Options for Turkey Hunting

4 Best Caliber Options for Turkey Hunting

Now that turkey hunting season is nearly upon us, it’s time for you to think about which type of weapon that you are going to use for your next hunting trip. Choosing a caliber for turkey hunting is especially important if you are a beginner to this sport in general.

Caliber Options for Turkey Hunting

Overall, a shotgun is easily the best choice for a weapon for turkey hunting.  But what caliber of shotgun should you choose for your turkey gun? In this article we will cover the primary options you have for a caliber for turkey hunting.

4 Best Caliber Options for Turkey Hunting

.410 Bore

The first option you have for a turkey hunting caliber is .410 bore (which is sometimes and incorrectly referred to as .410 gauge).  A .410 is easily the smallest and least powerful of the traditional sizes of shotgun caliber.  As a result, it is considered by many to be too light for turkey hunting, with the consensus being that a 20 gauge is the lightest you should go for turkey.

Nonetheless, many turkeys have been killed before with a .410, so it can be done so long as you get close enough.  The best advantage that a .410 has it has extremely limited recoil, which makes it easy to manage for children, young shooters, and women.

At the very least, .410 bore serves as a solid introductory round and is a good training caliber before you move on to the larger gauges such as 20 gauge or 12 gauge. 1

20 Gauge

The 20 gauge is a smooth bore shotgun that fires a smaller caliber of shell than the 12 gauge.  It is a popular choice among smaller statured shooters, beginner shooters, women, or anyone who is hunting for small game.

The 20 gauge has more than enough power for practically all game birds, including grouse, quail, and turkey.  When loaded with slugs it can even become an effective deer hunting caliber even.

The 20 gauge is also favored by many because it has significantly less recoil than the 12 gauge on average.  This makes the 20 gauge a more suitable choice for prolonged shooting and more desirable for anyone who simply desires less felt recoil.

However, this is only true so long as the 20 gauge shotgun you are using is not actually lighter in and of itself.  Many 20 gauge shotguns, particularly Youth models, are made lighter and shorter so they are easier to carry.

Unfortunately, this offsets the recoil and makes shooting the gun less manageable.  A 7 pound 12 gauge shotgun will have less recoil than a 20 gauge that weighs 5 pounds, for instance.

For this reason, if you want less recoil, make sure that the 20 gauge shotgun you choose is not lightened and is fairly heavy.

16 Gauge

The 16 gauge is enormously popular in Europe but is far less so in the United States.  Nonetheless, it is a truly excellent choice for turkey hunting.

If you think about it, the 16 gauge is actually a good compromise between the 12 gauge and the 20 gauge.  It has a bore diameter that is almost two thirds of an inch, and an ounce of shot from 16 gauge shotgun will create a column that creates a good pattern.

The 16 gauge is essentially the perfect gauge for all upland game bird hunting.  It was originally known as the ‘gentlemen’s gauge’ when it was popular in the early 20th Century, and when the 12 gauge was used more often by farmers and market gunners.

With the 16 gauge, you will get greater recoil and power than the 20 gauge but less so than the 12 gauge, which is exactly why it can be a good compromise between the two.

Since the 16 gauge is not as popular as 12 gauge or 20 gauge, ammunition can be a little harder to find for it as well, so you need to keep this in mind.

12 Gauge

Without question, the 12 Gauge is the most popular caliber of shotgun in the United States as well in the entire world.  There are definitely more turkey hunters who use the 12 gauge than any other kind of shotgun there is, maybe even combined

The 12 gauge will be effective on turkeys out to fifty yards so long as you are using the right type of ammunition for it.. There are far more pellets coming out of the barrel in contrast to smaller calibers, so you have a far greater chance of hitting and bringing down your target.

Another advantage to the 12 gauge is because it is so popular, the ammunition is cheap and readily available.  You can easily find a box of 25 rounds of 12 gauge birdshot rounds at practically any sporting goods store for around five to six dollars a box, which is a price you can’t beat.

Furthermore, there are a variety of shotguns chambered for the 12 gauge (as well as the 20 gauge) as well.

Conclusion

All in all, these are your primary caliber options for a turkey hunting shotgun.  Out of these ones that we have discussed, the 12 gauge and the 20 gauge are easily the most popular, so they are the main two that you should consider for yourself.

If you are still currently undecided between the 12 gauge and the 20 gauge, then here are the primary points for you to consider:

  • There are more pellets in the pattern for a 12 gauge
  • You have a greater chance of hitting the turkey with a 12 gauge
  • A 12 gauge has superior terminal performance and velocity, which makes it more deadly at longer ranges
  • The 20 gauge can still be effective out to the same distances (50 yards) as the 12 gauge with the right loads
  • The 20 gauge has far less recoil, but only if you choose a shotgun that has not been reduced in weight (stay away from Youth models of shotguns for this reason)

The .410 bore is generally too light for turkeys, and the 16 gauge is a great compromise but is also not so common.  Therefore 12 gauge and 20 gauge are your best choices. At last along the calibers try to get a good red dot sight for shotgun because a cheap quality sight can make your experience worst. Some people give lots of attention to the calibers but they often ignore other critical factors which should not be in your case.

Up Next: Survival Fishing | Unconventional Methods To Catch Fish


from SurvivalLife https://survivallife.com/best-caliber-turkey-hunting/

Halloween Safety: Staying Safe In 2017

Halloween Safety: Staying Safe In 2017

In 2016, I wrote Recent Clown Sightings: Safety Tips for a Fun and Safe Halloween due to the clown sightings at the time and Halloween being just around the corner. I think this article still holds great relevance due the premier of Stephen King’s movie “It” which hit theaters on September 8, 2017. It also highlights a need for Halloween safety this year and every year.

Halloween Safety: 2017 Edition

Recently, I have come across a couple of new ‘clown prank’ videos on social media and while they may seem like ‘good ol’ fashioned fun’ to some, it holds a stance of uncertainty for the victims of the pranks. Some people have an intense fear of clowns and to those people, it’s just not funny…it’s terrifying! As I watched these videos, I tried to put myself in the victim’s shoes and the saying “you just never know” came to my mind. In this case, practicing safety, being aware, and showing courtesy are all equally important, in my opinion.

Halloween Safety in 2017

Taking safety precautions isn’t just for Halloween. On October 31 and the days leading up to this much celebrated holiday, everyone should be alert and aware of their surroundings and the dangers that can present themselves to children and adults. Let’s go over some statistics for the night of Halloween.

Statistics

Auto Accidents – Statistics have shown that children between 5-14 years of age have an increased likelihood of being hit by an automobile on Halloween night.

Crime – The violent crime rate within major cities of the United States, increases by 50% on Halloween night. The peak of violent crime is around 6pm when the streets are filled with trick or treaters, some of which are not accompanied by an adult.

Car Theft – Car theft increases by 50% on Halloween night.

Poisoned Candy – It has been stated by many, including some police departments, that trick or treaters receiving poisoned candy on Halloween night is a myth. However, I encourage every parent or guardian to inspect every item (not just candy) in their child’s trick or treat bag. This safety measure goes back to what I said previously – you just never know.

Halloween Safety: Staying Safe In 2017

Safety Tips For A Fun And Safe Halloween

Halloween is a fun holiday for all ages! However, taking safety precautions HAS to be priority #1.

**The following safety guidelines are courtesy of CNN.com and SafetyKids.org and are also listed in my previous article (2016).

Remain Vigilant

  • Report any suspicious activity to authorities, including suspicious social media activity.
  • Listen to messages from police and school officials.

Walk Safely

  • Cross the street at corners, using traffic signals and crosswalks.
  • Look left, right and left again when crossing and keep looking as you cross.
  • Put electronic devices down and keep heads up and walk, don’t run across the street.
  • Teach children to make eye contact with drivers before crossing in front of them.
  • Always walk on sidewalks or paths. If there are no sidewalks, walk facing traffic as far to the left as possible. Children should walk on direct routes with the fewest street crossings.
  • Watch for cars that are turning or backing up. Teach children to never dart out into the street or cross between parked cars.

Trick-or-Treat With An Adult

  • Children under the age of 12 should not be alone at night without adult supervision. If kids are mature enough to be out without supervision, they should stick to familiar areas that are well lit and trick-or-treat in groups.

Keep Costumes Both Creative And Safe

  • Decorate costumes and bags with reflective tape or stickers and, if possible, choose light colors.
  • Choose face paint and makeup whenever possible instead of masks, which can obstruct a child’s vision.
  • Have kids carry glow sticks or flashlights to help them see and be seen by drivers.
  • When selecting a costume, make sure it is the right size to prevent trips and falls.

Drive Extra Safe On Halloween


  • Slow down and be especially alert in residential neighborhoods. Children are excited on Halloween and may move in unpredictable ways.
  • Take extra time to look for kids at intersections, on medians and on curbs.
  • Enter and exit driveways and alleys slowly and carefully.
  • Eliminate any distractions inside your car so you can concentrate on the road and your surroundings.
  • Drive slowly, anticipate heavy pedestrian traffic and turn your headlights on earlier in the day to spot children from greater distances.
  • Popular trick-or-treating hours are 5:30 p.m. to 9:30 p.m. so be especially alert for kids during those hours.


Pet Safety

Let’s not forget the safety and well being for our canine and feline companions this Halloween!

In closing, let’s remember to have lots of fun this Halloween! Enjoy the festivities with your family and friends! Just remember that safety is always important and, of course, necessary in today’s society.

From all of us here at Survival Life, Happy Halloween!

Do you have a Halloween safety tip you would like to share? Share with us in the comment section below.

Check out our article, Slasher Film Survival Guide: How To Survive A Horror Movie for a unique look into the best horror films ever made, with some great safety tips!


from SurvivalLife https://survivallife.com/halloween-safety-2017/

Tuesday 24 October 2017

Survival Gear Review: Personal Solar Light (PSL)

Best Survival Light

There is a reason that the term “Going Dark” contains ominous overtones no matter how it’s applied. But the Best Camping Solar Light
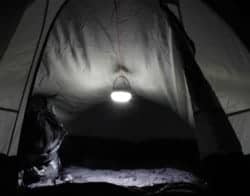
worst is when it is literal. A majority of the human brain is dedicated to the eyes and the hands with the remaining tiny portion covering all the rest of the senses and those functions necessary for life and decoding its challenges. And in case it wasn’t obvious, eyes need light to function. So light must be a key ingredient in all aspects of your survival kit and survival plan. And everyday life for that matter.

By Doc Montana, a Contributing Author to SHTFBlog and SurvivalCache.com 

Light The Way

I’m no stranger to the spectrum of survival lighting, and offered up solutions from large tool-battery lighting to tiny keyfob lights. From high end flashlights, to the nuances of gun lights. So I was especially happy to get a chance to the PSL or Personal Solar Light for a ride.

A major player in the lightweight expandable solar-powered area lighting solution has been something called the Luci Light. It was an inflatable cylinder that offered a mildly bright LED lantern for general camp situations and inner tent lighting. While the Luci Light has many drawbacks, its first-on-the-scene popularity made it the Kleenex of its inflatable lighting space. But being popular certainly doesn’t make it the best. As the only game in town for a while, the Luci Light was impressive, but now that the particular space the Luci Light popularized is getting crowded, we can ask for more. And more has certainly showed up in the form of the PSL or Personal Solar Light.

Covering the Bases

By crossing a flashlight and an area lighting lantern, the Personal Solar Light provides a single solution for PSL_Personal_Solar_Light_hangingmany situations. Years ago Black Diamond addressed the combination of diffuse and point light sources with its products reviewed here. But looking back, that was just a combination solutions where a directional flashlight was bolted onto an area light lantern. Compared to the PSL, the downfalls of the Black Diamonds were that the BDs took batteries, were of larger form factor, no solar options, no in-house recharging option, and they sink if you drop them in the water as if that even matters since they were only slightly water resistant to begin with.

Also Read: Compact Flashlight Comparison

Further survival lighting solutions addressed the Milwaukee Tool Best Camping Solar Flashlight lightLights and their high-capacity albeit heavy batteries and worksite durability. By leveraging powerful rechargeable tool batteries, there is much to be gained if your budget for weight and price is within Milwaukee specs. And while it would be nice to have the 861 lumens of a white gas Coleman lantern at your fingertips, the cost of liquid fuel, pressurized steel tank, and dangerously hot glowing mantels is just not worth it anymore. The 107 lumens of the PSL area lighting is plenty for a localized span of geography about the size of a picnic table. By pointing the bottom of the light forward, the entire front-end power of the LED generates a smoothly lit undiffused circle of light that is plenty bright enough to jog through the woods with reasonable confidence. And that same circle scales with the size of the accordion diffusion shade. When compressed, the circle of light is about twice as big as the distance from what it’s shining on. With the shade extended, the ratio is about 1:1 meaning the diameter of the circle of light is about the same size as the distance from the illuminated surface.

A Light Light

At only 4.2 ounces, the Personal Solar Light provides four modes of lighting, three of different intensities ofPSL_Personal_Solar_Light_outdoors-camping steady output, and one of a bright SOS signaling. The big red button on the side of the PSL toggles from off through the three light descending light volumes and back off. If the button is held down for three seconds, the SOS mode kicks in blinking out the three-short, three-long, three-short distress signal. Holding the button down in the SOS mode stops the blinking signal and lands on the brightest output.

Related:  SureFire G2 Review

A few hours of sunlight can be stored in the 2000 mAh battery housing up to 30 hours of lighting runtime. It turns out the PSL battery is about the same capacity as the battery in the iPhone 7. In other words, this is a serious battery in a serious light.

And also like the iPhone, you can charge the PSL with a cable and USB port. The included charging cable has aTent Solar Camping Light 
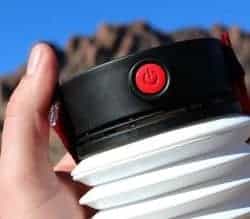
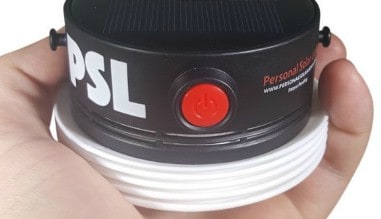
small circular pin connector rather than the industry-standard microUSB connector. So again like the iPhone, you will need the specific charging cable if you want to pump electrons into your PSL battery from the grid, an auto battery or a cell phone backup battery. But quite unlike the iPhone, the PSL costs less than $30.

Also Read: Tips To Fly With A Handgun

The onboard solar panel is about four square inches (2” x 2”) and resides on the top of the PSL under the removable strap. So a natural gravity fed hanging by the strap places the solar panel in a good to great position to absorb as much sunlight as possible.

The PSL Personal Solar Light floats, is solar powered, and can be hardwire recharged but best of all the PSL Solar Survival Flashlight
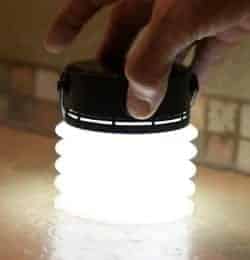
provides a very clean, white light both over a 360 degree area and a short throw spot option firing out unobstructed from the bottom of the light.

The single super bright LED creates a uniform, shadow-free flow of photons that is ultimately dependent only on the energy of the same powerplant that keeps our earth alive…the sun. Having an efficient solar charging system and large battery built into the bombproof PSL unit is what secures this performer’s place on the bug out lighting list.

Visit Sponsors of SurvivalCache.com


Epic Water Filters


from SurvivalCache http://survivalcache.com/survival-gear-review-personal-solar-light-psl/