Wednesday 31 May 2017
Tuesday 30 May 2017
Monday 29 May 2017
Deer Hunting for Beginners- An Introduction To The Hunt

In a world where our food sources are more and more commercialized and nearly coming off of an assembly line, who wouldn’t want access to 100% meat sources? Hunting is one of the ways that you become more self-reliant and at the same time provide your family with an incredibly healthy food source. With a small amount of guidance and direction, we can help you get started. In this video, Craig Caudill from Nature Reliance school will start us on the steps of deer hunting.
A Brief Introduction to Deer Hunting
There’s something about deer hunting that makes it so appealing and addictive to people – especially to hunters and outdoor enthusiasts. It’s not a skill or sport learned overnight but if you’re really motivated to get a good catch, perhaps it would take you months or even years of experience and exposure in the wild. If you’re just starting out with this sport or survival hunting skill, you should be equipped not just with your weapons but also with some knowledge about your quarry. Here are some tidbits of information you can use before you begin deer hunting to help get you ahead of the game!
1. Be a lawful deer hunter
The first thing you need to do is to check the fish and wildlife agency where you live and know what the laws are for deer hunting. There are usually programs that help hunters so check those out. You can also use them as viable resources too.
2. Know where to hunt

You need to go where the deer are. Deer go beyond the edge of the woods. Deer like to feed in grassy fields and congregate (or hang-out) in the woods between two fields. It’s like a corridor for them in a place where they are more comfortable to go and not be seen. If you see this kind of environment, most likely there are deer around the area.
3. Know how to track them

An area of trees before an open field is a good place to start looking for deer tracks and droppings. If you find where the droppings are around the habitat then you know more likely they’ll be coming into that field. This is also an indicator where you can set up your hunting gear.
4. Look for signs

If you see some sort of a barricade in an area (like fallen trees or dried twigs), deer regularly come up to this and walk-around. Also, an area with mud and close to grasses and leaf litter can give you a hint of where deer come and go because their tracks are also visible in these kinds of areas.
5. Go with other hunters

Get a company of other deer hunters. This will help you learn the ins and outs of deer hunting. You’ll surely gain a lot from them especially from their own experiences.
6. Be like a deer
Deer are like any animal. They need shelter, water, and food. Each day, deer travel corridors to get their necessities. Also, their bedding site is where they feel secure so if a predator comes by, they can easily run away. They often travel to and from a water source and along the way to the water source, they will look and forage for food.
7. What to do during deer hunting
Setting a tree stand is highly recommended for beginners. You don’t need to move around because all you have to do is observe, sit still and wait for your target. In that manner, you can see more deer, learn how they behave and acquire the behavioral patterns you need to learn for a better hunt.
If you’re a deerstalker — walking through the woods while hunting — movement is the key. Don’t walk the normal way because it will cause too many movements (and deer don’t want that!). Move slowly and deliberately. After 4-5 steps, observe your surroundings by looking at the corners of your eyes. In that way, you’ll minimize movements. If you’re on the ground and you’d stand up, it should take you about 60 seconds to get up off the ground.
It’s also important to bring the right weapons for your hunt, same with your hunting gear and sets and of course, camouflaging. Try using these tips to have great success in your deer hunting. Definitely, the best way to learn is through first-hand experience! Are you ready for your first catch? Happy hunting!
Do you have more suggestions and tips to share about deer hunting? Please add them in the comments below!
Now you’re ready for your first deer hunting experience, know if your orange hunting vest can be seen during the hunt!
![]()
Follow us on Facebook, Instagram, Twitter, Pinterest, and Tumblr!
Featured image via mathewfreeman
from SurvivalLife https://survivallife.com/deer-hunting-beginners/
The Bare Bones Minimalist Survival Kit

 An old standby “survival” skills game used to facilitate leadership development training forced participant teams to choose among a list of survival gear and supplies items. The game was posed as being cast on an isolated island after a ship wreck or plane crash (Hey, remember Wilson?), or in the jungle after a plane crash or some other fictitious peril. The teams were limited to picking only 10 items. It was fun, and very instructional.
By Dr. John J. Woods, a contributing author to SHTFBlog & Survival Cache
The groups had to gather up individually and begin the process of the picking of their top ten survival gear items from the available list. Then each team had to present their choices to the other teams and explain their rationale for their decision-making. The instructional part was not only the communication and exchange of ideas among team members, but also the feedback and assessments provided by the entire group. What survival items would you pick?
Just to take a note as a sidebar such a game would be very useful for potential prepper teams in the formation phase to process survival information and to express opinions about various related survival tactics. This would not only reveal other’s survival knowledge base, but also their compatibility, communication, and sensitivity to the other potential team members.
Formulating a Minimalist Kit
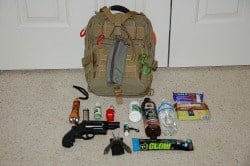 In our reality based world, lucky for us, we are not really limited by any set list of survival gear, tools, supplies, or essential items. We can choose from the infinity of everything out there to include in a bare bones kit bag. The only primary limitation then for the assembly of this kit becomes the kit’s total weight, and a practical choice of just the bare fewest items to complete such a kit.
Related: 10 Bug Out Bag Essentials
For this kit, we are not even suggesting a backpack or indeed a fanny pack sized carry conveyance. We have to keep focused on the minimalist approach here. This kit then is not really an EDC bag nor is it any kind of a BOB either. It’s different. It goes in the trunk of the car or under the back seat of a pickup truck, in an office desk drawer, or some other place that is easily and quickly accessible. It is not intended for long term use, but a “get by” circumstance.
This kit may also not be something that is necessarily grabbed and carried during an emergency, but it could be. It might be a kit used during an office or school lockdown during say an active shooter situation or maybe a tornado warning or other emanate emergency condition or SHTF. It could get you by if the interstate highway was shut down by a wreck for an extended period of time or if you got caught in a snow storm, perhaps even overnight.
Depending on the SHTF situation, you might have to hunker down in the office or in your vehicle. You could have the option or decide to hike out a few miles to another safe location or to be picked up elsewhere. Naturally, the potential emergency situations are also endless, so think for yourself, what are the likely events you could encounter and stock your bare bones kit accordingly.
Bare-Bones Kit Parameters
 For this exercise, I have volunteered as the Guinea pig. Of course, my personal situation and conditions are decidedly different than yours, so I will outline my own parameters. You need to do the same. It is important, no critical, that every person self-profile themselves so they build a kit that meets their exact personal needs for virtually any type of short-term survival SHTF. I am a senior citizen, retired, and of age for social security, but still quite active. I have health issues that require daily medication, hydration and minimal food intake. I am an avid reader, and writer with good mechanical and organizational skills. I am more of a hermit than a joiner, but am active in wildlife management work and serve on the executive board of a state wildlife conservation group.
Read Also: The Prepper Learning Curve
I could not run a hundred yards, but could walk for five miles, more if allowed to rest periodically. I actively hunt, fish, work my bug out camp, ride ATVs, and am a proficient shooter. I carry concealed with a legal permit. I work at home every day, but travel a fair amount. My Bare-Bones Kit would likely be used mostly via access in a travel mode, so they are kept in vehicles.
 Are there some assumptions then? Yes, of course. Let’s assume you will have your iPhone with you at all times, ideally fully charged. You’ll have a wallet or purse with IDs, cash money, and credit cards. If you have a CCW permit, carry it. You may have with you a concealed carry weapon, or in close proximity to one and maybe at least one extra loaded mag. Have available or carry a lightweight rain jacket ideally with a hood. Accordingly these items are not included in your minimalist survival bag, because you should always have them anyway.
One Bare Bones Minimalist Survival Kit
Here are the items in my own Bare Bones Minimalist Survival Kit:
Quick bag. This would be a lightweight nylon pull cord top bag, small satchel zip bag, or some small military type gear bag.
Water and Snack. I would pack (2) bottles of water and (2) protein and power bars.
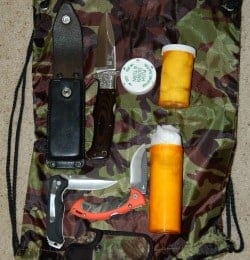
Medicines. 3-5 days of required meds. Small bottle of pain relievers.
Blanket or Cover. One fold up compact space blanket or similar cover/shelter.
Knife. A high quality folding knife or fixed blade camp/survival knife. Not a Rambo blade.
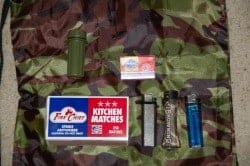
Firestarter. Box of waterproof, wood matches and (1) butane lighter. Small tin or med bottle with prepared tinder cotton balls.
Signals. (1) Signal whistle with lanyard.
Paracord. (1) Wrap of 50 feet of paracord rope.
Head and Hand Gear. One ball cap or hat with sun visor and a pair of durable gloves.
First Aid Kit. One micro first aid kit in tin or plastic container.
Final Assessments
 Now before you go crazy at ripping apart my selections for a bare bones kit, reflect on your own needs or make viable suggestions for other needed items. Undoubtedly, in my own thinking and planning, I have left out something. With practice and trial, perhaps I will change up my own bare bones kit to delete some items or add others. We want to learn from the readership, too. That is best accomplished by not criticizing, but by comparing and contrasting.
from SurvivalCache http://survivalcache.com/the-bare-bones-minimalist-survival-kit/
Sunday 28 May 2017
[Gear Review] Minimalist Footwear…an Ultralight Essential?

As a young United States Marine, training in combat and jungle boots wasn’t just routine, It was an order! When it came time for standard PT (Physical Training) we were able to slip on a more comfortable pair of go-fasters (standard running shoes) that had a padded heel and soles that incorporated shock-absorbing gel. With all of this new technology being implemented, why were so many of my fellow Marines experiencing knee issues that were taking them out of commission? …It wasn’t until many years later that I received the answer to that question: minimalist footwear.
Is Minimalist Footwear Part Of Your Survival Kit
Once I left active duty, my fitness level was certainly not a priority. I gained weight and spent most of my waking moments seated behind a computer screen. I became deconditioned due to the mental battle that I was experiencing as I tried to adjust back to civilian life. Things went on in this fashion for over a decade. One day, I woke up and stared at the mirror… A feeling of embarrassment overwhelmed me. I made a commitment to myself that from this point on, things were going to change.
I went out and got myself some new PT gear. Part of that gear was a high-speed, expensive, pair of running shoes. I started using a treadmill and lifting olympic weights. I began shedding some fat and was feeling pretty good about my decision. A couple months later, I was asked by my cousin to join him on the soccer field to practice with his team. I felt like I was up for the task and took him up on his offer.
Once I arrived at the arena, we started off with some warm-up drills. We began to pass the soccer ball around and on my first strike… I heard a loud POP in my right knee. I headed to the sideline in a bit of a daze, trying frantically to just- walk it off. My knee began to swell so I headed to the hospital. After some time and a battery of exams, the diagnosis was a full tear of my ACL and complete loss of my meniscus.
I was told by the various doctors that I needed surgery. Basically, they would take a ligament from a cadaver and place it in my right knee. I realized that this was a routine operation but something didn’t sit right with me. First off, I was no fan of having surgery… Secondly, there was the source of the ligament. My doctor’s all commented on my hesitation and warned me that without surgery, my active lifestyle would be non-existent.
But I knew that there had to be another way…
As I researched other options to surgery, I kept stumbling upon information on barefoot and minimalist footwear. Basically, people were “fixing” their knee and other issues by removing the technology from their footwear. This was counter-intuitive to what I had come to believe. However, I had been a lifelong martial artist and we were always barefoot in the dojo. I also reflected back on the knee issues that my fellow Marines were having while on active duty.
Things began to click…
What I came to learn from this experience was that we were allowing technology to do the work for us. By adding “high heels” and other technology to our footwear, we were masking the sensations from the activity that we were performing. Instead of strengthening our bodies with each workout, we were, in fact, becoming weaker. We are basically telling our running shoes to do the work while our muscles, tendons and ligaments take a back seat and rest.
I began training barefoot whenever possible and picked up a pair of minimalist shoes. These shoes resembled gloves for feet and certainly brought a lot of attention while I was out in public. I had various friends tell me that I looked like a duck when I wore those shoes. My reply was that:
I will take function over fashion any day!
Once I made the switch to training in minimalist footwear, things began to change. There was certainly an adjustment period but I knew that I had very few choices if I wanted to avoid surgery. I began to feel stronger and had much more sensitivity throughout the activity that I was performing. I was getting lots of feedback from my workouts that I had never gotten before. It was working wonders on my physical being but surprisingly, it was also increasing my awareness when I was out in the field.
I continued training in minimalist footwear and contrary to what the medical doctors had advised me… I completed the NYC Marathon in 2011 while wearing my duck shoes. 
This experience changed a lot on how I address my training for emergency preparedness. In addition, there were some interesting by-products that I gained from incorporating minimalist footwear. I’d like to share a few of those insights with you now.
So let’s delve right into it…
Compact & Lightweight:
Since the footwear is designed to be minimalist, they are extremely convenient to stow away in your pack. You can easily roll them up in the palm of your hand. The fact that very little material goes into their construction makes them lightweight whether they are on your feet or stowed away in your kit.

Keep in mind that the minimalist design does not mean that they are inferior in their construction. As a matter of fact, most of my minimalist shoes have outlasted other footwear that I own; even when the conventional shoes have gotten much less use.
Great For Water Activities:
Once again, less material means that they can dry much quicker than standard footwear. Whether you are wading through a pond, fishing from the shoreline or hiking through puddles… Minimalist shoes, on a whole, tend to perform much better than hiking boots in these instances. I wouldn’t exactly say that all minimalist shoes that I own are designed for water activities, but when compared to their non-minimalist counterparts, they tend to come out on top.

Build Up Your Body:
Less material in your footwear allows your body to participate much more in the actual work being performed. Taking away the “high heels” that most running and trail shoes feature, enables your body to maintain proper alignment.

In addition, your muscles, ligaments and tendons get more activation as you continue on with your task(s). Not only will this build your physical preparedness but also aids in keeping you injury and pain-free.
Comfort:
Wearing minimalist footwear allows your feet to move around freely. The lack of restriction brings a level of comfort that is not matched by standard footwear. Initially, the experience may actually feel like the opposite of what I am stating here. After all, we spent a lifetime wearing restrictive shoes so we need to take that into account. But if you take some time and implement minimalist shoes into your lifestyle, your natural movement will once again become prominent. You will experience a level of comfort that will bring you back to your childhood days.

Stealth:
Minimalist footwear allows you to feel the environment with each passing step. Twigs, rocks and other debris are easily felt as you continue on with your mission. Maintaining this awareness allows you to gauge the amount of pressure that you will place on these obstacles. This will directly correlate to the amount of disturbance and noise that you will cause as you interact with the trail. Traditional footwear allows you to barrel over obstacles, barely realizing that they are even there. This can easily give your position away whether you are stalking prey or just trying to remain under the radar.

Long Lasting Soles:
Most of today’s minimalist shoes are designed with running and hiking in mind. A large number of manufacturers choose to use a sole made by Vibram. Vibram has been providing soles for the U.S. military for decades and are quite the trusted name. The soles of the boots that I wore in the Marine Corps were made by Vibram. Also, the duck shoes that I referenced earlier… Their soles are also made by Vibram.

Other companies such as XERO Shoes offer a 5000 mile warranty on all of their footwear. That alone is a pretty good indication of the durability offered by minimalist shoes that are available in today’s market.
Let Your Feet Breathe:
Unlike most conventional shoes, minimalist footwear are designed to be worn with or without socks. This gives your feet the ability to breathe while you are performing work. I have the tendency to sweat and sweat a lot. Wearing conventional footwear usually results in me having to change my socks a few times while I’m on the trail. If I don’t, the annoying blisters and “hot spots” begin to form.

Wearing minimalist shoes greatly reduces the sweating and need for frequent sock changes. This allows me to pack less gear and alleviates the need of carrying stinky, sweaty socks while I’m working on my current mission.
Shower Shoes:
In a recreational camping environment, there are usually shower facilities available to the public. However, they may not be the most sanitary place to clean up. Wearing shower shoes is recommended and some may say… A Must! Unfortunately, including shower shoes in your kit is either bypassed or just simply forgotten. But with most minimalist shoes, especially sandals, there is no need to pack additional gear.

As we previously discussed, minimalist shoes tend to dry relatively fast. I shower with my minimalist shoes on which works for me two-fold. 1: I maintain a barrier between my feet and unwanted bacteria and 2: I also get to clean my shoes so that they are ready for the following day’s adventure. I can then place my shoes by the fire or other heat source and in no time, they are dry.
In Tune With Nature:
As I mentioned earlier, wearing minimalist footwear allows you to feel the environment around you. Each step provides valuable feedback to your nervous system about the terrain that you are operating in. This insight enables a much more positive experience with nature because you are paying attention. This will help to pull all of your senses together making your activity more enjoyable.

Bottom Line:
Minimalist footwear is not for everyone. As I eluded to earlier, there is a bit of a break-in period that many do not have the patience for. Most of us have been wearing conventional shoes for the majority of our lives. We certainly cannot expect to snap our fingers and return to our natural movement overnight. Just like most things in life… If we try to force it, injury usually follows.

If you are interested in giving minimalist footwear a try, Just remember… Baby-steps will always get you there the fastest.
What do you think of Coach Helder’s latest review of minimalist footwear? Let us know in the comment section below!
![]()
Follow us on Facebook, Instagram, Twitter, Pinterest, and Tumblr!
from SurvivalLife https://survivallife.com/minimalist-footwear-survival-kit/
Saturday 27 May 2017
Efficient Butchering: 3 Tips from a Lifelong Hunter

Butchering your own kill is the only way to make sure that you get the most “bang for your buck.” But how do you make sure that you’re doing it right?
I have been butchering my own kills since I was a teenager. When I worked at a bar and grill at the age of 15, I was expected to butcher a whole side of beef for all the meat we could render. Now that I am an avid hunter, I always look to get the most out of every kill. I butcher so much meat that my four year old son watches me and runs around saying “we have the meats”. It is a point of pride that we butcher our own meat.
That being said, there are some simple tricks that can help anybody make the most of their kill. In my family, we have a philosophy of respect when we kill an animal. We feel that we must honor the animal by benefiting from every part of that animal. It is the same philosophy that our Cherokee ancestors had. Therefore, it is very important that we know what we are doing during the butchering process.
Efficient Butchering Tips

Anatomy
Part of being efficient in butchering is knowing the anatomy of mammals. You need to understand that muscles come in groups. You need to know the internal organs that are common in any mammal. This knowledge will give you a feel for how you need to handle any mammal.
The first step in butchering any mammal is to gut the carcass. This means you will open up the belly and pull out the internal organs. It is important that you do this carefully, because a spilled intestine or stomach can ruin your meat. A knife with a gut hook is a good idea for this process. Most people start between the legs and open up the belly up past the sternum. This opens up all kinds of opportunities for more meat.
From the internal organs, you can eat the liver, kidneys, and heart. The liver and kidneys are a bit of an acquired taste, but the heart is pure delicacy. My son and wife wait every year for me to bring home deer heart from my hunting ventures. You can also cut below the jaw to remove the tongue for a tasty meal.
Quartering
Once an animal has been gutted and skinned, it brings around the task of quartering the animal. This is a big area where hunters waste meat. The most important point of focus for quartering an animal is to cut close to the bone. This requires a flexible knife that can work around the joints and tissues of the animal. It is also important that you bring home parts like the ribs that can be used for several dishes. Every piece of meat must be used. We even use the hides when possible.
Butchering
As you cut meat away from the bone, you have to be practical. When dealing with ribs, it is often smarter to cut the meat away from the bone versus freezing the ribs with the bones. When cutting up the shoulders, it is smart to use a saw to cut through bone versus cutting the meat away from the bone. Your goal is to trim every ounce of meat away from bone that you can, but bone-in roasts are fine too.
Conclusion
In the end, your priority must be to use every piece of the animal. Using these tips (and with a little practice), you should be able to make the most of your kill. Hopefully we have encouraged you to be efficient in your butchering so this tradition can continue.
Up Next: Beginner’s Guide To Having an Outdoor Herb Garden | Survival Gardening
If you’re looking for useful survival gear that you can’t make at home, check out the Survival Life Store!
from SurvivalLife https://survivallife.com/efficient-butchering-tips-hunter/
Thursday 25 May 2017
[Gear Review] Getting A Better Handle On The Snappy Grip

If you’re reading this post, odds are you have at least one five-gallon bucket in your house, garage, or shed. Over 400 million of them are produced each year to handle a myriad of different products. In fact, the five-gallon bucket became so popular that big box retailers started selling new ones to their customers. They are an essential modern tool because they are both useful and ubiquitous. About the only problem with these buckets is they are an absolute pain to carry! (Especially when loaded down with supplies or tools). At least they USED to be until I stumbled across these “weird” orange plastic grips.
The Snappy Grip
A couple of years ago, I was at a prepper show in Phoenix and saw something that caught my eye. It was a set of orange plastic handles that were attached to some non-descript five-gallon bucket. The manufacturer was selling them at the show and was demonstrating how they were used. He was a local guy and I talked to him for a few minutes about his product. I decided to buy a pair and try them out at home. If memory serves, I think I only spent $2 for two of them because he wanted to unload his inventory at the show. I put them in my goodie bag and took them home.

I have a half dozen five-gallon buckets in my garage that I use somewhat regularly. Some were used ones that I repurposed for around the house and others were new ones I got at my local big box retailer. All of them had the same small diameter white plastic handle that millions of other buckets have. This means after a short time, they become a real pain to carry. Since a couple of these handles were beginning to crack, I decided to remove them and replace them with the Snappy Grips that I purchased at the prepper show.
Projected Costs
MSRP on these are about $1.50 per grip but cost less when you buy in bulk.
Observations
To install them, you take one half and put the wire bale in it so that the round end faces down. Two plastic prongs stick up and two pairs of slots are exposed from the top. Then, take the other half and orient the plastic prongs so they face down and go into the two open slots. Make sure everything is lined-up, then press them together until they snap into place. It only takes a few seconds and the hardest part is getting everything properly aligned.
Then I picked the bucket up…and noticed the difference immediately. The grips have a much wider diameter than the regular ones, meaning the weight of the bucket is distributed over a wider area. They felt much more solid too, I didn’t feel like they were going to break when I filled the bucket up with water or rocks. It’s amazing what a difference they made, I was impressed by these simple yet effective replacement handles. In fact, I went online and got a baker’s dozen of them so I could replace all my handles with them plus have a few left over. Later, I got another baker’s dozen and gave them out as gifts to family members. Guess you could say I like the Snappy Grip and use them, which is the ultimate compliment.
Besides five-gallon buckets, you can use Snappy Grips in other applications. I’ve seen pictures of them being used as handles for pull starters (i.e., for lawnmower engines), wire cages, firewood bundles, auto battery, jump rope, dog leash, and others. It seems the Snappy Grip has a lot of uses, limited only by one’s imagination.

Pros
Solid construction, simple installation, and a drastic reduction in hand fatigue!
Cons
Not widely available at this time. Also, aligning everything so the grip snaps together properly is important for proper assembly.
Bottom Line
This is a simple and inexpensive product that I am glad I found. It makes the standard five-gallon bucket easier to carry and is so easy to install, even an information technologies professional can assemble it. Your hands will thank you for getting these.
Overall Rating 9/10
Up Next: 6 Benefits Of Using Vinegar In Your Survival Garden
If you’re looking for useful survival gear that you can’t make at home, check out the Survival Life Store!
from SurvivalLife https://survivallife.com/snappy-grip/
Wednesday 24 May 2017
NJ Emergency Alert System ‘Accidentally’ Sends Nuclear Emergency Warnings
The New Jersey Office of Emergency Management says the Emergency Alert System "accidentally" sent out a warning that something was wrong at a local nuclear power plant. [...]
The post NJ Emergency Alert System ‘Accidentally’ Sends Nuclear Emergency Warnings appeared first on Off Grid Survival - Wilderness & Urban Survival Skills.
from Off Grid Survival – Wilderness & Urban Survival Skills https://offgridsurvival.com/nj-emergency-alert-system-accidentally-sends-nuclear-warnings/
Tuesday 23 May 2017
Monday 22 May 2017
Possible Terrorist Attack Targeting Children in Manchester
Several people have been killed after an explosion rocked a Manchester Arena at the end of a teen concert. Early reports say at least 20 are dead and hundreds are injured. [...]
The post Possible Terrorist Attack Targeting Children in Manchester appeared first on Off Grid Survival - Wilderness & Urban Survival Skills.
from Off Grid Survival – Wilderness & Urban Survival Skills https://offgridsurvival.com/possible-terrorist-attack-targeting-children-manchester/
Leatherman Squirt PS4 Review | Survival Multi Tool

If you’re a hoarder of multi-tools and survival gear, the Leatherman Squirt PS4 is definitely a temptation that’s hard to resist! But is it worth carrying? Check out my review below and decide for yourself.
Leatherman Squirt PS4: All-in-One Mini Multi Tool
A while back, Leatherman introduced a series of small multi-tools designed to carry on a keychain. These ones include the Micra, Style, and Squirt series. I’ve carried a Micra for years and incorporated it into my EDC, but I wanted to see how the other ones performed. I reviewed the Style PS in a separate post so this one will concentrate on the Squirt PS4.
Format

The Squirt PS4 hasn’t been around as long as the Micra but is very similar to it. When it is folded up, it has the more traditional Leatherman rounded rectangular shape. Like many of the new tools, it also comes in a variety of colors. It is under 2.5” long when closed and weighs in at only 2 ounces. The Squirt isn’t a burden to carry and won’t get in your way.
Unlike the Style, the Squirt looks and feels more like a regular Leatherman multi-tool. The way the tools fold out and operate will be familiar to anybody who has owned a Leatherman for many years. It packs all the quality and good design of it’s larger cousins into a compact format. Even though it is small, you won’t have to worry about it failing you when you need it.
Tools

The tool selection is decent for a keychain-sized unit. The Squirt PS4 incorporates the following:
- Needlenose pliers
- Pliers
- Wire cutters
- Scissors
- Flat-head screwdriver
- Medium screwdriver
- Knife
- Bottle opener
- File
Of these, the first four use a spring action to operate them. The knife is small but works well, which is appreciated in any multi-tool that I carry.
Observations

I got my Squirt PS4 and decided to carry it for a while on my keychain. My experience was generally positive although I found myself needing a pair of scissors more often than a set of pliers. I used the scissors a few times but they are fairly small and not really designed for regular use. The screwdrivers work ok but are limited by the leverage you get from a keychain-sized multi-tool.
It is a good tool, a solid one that will work well when needed. The Squirt PS4 has a good selection of tools, but I found they aren’t the right combination for me. That’s why after a few weeks on my keychain, I consigned it to backup status in my office. I eventually put it into one of my Altoids tin kits, but it really doesn’t get much use there. When called on, it works well so I have no qualms about it. The fact is I find myself needing scissors fairly regularly, which is where the Squirt PS4 comes up a little short. Like some other items in my inventory, I found myself wanting to love this item but ended up only liking it.
Pros, Cons, and Projected Costs
Spring action pliers are great, has a decent blade. However, the scissors are small and of limited use. MSRP on this tool is $32.95.
Bottom Line
For this tool, I’ll be giving it an overall rating of 7/10. The Squirt PS4 is a good, solid multitool in a small package. It is easy to carry around and has a fair number of useful tools.
Leatherman Squirt PS4 comes in a variety of colors too! Hit the play button and check out this review:
If you need pliers more than scissors, this tool is a great one to get. For the most part, the Squirt lives out its days in my office drawer while My Micra stays clipped to my carabiner. Ultimately the multi-tool you choose to carry is up to you… just make sure you’re never caught without one.
Have you tried using the Leatherman Squirt PS4? Share your experiences in the comments below!
Looking for more multi-tools for your EDC kit? Here’s a review about the Spark Multi-tool Lighter!
![]()
Follow us on Facebook, Instagram, Twitter, Pinterest, and Tumblr!
Featured image via nozhiki.su
from SurvivalLife https://survivallife.com/leatherman-squirt-ps4-review/
Survival Gear Review: Back Packer’s Pantry Multigrain Buttermilk Hotcakes
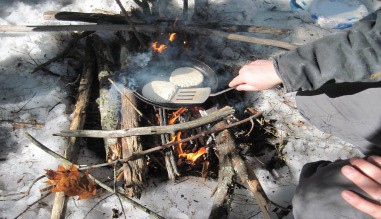
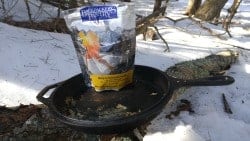 This past weekend, I had a bit of cabin fever – I needed to get out of the house, tromp around in the woods, start a fire in the snow. So I bundled up my 3-year-old boy, filled a backpack with a thermos of hot chocolate, a small container of olive oil, a Lodge 12” cast iron skillet, a liter bottle of water, a spatula, a bit of Maine real maple syrup, and the coup de grace – a package of Backpacker’s Pantry Multigrain Buttermilk Hotcakes. We gathered up the dog and stomped out into the woods, leaving Mrs. Drew to enjoy a few minutes of precious peace and quiet, sipping her coffee.
By Drew, a contributing author of Survival Cache & SHTFBlog
I’ve been starting my lil’ dude on making fires in the woods (never too early!) so I had him find a birch tree and peel some bark while I collected dry twigs and branches from the myriad white pine trees in the area; I scored and found a recently fallen small sugar maple to get some nice hardwood coals in the fire for cooking.
We set up the birch bark and dry twigs, and I showed my son how to scrape a firesteel for a small pile of ferrocerium shavings, and with one healthy blast on the Firesteel GobSpark Armageddon, we had a toasty little fire going. Once the fire was healthy and happy, I let him poke around in the coals with a long stick – an irresistible fireside hobby that comes to us while we’re young, apparently. The fire danced and snapped, my son slurped hot chocolate, my dog searched for squirrels, and I started looking into breakfast.
Pancakes in a bag?
I dug the package of Backpacker’s Pantry Multigrain Buttermilk Hotcakes out of my pack, and set to reading the instructions. Pretty simple: open the pouch, dump in ¾ cup of cold water, seal the bag up, shake until mixed. I could handle that. Probably.
 I opened the resealable bag of mix, and looked inside. First order of business was to locate the little oxygen absorber packet so it didn’t accidentally become hotcake ingredients and then remove all the oxygen from my stomach through a probably very unappealing chemical process. I dug around through the mix and located the errant hitchhiker, then poured my approximation of ¾ cup of cold water in the bag. I sealed the bag up, folded it over, and shook the shit out of the package. For good measure, I let my son shake it up, too. You can never be too careful.
Read Also: The KISS AR – 15
I opened up the bag and peered inside at its goopy contents. It looked pretty runny to me even after a couple good hearty shakings, so I used my spatula to mix things up a bit, scraping the sides of the bag to make sure I got all the mix. No improvement: I came to the conclusion that either my water-measurement eyeballing skills were far below par, or the mix was a little on the soupy side when properly made. No worries, though – I was committed at this point, and lil’ dude was giving me toddler hell about not having pancakes, so I oiled up the cast iron skillet and let it sit over the two wrist-sized hardwood logs I’d placed atop the campfire cooking coals we’d cultivated and poked at. In a few minutes, a sprinkle of water danced on the surface of the skillet, so I knew it was game time.
The Magic Of Campfire Cooking
Ahh, the beauty of a fire in the woods – pine smoke, crackling branches, clothes that retain that sweet smoky eau de campfire scent that drives the women crazy. However, when it comes to cooking pancakes on cast iron, that campfire becomes an evil beast that makes one jump to grab the spatula like a man who just sat on a rattlesnake that’s having a bad day.
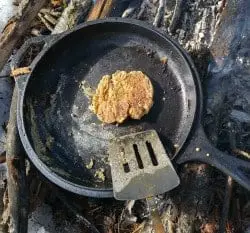 I poured the batter from the pouch onto the oiled, heated cast iron skillet, and the batter practically baked on the spot; bubbles (a sure sign that pancakes are done) burst from below in seconds, shocking the hell out of me and ensuring that breakfast would be a bit quicker than intended. I lunged for the spatula, shook off the residual batter left from stirring, and hastily scraped the poor scorched hotcakes from the pan. A quick flip for the two pancakes I’d made, and I let the pancakes sit another fifteen seconds or so before popping them off the skillet onto a paper plate. Round one went to the skillet.
I pulled the skillet back off the volcano to let it cool, and thankfully the next round of pancakes was a little bit easier on me. I was a nice dad and gave the better-looking pair of hotcakes to my son, lest he hate campfire cooking for the rest of his life. I’m sure he’ll thank me for it later when he’s burning bacon and eggs over campfires for years to come.
I drizzled on some real maple syrup (that fake Mrs. Butterworth stuff is for commies) and gave the Multigrain Buttermilk Hotcakes a whirl.
The Verdict Is In
I know it’s hard to make something taste bad when it’s covered in the delectable nectar that is Maine maple syrup, but these Hotcakes were actually pretty damned good. They tasted very similar to whole wheat or buckwheat pancakes (if any of you have ventured into that territory), very rich and a little dense. These hotcakes were meant to provide a bunch of protein for the backpacker or camper, and they taste the part. They weren’t like scratch-made griddle cakes like grandma used to make, but considering they will give you honest long-lasting energy (plus a nice sugar boost if you put syrup, honey, or jam on them), with four 4-inch pancakes providing 15 grams of protein.
Related: Making Maple Syrup
My three-year-old son requested seconds, so I happily obliged. The hotcakes were pretty filling, and we sat in the sun next to the fire, recovering happily from the unexpected need to make fast food and sipping hot chocolate. The hotcakes were winners.
The Company
![]() Backpacker’s Pantry – just so you know – pride themselves in offering organic foods to their customers, and these hotcakes were no different. The ingredient list is comprised of all food, no preservatives or chemicals. The spelt flour, evaporated cane juice, baking powder, and cornstarch are all listed as being from organic sources. A good FYI for people with allergies: These hotcakes include milk, eggs, wheat, and gluten – so keep an eye out. Nobody likes dealing with food allergies, especially out on the trail.
Backpacker’s Pantry – just so you know – pride themselves in offering organic foods to their customers, and these hotcakes were no different. The ingredient list is comprised of all food, no preservatives or chemicals. The spelt flour, evaporated cane juice, baking powder, and cornstarch are all listed as being from organic sources. A good FYI for people with allergies: These hotcakes include milk, eggs, wheat, and gluten – so keep an eye out. Nobody likes dealing with food allergies, especially out on the trail.
I wouldn’t throw this hotcake mix in a Bug-Out Bag or emergency bag – the hassle of needing large cookware and a spatula would be too much. However, keeping a couple packages of Backpacker’s Pantry Multigrain Buttermilk Hotcakes in a Bug-out camper, or in your house pantry in case you need a just-add-water breakfast, would be a great idea, especially if you have kids and need some calming comfort food. While I didn’t try it, the addition of berries or nuts would be a fantastic locally-sourced addition. Baking this mix in a dutch oven probably wouldn’t yield bad results either…I’ll have to try it out, now that I think about it. The Backpacker’s Pantry Multigrain Buttermilk Hotcakes are definitely a welcome addition to anyone who might want a kick-start to their day but not carry around the whole refrigerator.
from SurvivalCache http://survivalcache.com/survival-gear-review-back-packers-pantry-multigrain-buttermilk-hotcakes/