Saturday 30 September 2017

Bubonic Plague Threat…What You Need To Know

Viruses such as the Zika virus (contracted by mosquitoes) and the Powassan (POW) virus (contracted by ticks) have continued to make headlines this year with new developments. However, there’s another threat that is making recent headlines this summer. A threat from the past…the bubonic plague!

Bubonic Plague | Being In The Know May Help You

As of mid-August 2017, it has been confirmed that the bacteria (yersinia pestis) that causes the bubonic plague has been found in fleas in two Arizona counties that are 120 miles apart from each other – Navajo and Coconino counties. How did this spread to Arizona? Back in June 2017, three people needed hospital treatment after contracting the plague 400 miles east in Santa Fe County, New Mexico. There were four confirmed cases in New Mexico back in 2016, none of which were fatal. So, it is easily assumed that this is one possible way that the infected fleas ended up in Arizona, which is a border state to New Mexico.

Bubonic plague! How is this possible? Many are not aware (including myself, until a few days ago) that the bubonic plague has never been completely eradicated since the pandemic that spread across Europe and Asia in the 14th century which claimed 200 million lives. Due to this fact, there are thousands of confirmed cases each year around the globe.

The Cycle – How The Plague Has Recently Spread

The Cycle - How The Plague Has Recently Spread | Bubonic Plague Threat In Arizona...What You Need To Know
Back in the 14th century, black rats were the primary carriers of the bubonic plague. Today, other ground rodents such as ground squirrels and prairie dogs have become infected with the bubonic plague. The connection? All rodents can carry fleas. Furthermore, these are not the only animals that can be infected. A single bite from a flea carrying the plague causing bacteria yersinia pestis, can transmit the plague to other small wild animals such as rabbits, for example. Also, any predatory wild animals that commonly feed on these (infected) smaller wild animals, can, in turn, become infected as well. These fleas can also infect our beloved dogs and cats. Our canine and feline companions, if infected, can then infect us! If infected, the fleas of our pets can infect us by a single bite. We can also contract the plague by cat saliva coming in contact with our skin.

The symptoms of the bubonic plague in humans appear within 2-6 days after exposure and include the following:

  • Fever
  • Chills
  • Headache
  • Weakness
  • Muscle pain
  • Swollen lymph glands in the groin, armpits, and limbs

When caught early, the bubonic plague is 100% treatable with antibiotic treatment. It’s important to seek medical treatment as soon as possible if you suspect being infected! Left untreated, it can become septicaemic which means it can spread throughout the bloodstream. Also, left untreated, it can become pneumonic, which means it affects the lungs. This is when it can turn fatal very quickly!

Abc15.com reports on August 11, 2017:

“Officials are urging residents to reduce their exposure to the disease. Dogs are encouraged to be kept on leashes. Cats are highly susceptible to the plague; sicks cats, especially ones that are allowed to roam outside, should receive a proper diagnosis and treatment to reduce human exposure.

Authorities also say a sudden die-off of prairie dogs and rodents may indicate that the plague is present or has spread. Anyone who has noticed a sudden decrease in rodents or rabbits are encouraged to contact the Navajo County Health Department.”

Officials in Navajo County released the following tips for those who work, live or visit areas where the plague or where rodents are present:

  • “Do not handle sick or dead animals.
  • Prevent pets from roaming loose. Pets can pick up the infected fleas of wild animals, and then pass fleas on to their human owners. This is one of the common ways for humans to contract plague. Cats with plague can also pass the disease on to humans directly through respiratory droplets.
  • De-flea pets routinely. Contact your veterinarian for specific recommendations.
  • Avoid rodent burrows and fleas.
  • Use insect repellents when visiting or working in areas where plague might be active or rodents might be present (campers, hikers, woodcutters, and hunters).
  • Wear rubber gloves and other protection when cleaning and skinning wild animals.
  • Do not camp next to rodent burrows and avoid sleeping directly on the ground.”

Fox News shows a video news on ticks testing positive in Arizona:

In closing, I would like to state (as I have in my previous articles) that I am not trying to induce panic of any kind. However, left untreated or ignored, the bubonic plague is fatal. I encourage all of you to do your own studies (beyond this article) in regards to more information and to stay current on weekly updates that may include your state. Centers for Disease Control and Prevention (CDC) is a great resource for the most current and accurate information.

What do you think about the Bubonic Plague threat? Please let us know in the comments section below.

Up Next: 5 Natural Remedies to Get Rid of Fleas In and Around Your Home

Check out Bubonic Plague Threat...What You Need To Know at https://survivallife.com/bubonic-plague-threat/

Follow us on FacebookInstagramTwitterPinterest, and Tumblr!

Check out these articles to have updated information on the Zika virus and the POW virus:

The Zika Virus – 2017 Update

The POW Virus – What You Need To Know

Check these articles on other ways to protect yourself and your family from other (potentially) virus causing insects:

3 Homemade Mosquito Repellents

5 Natural Tick Repellents to Get Rid of Ticks NOW


from SurvivalLife https://survivallife.com/bubonic-plague-threat/

Friday 29 September 2017

7 Odd Ways People Have Died In The Wild | Outdoor Survival Tips

Exploring unfamiliar territories may sometimes lead to unexpected demise, so here are some outdoor survival tips that may come in handy. We’ve seen plenty of gruesome death scenes in movies set in the wild and it would be a shame if we fall victim to that same plot, right?

Outdoor Survival Tips | How to Avoid Death in the Wilds

If we are going out alone or with friends in the wild, it’s a must to equip ourselves with the right outdoor survival tips for everybody’s sake. Having sufficient knowledge and skills will definitely take us the extra mile and help us create a safe zone within any hazardous areas. But before that, what are the most common deaths in the wild and how can we avoid them?


1. Drowning

Drowning | Outdoor Survival Tips | Odd Ways People Die So You Don't Have To
Drowning is no stranger to this list as lack of certain skills and equipment can spell doom for anybody. Given we’re decent swimmers, it’s a no-brainer to avoid submerging when seas are turbulent as the last thing we would like is to helplessly explore its unimaginable depth.

2. Heat Stroke

Heat Stroke | Outdoor Survival Tips | Odd Ways People Die So You Don't Have To
It’s no secret that before embarking on a journey, we should always bring water. We’ll never know if the rivers we come across are drinkable or contaminated. Hence, always make sure you have a bottle or two in your bag to prevent dehydration and heat stroke.

3. Falling off a Cliff

Falling off a Cliff | Outdoor Survival Tips | Odd Ways People Die So You Don't Have To
This is arguably the most common way of dying when exploring rough terrains. A misstep can lead to fatal wounds or worse, dismemberment of the body. It is necessary to bring a flashlight and take the time with our steps. You can also tie a long rope around the waist and tie the other end around a sturdy tree trunk.

4. Mauled by Wild Animals

Mauled by Wild Animals | Outdoor Survival Tips | Odd Ways People Die So You Don't Have To
Camping at night? Better be equipped with sharp weapons as we’ll never know when a pack of wolves or a giant bear may possibly maul us for dinner. Also, place all the food at least a hundred meters away from the campsite since bears have a heightened sense of smell.

5. Eating Poisonous Food

Hunting isn’t the only means of finding food in the wild. How to Find Edible Plants in the Wild https://t.co/o429gaQXEv

— Survival Life (@SurvivalLF) September 5, 2017


Our last resort should be consuming unknown plants or fruits when food supply runs out. Always go for the safe consumables and when the going gets tough, it is best to heat the food thoroughly to kill bacteria or any microbes that could lead to poisoning.

6. Quicksand

Quicksand | Outdoor Survival Tips | Odd Ways People Die So You Don't Have To
We won’t actually die in quicksand as seen in the movies. Being stuck for days leading to starvation and dehydration will. Apparently, panicking will only make it harder to get out as this will agitate the sand.

The best way to approach the situation is to take your time, lean backward, and slowly wiggle your legs up until it reaches the surface. Then, move the arms in a sweeping motion until we reach the edge and start to roll over.

7. Heart Attack

Heart Attack | Outdoor Survival Tips | Odd Ways People Die So You Don't Have To
We will never know when this dreaded disease will hit us, heck, it’s not ranked as one of the top causes of death worldwide for no reason. So, before heading out, make sure the body is in tip-top shape and is ready for any rigorous activities like mountain climbing. If there’s a need to do so, rest by all means.


Looking for something more hardcore? Here are 10 horrific ways people died courtesy of Alltime10s: 

Our desire to explore uncharted territories should always come with proper preparation. In the outdoors, a minor miscalculation may result to gruesome injuries, or worse, death. When unsure, the best course of action is to always stay put and observe. Hopefully, our outdoor survival tips here can help you out when you’re in a difficult situation in the wilderness.

Which scenario do you find scariest? Share other outdoor survival tips in the comments below.

Up Next: 8 Outdoor Survival Hacks Using Everyday Items

Check out 7 Odd Ways People Have Died In The Wild | Outdoor Survival Tips at https://survivallife.com/outdoor-survival-tips/

Follow us on FacebookInstagramTwitterTumblr, and Pinterest!


from SurvivalLife https://survivallife.com/outdoor-survival-tips/

Wavian Can | 20L Fuel Container Product Review

Do you know why a lot of campers, off-roaders, and preppers keep their fuel in a Wavian can? It’s because fuel is heavy and takes up a lot of space. Plus, you need to store it safely and securely to prevent leaks or fires.

Wavian Can | Product Review

Fuel is an essential part of modern life, and this is especially true during emergencies. Sometimes fuel is not accessible due to natural or man-made disasters. That means you should have some on-hand in case such a disaster happens. The trick is storing and transporting fuel. This is where the Jerry Can comes in.

History

The Jerry Can has an interesting history and traces it’s origins back to 1937. Back then, Vinzenz Grünvogel, a German from Schwelm, designed a rectangular, metal fuel can that could carry 20 L of liquid. It featured three integrated handles, which meant it could be carried by one or two men. Plus, it had a flip-top spout. This allowed the contents to be poured out quickly. The can also had enough space for an air pocket. This pocket of air allowed it to float if dropped in the water! It was called the Wehrmachtkanister, and the German Army adopted it before the outbreak of World War Two.

The Allies quickly adopted this ingenious design wehen they saw that it was superior to their fuel cans. Allied soldiers called these containers “Jerry Cans,” as “Jerry” was the slang term for Germans. The Jerry Can was adopted and produced in vast numbers to support the British and American armies. After the war, millions were either sold as surplus or found as discarded items across the battlefields of Europe. Jerry Cans became a popular means of storing and transporting fuel due to their design and durability. The features that made them great back then continue to popularize them today.

Today

There are many different manufacturers of Jerry Cans these days — and there are just as many styles. NATO militaries currently use a design made from plastic with a round fuel spout receptacle in the center of the can. Scepter is the primary military supplier for these cans, although there are other manufacturers who produce the same design.

However, the traditional, metal German-designed Jerry Can is still being produced. Their metal build and D-shaped fuel spout receptacle on the right-hand side of the can distinguish these cans from competitors. They use a rubber gasket to keep fuel from spilling. They also have metal locking mechanisms for the spout.

The Wavian Can Craze?

The Wavian Craze? | Wavian Can | Fuel Container Product Review
One brand seems to most popular among Jerry Can uses though, which is why I decided to purchase and evaluate one. When I was at a prepper show a while back, I was talking to one of the vendors and asked him what his most popular item was. Without hesitation, he mentioned Wavian Jerry Cans. He would import a 40’ shipping container of them, and they would still sell out in days. After some research, I realized the consensus was that the Wavian Can was the best new Jerry Can out there.

Types

Before I go any further, I should mention that color matters when it comes to Jerry Cans. There is a color code for civilian fuel containers used within the United States. Basically, the color of the Jerry Can determines what can be carried in it. The following table lists the color and associated fuel.

Fuel Container Colors
Color Fuel
Red Gasoline
Yellow Diesel
Blue Kerosene
Green Oils

Surplus Jerry Cans are usually olive drab and sometimes desert tan. Be aware of these restrictions before you put fluid in your Jerry Can.

Legality

One more thing to keep in mind: There may be restrictions on how much fuel you can keep in your garage. Contact your local fire department or your insurance agent to find out how much fuel you can store. You can only store fuel in approved containers, like a Wavian Can.

Projected Costs

I got my Wavian Can at a local military surplus store (new) for $59.95. I’ve seen them online for anywhere from $79.95 all the way down to $49.95. However, be aware of shipping and handling costs. These are large, heavy items, so you may end up paying a lot of have them delivered.

Observations

I have had this particular Jerry Can for almost a year and haven’t had a chance to use it. One day, I decided to put it to the test to see if it was worth the hype. I put it in the back of my car and took it to the gas station down the street. I started filling it up and got to about 4.3 gallons (16.3 L) before the pump stopped. The nominal capacity of the Jerry Can is 20 L or 5.3 gallons, but modern fuel pumps won’t fill it up all the way. I withdrew the pump a bit and filled it to the brim. This was a mistake…but more on that later on. In the mean time, I closed the fuel cap, inserted the retaining pin, and placed the Wavian Can on its side inside the trunk of my car.

I got home and opened the trunk. No fuel had spilled and there wasn’t any fuel vapor odor. All this was good, meaning that the seals worked as intended. I placed the Jerry Can in my garage and waited for it to cool off before I went to fill my other vehicle. It was over 105F that day, so I wanted to refuel when it was cooler.

About an hour before sunset, I decided to fuel my other vehicle. However, I got a bit of an unexpected surprise when I took the cap off to attach the fuel spout. Remember how I filled the Jerry Can to the brim? Well, since the fuel came from an underground storage tank, it was cool. Then I left the can in my garage for a few hours, meaning the fuel warmed up and expanded. When I opened the cap, gasoline sprayed out at me.

Observations | Wavian Can | Fuel Container Product Review
I don’t blame the can for this. The incident was purely human error on my part.

I attached the EPA-approved fuel spout and went to fuel my other car. This is where the process became a mess. The spout wouldn’t fit into the fuel filler, meaning I spilled some gasoline before I halted the fueling process. There was no way the spout would allow me to dispense fuel into the tank, meaning I either had to use a funnel or transfer the gasoline to another container before fueling.

I ended up having to pour the fuel from the Wavian Can — sans EPA-approved fuel spout — into one of my smaller gasoline containers. Then I poured the contents of the smaller can into the fuel tank, which I repeated four times. The good news was that without the EPA-approved fuel spout, the Wavian Can emptied the fuel very quickly and without interruption. While it was a pain to use this process to fuel the car, I began to formulate some ideas on how to address this problem in the future. After all, this wasn’t an emergency situation, and I wasn’t in a hurry.

Essentially, if you have an old-school Jerry Can with a new-style fuel spout, forget about fueling an automobile with it. You will either need a funnel or a pre-2009 fuel spout that will fit a traditional Jerry Can. Otherwise, you are going to spill a lot of fuel on the ground and not in your tank. I am going to look at both possibilities, since I really want to be able to use my Wavian when necessary. It is a great fuel container with an absolutely abysmal fuel spout.

Pros

  • Solid construction, the seals and connections are top-notch.

Cons

  • EPA-approved fuel spout is an absolute pain to use.
  • Metal fuel cans weigh more than plastic fuel cans, and the heavy gauge metal used in the Wavian cans makes them even heavier.

Wavian Jerry Cans shows a video of the quality testing their products goes through:

I really like the Wavian Jerry Can, but the current fuel spout makes it difficult to use. I don’t blame Wavian for that. They’re just following the dictates of our Imperial Overlords at the EPA. The can itself is well-crafted and solid, and I will be using this one for many years to come. In fact, I plan on buying several more in the near future. If you are in the market for new Jerry Can, this is the one to get.

Overall Rating 8/10

Do you have a Wavian can of your own or plan on purchasing one for yourself? Let us know in the comments section below!

UP NEXT: Fire Survival Tips | Know What To Do When SHTF

Check out Wavian Can | 20L Fuel Container Product Review at https://survivallife.com/wavian-can-fuel/

Follow us on FacebookInstagramTwitterPinterest, and Tumblr!


from SurvivalLife https://survivallife.com/wavian-can-fuel/

Thursday 28 September 2017

Antifa Planning Nationwide Riots on November 4th, 2017

The radical left-wing terrorist organization known as Antifa is planning nationwide riots, violence, and acts of terrorism throughout the United States that will begin on November 4th 2017. [...]

The post Antifa Planning Nationwide Riots on November 4th, 2017 appeared first on Off Grid Survival - Wilderness & Urban Survival Skills.


from Off Grid Survival – Wilderness & Urban Survival Skills https://offgridsurvival.com/antifa-planning-nationwide-riots-november-4th-2017/

Wednesday 27 September 2017

7 Fidget Spinner FAQs You Should Know Before Buying One

Fidget Spinner FAQs You Should Learn Before Buying One

The fidget spinner is taking the world by storm and is no doubt, the most popular toy of 2017. Not only is it fun to play with, it is also said to help adults and children with attention-deficit hyperactivity disorder and mild autism.

Fidget Spinner FAQs

The fidget spinner is currently the talk of the town due to the alleged benefits it presents to every demographic. Although this may raise some eyebrows, there is no denying this toy can keep you entertained for hours. Is it really good as people say it is? Or is this just a marketing ploy? Let’s take a look at the pros and cons of this toy, so you can decide for yourself.

1. Relieves Anxiety and Releases Happy Hormones

Relieves Anxiety and Releases Happy Hormones | Fidget Spinner FAQs You Should Learn Before Buying One
The fidget spinner grabs the child’s attention and this undivided focus produces a hypnotic effect believed to release happy hormones. It is a must-try for restless children as the motion of the toy helps relieve anxiety and calm their minds.

2. Provides Pleasing Sensory Experience

Although no research confirms this claim yet, the toy is said to correct neurological disorders for children with ADHD or even mild autism. In parents’ testimonials, they claim their children seem more relaxed when playing and watching the toy spin.

3. Helps Alleviate Stress Levels

Some adults say having one in their workstation help alleviate their stress levels when the going gets tough. The sound it creates is said to put their mind in a blank state, helping them kill boredom and occupy their mind with simpler thoughts.

4. Keeps Kids Away from Electronic Gadgets

is she really trying to spin a fidget spinner on her toes pic.twitter.com/1rMIQD9Kid

— jaz (@pupcamilas) August 21, 2017


Some kids treat it as the new yo-yo since the toy can perform a handful of tricks. From inserting a pen in between to letting it spin on top of the nose, there are plenty of ways to make the spinning device more entertaining. Furthermore, parents see it as a breath of fresh air when they see their kids stay away from electronic gadgets and the Internet.

5. Distracts Kids in School

Teacher's Worst Nightmare | Fidget Spinner FAQs You Should Learn Before Buying One
As much as it helps kids to focus, the fidget spinner was banned in schools due to the teachers’ complaints. Students tend to use the toy inside the classroom and this clearly affected their studies. This problem, however, can simply be solved by proper discipline and the enforcement of classroom rules.

6. Poses Health Risks

Is It Safe? | Fidget Spinner FAQs You Should Learn Before Buying One
The toy also has its fair share of controversies as inspectors found lead content in it. Another concern raised is the risk of possible choking from the spinner’s smaller parts when kids play with it. As a countermeasure, a safety guideline was released banning three-year-olds from playing the toy and a reminder to keep it away from the mouth as much as possible.

7. Reinvents Designs and Styles

Is It Here To Stay? | Fidget Spinner FAQs You Should Learn Before Buying One
Is it a fad? According to its users, not even close. There are little to no other toys that can improve concentration while having fun at the same time. In fact, the toy’s influence continues to grow as there are now customized spinners like the shuriken style, which appeals to different audiences.


Here’s what the media and parents have to say about the fidget spinner courtesy of ABC15 Arizona:

Believe it or not, the fidget spinner will continue to sell because of parents who want nothing more but a chance to improve their children’s well-being. Moreover, adults would also like a chance to escape from stress, so it won’t be a surprise if some decide to purchase one. As the saying goes, you won’t know unless you try, right?

Do you believe in the benefits the fidget spinner provides? Share your opinion on the trendsetting toy in the comments below!

Up Next: UVPaqlite: A Childhood Toy With Glowing Potential

Check out 7 Fidget Spinner FAQs You Should Know Before Buying One at https://survivallife.com/fidget-spinner/

Follow us on FacebookInstagramTwitterTumblr, and Pinterest!


from SurvivalLife https://survivallife.com/fidget-spinner/

7 Survival Tips From Bear Grylls: Best Of The Living Legend

Survival Tips From Bear Grylls | Best Of The Living Legend

These survival tips from Bear Grylls will come in handy once you’re out there in the wild. Learn how to adapt, survive, and overcome the odds with these tips below!

Survival Tips from Bear Grylls: Learning the Mindset

These survival tips from Bear Grylls will be very helpful when you’re exploring uncharted territories. With no idea what to expect, remember that there are no set of rules to follow except just be prepared for anything and everything. It is safe to say that anyone who follows his exploits will have a higher chance of surviving the wild. Prepare yourself the best way possible and take a look at his best outdoor survival tips below:


1. Finding Water Like Bear Grylls

Your body is constantly losing water. Wilderness Survival Skills | 7 Unique Ways To Find Water In The Wild https://t.co/cc5pYhmhmg

— Survival Life (@SurvivalLF) August 2, 2017

Finding something to drink is the top priority in order to survive longer. You may have to rely on strange sources of water, which most of the time is limited and disgusting. Bear Grylls has been famous for drinking his own urine, fluids from a plant, or even from a dead snake. But remember, only relatively clear urine will hydrate you.

2. Learn What to Eat like Bear Grylls

Learn What to Eat | Survival Tips From Bear Grylls | Best Of The Living Legend
Generally, not everything that looks edible is really edible. You have to question your surroundings and observe what other animals are eating. You have to be creative and stomach any creepy creature you might encounter – may it be snakes, centipedes, and other creepy crawlies.

3. Be Steady and Survive like Bear Grylls

Be Steady and Survive | Survival Tips From Bear Grylls | Best Of The Living Legend
It’s natural instinct to listen to that voice inside your head telling you to act immediately. Still, you have to remind yourself your order of priorities: protection > rescue > water > food (PRWF). Do not make impulsive decisions out of panic. View the situation logically and take one small step at a time.

4. Find Shelter like Bear Grylls

Find Shelter | Survival Tips From Bear Grylls | Best Of The Living Legend
Build your shelter probably on a higher ground but near a source of water and a spot that’s visible for rescue. Bamboo is the best wood to use for its flexibility and strength and is also used for making a raft.

If you find yourself stuck somewhere hot, the shade is incredibly important as well. Keep yourself warm and dry as long as possible. When you get wet, your body will start to lose heat up to 20 times faster.

RELATED: 377 Survival Hacks And Skills You Should Know

5. Face Your Fears Like Bear Grylls

Face Your Fear | Survival Tips From Bear Grylls | Best Of The Living Legend
You will never know what to expect when stuck in the wild. When confronted with a difficult and potentially dangerous situation, will you run away or face it head-on? It will be normal to feel fear; it can keep you alive and push you to do what it takes to survive. Take a deep breath and overcome your fear!

6. Start A Fire Like Bear Grylls

Making fire will be one of the most challenging things you have to do to stay alive. Not only will it keep you warm, it can be utilized for cooking food, purifying water, and keeping wild animals away. It will be good to have a bow drill, flint, and steel, or waterproof matches. But, when there’s no other choice, grab two sticks and start rubbing.

7. Compose Yourself Like Bear Grylls

Composure is Key | Survival Tips From Bear Grylls | Best Of The Living Legend
It is very easy for anyone to panic when placed in a dire situation. As a result, you won’t be able to think straight and your decision-making may fail you. For Grylls, the best way to overcome this is to let your heart rate slow down, think of all the scenarios possible, and make sure the decision you will make is not an impulsive one.


Can’t get enough survival tips from Bear Grylls? Here’s how you can utilize blades and other sharp objects when in the wilds courtesy of Coltelleria Collini:

Learning from Bear Grylls, who is a veteran in this field, will definitely increase your chances of survival if you get lost in the wild. He is a proven expert and utilizing his mindset will help get you out of harm’s way in almost every situation. Expect more death-defying acts as the daredevil is not stopping anytime soon in defying the odds when he ventures deeper into unfamiliar territories.

Were you able to apply survival tips from Bear Grylls during a trip to the wilds? Share other noteworthy survival tips from the legend in the comments below!

Up Next: Bear Grylls’ Survival Kit Review

Check out 7 Survival Tips From Bear Grylls: Best Of The Living Legend at https://survivallife.com/survival-tips-bear-grylls/

Follow us on FacebookInstagramTwitter,  Tumblr, and Pinterest!


from SurvivalLife https://survivallife.com/survival-tips-bear-grylls/

Signaling for Help | Different Strategies You Need To Learn To Survive

Signaling for Help | Different Strategies You Need To Learn To Survive

You hear a great deal of big talk about survivalists hunting animals with spears, building elaborate shelters, and rubbing two sticks together. However, real survival is typically about finding rescue by learning the different ways in signaling for help.

Signaling For Help | Learning The Different Strategies

There are times you might be stranded a mile from help, and times you might be 50 miles from the nearest person. However, with a proper signaling strategy you can find help in almost every scenario.

Contrast

No matter how you plan to signal for help, contrast is the key. This is the principle of ensuring that your signal stands out from its surroundings. For a stationary signal, this could mean bright colors against a drab background. It could mean letters or shapes in a natural environment. For a smoke signal, it could mean black smoke against a white sky or white smoke against a blue sky. As for sound based signals it could mean a horn, a whistle, or the sound of metal clanging. Contrast light signals, it means a bright light against a dark background, a flashing light, or a light making a pattern. All of these are examples of creating contrast using your signal.

Light Signals

Light Signals | Signaling for Help | Different Strategies You Need To Learn To Survive
Using light to signal for help is one of the best ways to get the attention rescue personnel. LED flashlights and laser pointers are great for signaling at night. You can simply flash them on and off, or you can use Morse code to signal ‘SOS’. One of the most common ways of signaling is using a reflective surface like a mirror. This allows you to bounce the light of the sun off of a distant target. You can poke a hole in the center to help you aim these flashes of light at a helicopter or car. Just remember that you must be facing the sun to signal a target that you are facing. All of these visual signals can work miles away from their targets.

Sound Signals

Sound is another excellent way to signal for help, especially if the sun is not visible. You can yell for help, but you will tire quickly and often your voice will be drowned out by the wind. A whistle is a very common signaling tool to use as it requires less effort and reaches much further than a human voice. If you can find anything made of metal, you can often bang on it to create a distinct sound that carries. Just remember that sound rarely travels as far as light. In addition, windy conditions and valleys make sound signals more difficult.

Smoke Signals

By simply building a fire, you can often signal for help. You will need a good way to start that fire, so a lighter or Ferro rod is good to have. Once the fire is started, you will need a way to create contrast. You can use rubber or plastic for black smoke, or green vegetation for white smoke. To create a pattern, you can build three signal fires about 50 feet apart. You can also use a blanket or tarp to waft the smoke and create a signal with the plumes. Typically Morse code is used for this as well. Just wait to add the plastic or green vegetation until you think you have rescue personnel in range. You do not want to run out of supplies too early.

Stationary Signals, Flagging, and Vehicles

Stationary signals are large letters or shapes made in contrast with the ground. These must be visible from the air. Three equal lines is a universal sign of distress. If you have any material that is bright in color, you can attach it to a long pole and move to a high spot. Wave it back and forth when rescue teams are in range. Finally, remember that a vehicle is often your best signal. It is large, colorful, and metallic. You have a horn and headlights for sound and light. You can even burn parts of the car for black smoke, or bang on the hood for a sound signal.


Bear Grylls survival tip of the week is posted by Discovery Channel Southeast Asia:

Do you know other ways in signaling for help? Let us know in the comments section below.
Check out Signaling for Help | Different Strategies You Need To Learn To Survive at https://survivallife.com/signaling-help/

Follow us on FacebookInstagramTwitterPinterest, and Tumblr!


from SurvivalLife https://survivallife.com/signaling-help/

Sunday 24 September 2017

Survival Gear Review: Milwaukee Sawzall

best survival tool

Created in 1951, the Milwaukee Sawzall has been destroying wood, metal, nails, bolts, pipe and stone ever Milwaukee_Sawzall_battery_posing
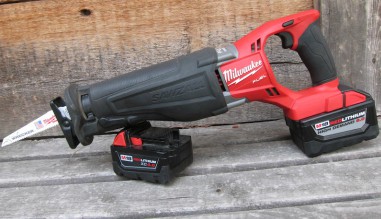
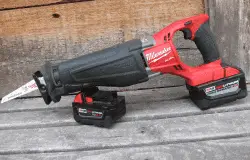
since. With it’s few moving parts, fast blade changes, variable speed, and a near unlimited number of blade options, the Sawzall is first and often only choice when speed and results are more important than precision and stealth.

By Doc Montana, a Contributing Author to SHTFBlog and SurvivalCache.com

The Milwaukee Sawzall is a reciprocating saw of which there are many brands. Most major power tool manufacturers sell a reciprocating saw, but the Milwaukee Sawzall is the original. Lately battery-tool options have pushed the reciprocating saws well beyond the extension cord, outside the construction site and into the hands of fire/rescue personnel. And from there it was a short hop into the survival kit for those who are a little more prepared than most.

See also: Milwaukee Work Lights

The real breakthrough came with the high-capacity Lithium-Polymer batteries that give the battery-powered Milwaukee_Sawzall_gun_in_hand
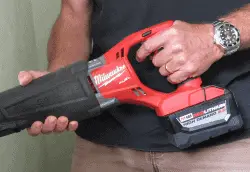
Sawzall near-corded performance. With 18 volts and 9 amp-hours of run time, the ability to swap blades and batteries will keep the Sawzall in the destruction fight until the job is done. Using a corded saw, here’s a video showing 73 seconds of saw time to cut a car in half.

Reciprocating saw blades come in many lengths but three main flavors of cutting prowess: those for wood (mostly), those for metal (mostly) and those for both. There are a few less common options for cutting cast iron, stone, trees, and plastics, but the survival/rescue side usually leans towards the combination blade or metal cutters.

A Survival Lightsaber (almost)

Much of the cutting magic is found in the dance between number of teeth per inch and the reciprocating speedMilwaukee_Sawzall_blade_kit 
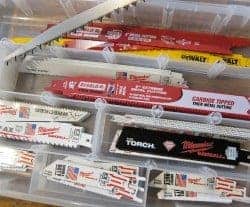
of the saw. For instance, a popular general purpose survival choice might be the six-inch 18-tooth metal cutter, or perhaps the nine-inch 12-tooth combination blade. But luckily, you can have both. And others. And more. By finding the cutting sweet-spot of blade type and blade speed, the ideal recipe for slicing up whatever you’ve got can be found quickly. Full speed is always an option, but it might just dull your blade faster and heat up your workspace.

Some specific uses include using the five-tooth Sawzall Axe blade to cut through windshield glass and reinforced protective plastics. Or the 14-tooth Sawzall Torch blade to slice through chain link fence like butter. Need to go through a wood door with metal hardware, the Sawzall Wrecker blade is a good choice. Slicing bolts and rebar is child’s play for the right blade, and cutting your way into a vehicle or out of a building is a powerful breaching option camouflaged as a common power tool.

Also Read: Estwing Survival Tomahawk

If I had to choose only one blade, it would be the nine-inch 8-teeth per inch Diablo Steel Demon carbide-Milwaukee_Sawzall_Diablo_extreme_metal_cutting
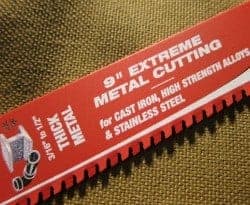
tipped thick-metal cutting blade. A few companies even make specific “rescue/demolition” blades in bright emergency yellow color and averaging 12 teeth per inch in lengths from six inches to 12 inches.

Some of the best blade choices regardless of length or teeth is bi-metal technology. Bi-metal means that the blade is actually a composite of two metals, a harder high-speed steel for the teeth, and a durable and flexible spring steel for the blade body. The two metals are welded together creating a stronger blade that stays sharp longer.

Always Use Protection

When using the Sawzall, eye protection is a must, and ear pro is highly recommended. Gloves are also a good Milwaukee_Sawzall_closeupidea because there is nothing subtle about the way the Sawzall cuts. It’s violent, aggressive, and permanent. Once the jackhammer-like action of the Sawzall starts up, the blade strokes back and forth at hundreds to thousands of times a minute, or if the blade jams, the saw starts slam dancing, the blade bends or snaps, or usually a combination of the above. A key element to successful and safe Sawzalling involves keeping the shoe tight against your workpiece. The shoe is the adjustable metal plate between the blade and the saw body. By pushing the shoe against what you are cutting, the reciprocating motion is only with the blade. But if you loosen your grip, the saw will buck violently. Because the Sawzall cuts with impunity, you must take care around electrical and gas lines, and the heat generated by the sawing friction can start a fire.

If rescuing a person, don’t forget that the jabbing blade on the far side of cut can do serious damage to flesh so apply the necessary safeguards and distance when operating the saw. Additional protection should be provided when glass and hot metal flakes can rain down or fly around in the wind. Pulling metal shards out of an eyeball is hard enough in an emergency room.

Related: Survival Tools

Adjusting the depth of the shoe keeps fresh blade in contact with the material to be cut while allowing a firm Milwaukee_Sawzall_Wreckersaw placement. The Sawzall can behave like a small chainsaw as well when using one of the pruning blade choices. The heavy tooth design is similar to bow saws and camp saws and cuts with the same speed and flying sawdust. Another area where the Sawzall excels is with large game butchering. If metal presents few problems for the Sawzall, then bone and gristle will do little but wet the blade and damen the noise.

Packing an 18 volt Milwaukee Sawzall in your kit might be on the advanced side of preparedness, but many of the battery-powered tools and lighting solutions popular in shops and construction sites can make important contributions to your initial survival options.

Visit Sponsors of SurvivalCache.com

pure pitcher vs brita made in usa made in china 99.99 WITH blue ribbon 600x200 USA survival cache 01


from SurvivalCache http://survivalcache.com/survival-gear-review-milwaukee-sawzall/

Sunday 17 September 2017

Five Cheap Things That Can Get You Killed

Cheap survival gear

There is no shortage of inexpensive survival items that can actually get you killed. Counting on your kit is essential when things go dark yet when it really matters, there is also no lack of folks who are fine with trusting their survival to the lowest bidder. And that doesn’t even include the issue of redundancy of cheap things. Of course it’s your call as to where you draw your quality and expense line, however less-but-quality always beats more-but-poor-quality. And that goes double in a survival situation.

By Doc Montana, a Contributing Author to SHTFBlog and SurvivalCache.com

Cutting to the chase, let’s take a look at five essential survival items that can get you killed if you err on the side of cheap because there is often a very good reason why quality kit costs more even though the higher price might only add a 10% increase in performance or accuracy. But it is in that narrow 10% where survival is found.

Compass: In reality, a compass only points north. That is its job with the rest of the navigation up to Suunto_compass_wristyou. While usually no problem, a faulty compass can mislead you into a false sense of orientation. Unfortunately a compass will always point somewhere. Unlike a knife that doesn’t cut, or a flashlight that doesn’t turn on, a compass will behave as if all’s well even when it’s not. And worse, a compass may give incorrect information ranging from slightly off to completely backwards, and anywhere in between. This list started with the compass because it is the most likely to be sold in cheap kits.

Compass Rules of Thumb: Stick with the brands of Silva, Suunto, or Brunton in that order. The bigger the compass, the likely more accurate and durable. Keep your compass away from shock, magnets and temperature extremes. If you are comparing compasses, keep them at a foot apart or they will alter each other’s needle’s direction.

Also Read: Ruger Alaskan .44 Mag Review

Knife: Cheap knives are a pet peeve of mine. Not that you need a high-priced custom blade, but since Fallkniven_MB_Modern_Bowie_Knife_Cobalt_posing
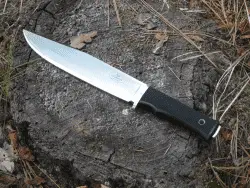
the knife is an essential component of any survival kit, cutting corners with your cutting steel is a bad idea from every angle. Like the compass, a knife can be deceiving. Even cheap blades can cut something. Where the cheap knife becomes dangerous is when the knife must perform under pressure. Quality directly affects steel strength, ability to hold an edge, and the obvious need to be resharpened. Cheap folding knives can snap in half, unlock when least expected, and fail in multiple mechanical ways. Cheap fixed blade knives can also snap in half, bend, chip, and dull quickly. And once dull, might not easily take a new edge. The deception with a cheap fixed blade is that until push really comes to shove, the true cheap nature of the blade may remain hidden. Spending more for a quality blade will yield many happy returns. But skimping on your primary blade is giving up before the battle even starts.

Knife Rules of Thumb: Stick to USA made knives or known factories overseas from Finland, Japan, Germany, or England. Learn to sharpen your own knife, and keep it that way. But if your blade dulls easy, chips or rusts, start looking for another blade. Modern super steels are high performance and low maintenance. Leave the antiques for kitchen duty.

Flashlight: As the only electronic item on this list, the flashlight has more points of failure than other Surefire_flashlight_survival_gun_light_mountedmechanical-only devices. Flashlights in the hundreds of lumens are available from a couple bucks found in the grocery store checkout line, to a couple hundred bucks from high-end manufacturers who cut no corners and only use the highest quality parts. With flashlights there are many things to consider, but the two primary concerns are 1) quality of the LEDs, and 2) quality of the circuits. The LEDs or Light Emitting Diodes, are the things that provide the light. They are made by the thousands if not millions, but not all are equal. When produced in mass quantity, there are vast differences between those LEDs that are rock-solid high performers, and those that merely look like LEDs but will fail rapidly. Failure often happens with the LED coming apart, falling off its panel, or burning up. Those companies that produce high end lighting tools test each and every LED ensuring only those with the proper performance pedigree get into the assembly line. And the circuitry connecting the LED to the battery is a solid electron pathway designed for not only the proper voltage, but also intense shock, water intrusion, corrosion, and general durability.

Flashlight Rules of Thumb: Buy name-brands like Surefire, Streamlight, 4Sevens, Pelican, and those lights with a reputable company behind the name. AA batteries are general purpose, but use the CR123 batteries for serious use. Avoid AAA unless you need a tiny light. Triple-A batteries are low power with short life.

Related: The Ultimate Survival Arm

Backpack: The humble backpack is often little more than an afterthought. A bag with straps. If it’s a Backpack_Eberlestock_bug_out
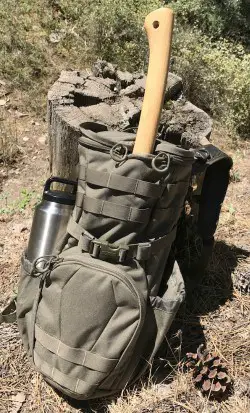
bag and got straps, then it’s good to go. The sad fact is that not only are backpacks unequal, but many are downright dangerous. As costs are cut, so are corners. But those cut corners don’t appear right away on the store shelf or online catalog. Instead those missing corners rear their ugly heads when needed the most. Straps tear. Hardware cracks. Seams rip. And zippers fail. Even the best packs can run afoul of Mother Nature, but a quality pack will fight to the end while a cheap pack already gave up the fight before ever leaving the store.

Carrying your life-sustaining gear is not a job for a second-rate pack. If you have to run flat out with your kit bouncing like a kangaroo on your back, any weaknesses will quickly start launching gear in all directions, And that’s assuming your shoulder straps don’t rip off leaving you with a little more than a laundry basket.

Backpack Rules of Thumb: Quality, of course. But also avoid major zippers without stress relieving straps. It’s best to underload a larger pack than to overload a smaller pack. Carrying a pack over 20 pounds should have a padded waist belt that is used to hold a majority of the pack’s weight. Load up your pack and take it for a jog. You will learn more in those five minutes than hours of thinking about it

Ammo: I know it’s tempting to pick up a box or two of shells when on sale or even stockpile a case of Glock_19_Katrina_Pistol_Trijicon_Streamlight_TLR2_Surefire_ammo_pilesome obscure brand of obscenely low priced cartridges, but you might just be making the biggest mistake of your life. An exaggeration? Perhaps, but cheap ammo can be dangerous to both you and your firearm. Inexpensive ammo can only be made by cutting some serious corners. The powder may be impure or corrosive, the bullets asymmetrical and scratched, and the cases out of tolerance. And even if the gun cycles and goes bang, the cases may be non reloadable, the primers bulged, the velocity a variable, and the accuracy involves luck. Some would argue that cheap ammo is fine for practice, but you wouldn’t use cheap gas in your Bug Out Vehicle when times are good, or run dime-store batteries in your valuable electronics just because you are safe at home.

Ammo Rules of Thumb: Stick with new, name brand ammo. Keep it dry and cool. Practice with the same ammo you will count on when you really need it. Watch for sales, but always lean towards quality over quantity.  Always

This list of five cheap things that can get you killed is far from comprehensive, but many of the same lessons can be applied to the rest of your gear.

Visit Sponsors of SurvivalCache.com

https://www.epicwaterfilters.com/

Save

Save


from SurvivalCache http://survivalcache.com/five-cheap-things-that-can-get-you-killed/

Saturday 16 September 2017

Making Granola | A Quick & Simple How To For On The Go Survival Food

In this article, I will walk you through the quick and simple process for making granola, a delicious, nutritious, and long lasting trail food that every survivalist should carry. When you are facing the tough physical work that survival requires, you need a quality preserved snack. It needs to provide carbohydrates, fiber, sugars, and protein. It also needs to last long enough for a few weeks of hiking.

Making Granola | Making Your Own Survival Snack

Unlike most preserved foods, you would prefer it to be tasty as well. For this type of snack, homemade granola is what you want. There are no preservatives or artificial ingredients when you make it yourself. In addition, the recipe for this snack is one of the fastest and simplest I have seen.

Making Granola | A Quality Snack Every Survivalist Needs
When I first experimented with this recipe, the amazing toasty smells filled our house. I let my wife and son taste the first batch, and it was almost gone on the first night. I brought it with me when I took my two nephews on a survival challenge over the summer. While my pack was filled with preserved foods, the granola was gone before they even tried the other foods. This recipe is sure to be a favorite for anybody that tastes it.

Ingredients for making granola:

  • 2 cups rolled oats
  • 3 tbsp. honey
  • 2 tbsp. coconut oil
  • ½ tsp. vanilla extract
  • 1 tsp. salt

Optional ingredients:

  • Nuts
  • Dried Fruit
  • Sunflower Seeds
  • Brown Sugar
  • Cinnamon

Get a large mixing bowl and add the oats. Spoon in the honey, coconut oil, vanilla extract, and salt. You should now get your hands dirty and mix all of these ingredients. Depending on the type of coconut oil, it could be liquid or solid. If it is solid, you will have to work it into the mixture well to get an even product.

If you have raw nuts, raw sunflower seeds, dried fruit, brown sugar, or cinnamon, you should add it now and mix. Preheat your oven to 300F and spread out the mixture on an ungreased baking sheet. You should eliminate as many clumps as possible to ensure that it dries evenly. Place it in the oven for ten minutes and remove it to let it cool. You can now add any toasted nuts or toasted sunflower seeds you have to the mixture. If you had added them sooner, they would have burned. Once the mix is completely cooled, put it in an airtight container in a cool dry place.

Here’s a video by The Domestic Geek on 3 delicious ways of making granola:

This recipe is very approximate. If you follow the general principles, you will still come out with a good product. You should limit the liquid products that you use or it will take longer for everything to dry out. Your goal is for the finished product to be dry and crispy. It should be lightly browned when finished. You can even add items after cooking such as dried pineapple or chocolate pieces for a sweeter taste. I can assure you, no matter what mixture you make you should make a large batch. This stuff will go fast. Just remember that it could keep you alive in a survival scenario. We always keep several pounds on hand.

Do you have your own recipe for making granola? Please let us know in the comments section below.

Up Next: Trail Nutrition – More Than Just Peanut Butter And Granola

Check out Making Granola | A Quick & Simple How To For On The Go Survival Food at https://survivallife.com/making-granola/

Follow us on FacebookInstagramTwitterPinterest, and Tumblr!


from SurvivalLife https://survivallife.com/making-granola/

Thursday 14 September 2017

“Solar Kill Shots” and CME’s: How Space Weather Can Affects Your Preps

https://survivallife.com/drone-defense-gnat-warfare/

The planets within our solar system have a strange effect on Earth. This effect has been studied through astrology for thousands of years. However, recently research has shed light that the planets, along with our Sun, have concrete physical effects on Earth as well. Let’s call this phenomena space weather, shall we? Understanding space weather can help with understanding how to survive and prepare on Earth.

Space Weather | How It Affects Earth

One example of space weather is the Moon’s magnetic effect. This magnetism coincides with Earth’s ocean tides. In addition, the Sun’s behavior has been shown to correlate with earthquakes. Solar winds released from Coronal Mass Ejections (CME’s) and Coronal Holes trigger these natural disasters.

The Sun also has an electromagnetic effect on Earth. As CME’s released from the Sun’s surface increase in speed, the particles trapped in the solar winds hit Earth’s magnetosphere. This causes the Aurora Borealis, which can be seen in the South. In our daily life, these solar winds impact Earth’s electrical grid as well. This effect is continuously monitored. You can check the relationship between the electrical grid and solar winds via the Kp Index.

With enough speed, a CME released from the Sun could wipe out our entire electrical grid. The most recent recorded event occurred in 1859. Known as the Carrington Event, the sun released such a powerful CME, also known as a Solar Kill Shot, which caused telegraphs to be disrupted. Some even burst into flames. Although not much of society was reliant on the electrical grid at that time, a Solar Kills Shot today would virtually set humanity back to the stone age.

The Solar Kill Shot

A Solar Kill Shot must be understood and accounted for in your family emergency preparedness plan. Similar to an EMP (electromagnetic pulse), a Solar Kill Shot would render every electrical unit useless. This includes cell phones, radios, computers, most vehicles, medical equipment, and of course the grid which powers your home’s lights, sewage, and heat.

A recovery from a Solar Kill Shot has been estimated to take upwards of $2 trillion to repair. In addition, recovery from such an event could take up to 10 years. With this in mind, long term survival skills should be learned beforehand. Survival tools, gear, and equipment also should be prepared.

Learn more about the Solar Kill Shot by Alden Morris here:

You can track and monitor solar winds, coronal mass ejections, and activity from coronal holes by adding the resources below to your emergency preparedness plan. Many of the resources provide instructional videos on how to read the various charts. They can teach you how to monitor solar winds reaching Earth and the effect they have on your hometown.

Smaller celestial bodies such as comets and/or asteroids also constitute as space weather. These space objects also have an electromagnetic effect on Earth. They can be tracked using the live enlil spirals provided by both NOAA and NASA.

Space resources:

The Sun, Earthquakes, and Volcanic Eruptions

The Sun, Earthquakes and Volcanic Eruptions | How Space Weather Can Affect Earth

The arrival of solar winds into Earth’s magnetosphere and the corresponding earthquakes thereafter show a correlation between the two. For example, when the Kp Index measures an X-Ray Class Solar Flare, the solar winds entering into Earth’s magnetosphere seem to have an electromagnetic effect on Earth’s tectonic plates. This results in earthquakes throughout different parts of the globe.

However, which part of the globe the solar winds hit and where the resulting earthquake occurs thereafter is still being studied. Scientists are still perfecting a model which can predict the location of earthquakes after notable solar wind speeds.

A group named Suspicious Observers is heading the earthquake prediction model. The group is a great resource for survival information, as their goal is to help mankind by forewarning communities. They seek to warn areas prone to natural disaster before the disaster occurs. The group has had so much success that models displaying a connection between solar winds and volcanic eruptions are already underway.

See a video by Alden Morris regarding Volcano Eruption Prediction Model, Electromagnetism and Volcanic Eruptions:

Earthquake resources:

Magnetic North and Traditional North

Magnetic North and Traditional North | How Space Weather Can Affect Earth

The Sun and the Earth’s correlation are in array during times of solar minimum and solar maximum. These are the Sun’s cycles that determine whether Earth will undergo long periods of heat or cooling. This phenomena explains our planet’s recent ice age and the current controversy over global warming.

Another result from the Sun’s influence on Earth is the wandering of the North Pole. For years, travelers relied on their compass to point to magnetic north. However, since the North Pole has been traveling due to the effects of the Sun, a slight deviation has occurred from magnetic north and true north. Although minimal, if not accounted for when an individual is traveling, they’ll never reach their location. This is especially true for travelers on foot and those going long distances. Keeping this in mind, survivalists often calculate for magnetic declination.

Calculating Magnetic Declination

Use updated information to differentiate on all of your maps the degrees between magnetic north and true north. Land navigation courses will teach you how to properly calculate magnetic declination over a long distance. A quick search on any search engine can also give you the exact degree that your hometown is between magnetic and true north. For example, Seattle, Washington is approximately positive 14 degrees East of True North.

While this may sound confusing, calculating your hometowns’ magnetic declination isn’t complicated on paper. Use this resource to properly track your areas magnetic declination.

See a hypothesis by Alden Morris regarding magnetic declination in conjunction with climate change:

Are you prepared for space weather? Please let us know in the comments section below!

UP NEXT: 19 “old world” primitive survival skills you’ll wish you knew before SHTF!

Check out

Follow us on FacebookInstagramTwitterPinterest, and Tumblr!


from SurvivalLife https://survivallife.com/space-weather-can-affect-earth/