The wizards at Magpul have done it again. This time with the humble rifle bipod. From its earliest start of two crossed sticks, to the dedicated but standalone bipods of the 19th century buffalo  hunters, to the advent of the bolt-on bipods of bolt actions and machine guns in the 20th century, bipods have proved their necessity. One of the most popular civilian bipods is the ubiquitous Harris. The spring-loaded adjustable length legs of the 12.3 ounce Harris have pinched skin and caused blood blisters for over six decades. And still it remains popular. Until now, that is because the industry disruptor extraordinaire named Magpul Industries just showed up to the party and heads are turning. By mixing their special alchemy of hardened steel, anodized aluminum and proprietary plastic polymer, Magpul has delivered yet again another product that not only outperforms all others in its class, but makes everyone need one even if they didn’t yet know it.
By Doc Montana, contributing author to SHTFblog and Survival Cache
Futureland
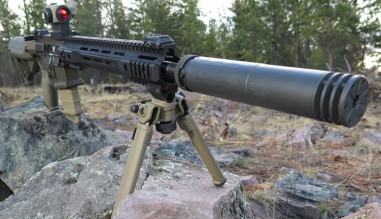
So what is the Magpul Bipod? Well, let’s start with what the Magpul Bipod isn’t. It isn’t two pounds. It isn’t $300. It’s isn’t spring-loaded. And won’t give you a blood blister or cut your finger no 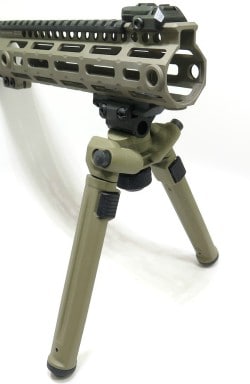 matter how many times it’s deploy it. And just what is the Magpul Bipod? Well, it is now the finest 11.7 ounce, $109, button-deployed bipod on the market. Available in two colors and three attachment options, the Magpul Bipod has raised the dusty old bipod bar so high that unless there is another company out there like Magpul, we won’t be seeing a better bipod offering any time soon. And we all know Magpul is a singularity.
Also Read: The Katrina Rifle
The Magpul Bipod, for such a simple and elegant design, has a remarkable portfolio. In addition to being a six-position, adjustable length, pan, tilt, 45-degree, reversible platform of stability, it keeps its footprint small and personality sedated. Personally, I opted for the Picatinny rail option for the widest application across my rifles. The dual-bolt clamp grabs the rail, securely tightened with either a larger slotted screwdriver or 1/8th inch hex wrench.
Isosceles Rules
The key to the Magpul Bipod’s performance is its ability to lock up solid when under load. The geometric magic of the triangle is in the amazing property where a triad of corners connecting three 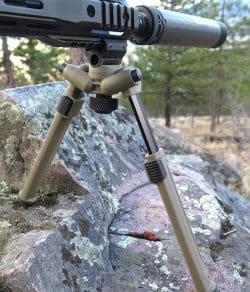 lines eliminate movement and distributes the force equally across the entire geometric structure. So no matter how much play there is in the system when not under load, when forward pressure is added to the equation, the Magpul Bipod steps up and locks down.
Related: Designated Marksman Carbine
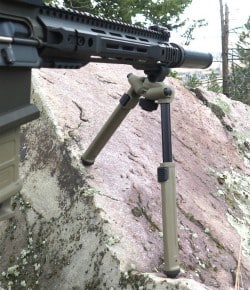
The Magpul Bipod has no loyalty to any particular triangle whether acute, obtuse, scalene, isosceles or even equilateral. The variability of the triangles along with the added 50 degrees of pan and 40 degrees of total tilt makes the Magpul Bipod a wildly effective stability enhancement. The polymer and 6061 T-6 anodized aluminum legs extend four inches beyond their initial 6.3 inches. The pair of glove-friendly buttons, one each for leg deployment and leg extension, snap to attention through spring-detent only. Not a blood blister in sight. For those who don’t get the reference, the Harris bipod is known to retract with sudden force often catching a bit of skin in the mix. Don’t worry, it happens to everyone, and like having a mean dog for a pet, you learn to keep your distance.
New Shoes
The legs of the Magpul Bipod have agressive rubber feet, but if your mission requires something even more overt, the legs will accept Atlas-pattern bipod feet whether spikes, skids, or spiky skids. 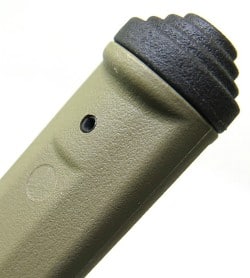 A single roll pin holds the current shoes in place so swapping them out is as easy as swapping out a flat trigger guard with a Magpul enhanced trigger guard on an AR15. Easier actually.
When combining the tilt of the Magpul Bipod with a single full leg extension, you can get over 45 degrees of single direction offset. The average roof, pretending for the moment that you have SHTF overwatch in your neighborhood, is 26.6 degrees. Any roof over 37 degrees is considered a steep slope. In fact, a roof slope of 45 degrees would be difficult to stay on without ropes. So the Magpul Bipod will easily perform as needed across all useful domestic ridge lines. And should your immediate needs not require any panning (side to side swing of the rifle), you can spin a disk that sits between the bipod and mounting platform to lock out the panning feature. This adds a measure of additional stability to situations where you are guaranteed a perpendicular intersection between bipod face and target direction.
Related: KISS (Keep It Simple Stupid) AR-15
Before the Magpul Bipod, my favorite bipod was the Elite Iron Revolution Bipod. It is truly a feat of engineering, and has no loyalty to pretty much anything. 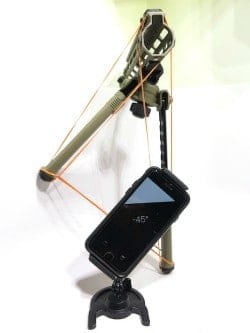 It works just as well upside down as right-side up essentially allowing the rifle barrel to spin freely but solidly within the bipod’s center. The two problems with the Elite Iron Revolution Bipod compared to the Magpul Bipod are that the affordable steel version Elite Iron starts at $600, and second, the 34 ounces of bipod is three times the weight of the Magpul Bipod. All that said, the Elite Iron works well for those heavy rifles in the upper thirty caliber numbers and well into the forty-plus calibers.
Size Matters
In the crotch of the Magpul Bipod is a manly one-and-a-quarter inch diameter knob that locks or loosens the pan and tilt. A quarter turn is plenty to access those features, but if you want to reverse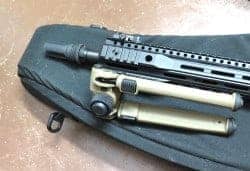 the direction of the Magpul Bipod legs, you will need to spin the manly knob about four revolutions. And why would you want to reverse the leg direction? Simple. First, the bipod legs are usually mounted at the most forward position of the available rail, and since bipod stability is often a function of the forward pressure load on the bipod (lightly pushing the rifle away from you to strengthen the angle of the bipod), you would want the deployed bipod legs to be pushing against their housing rather than against the release mechanism. But this usually puts the feet of the stowed bipod in front of the muzzle essentially extending the overall length of the rifle package. By spinning the bipod around pointing the feet towards the stock, the Magpul Bipod extends only a quarter-inch in front of the mounting point. I have several covert rifle cases that easily hold my ARs but not with the bipod pointing forward. A quick spin of the center knob (which, by the way, does not fully unscrew so there is no risk of loss or rifle wardrobe malfunction) the Magpul Bipod spins freely allow the rifle system to smoothly seat into its minimum case.
Also Read: Magpul Tejas Gun Belt Review
The knurled knob at the center of this angular masterpiece is a massive improvement over previous bipod designs. But also of note are other two pairs of buttons controlling the legs. A 7/16th inch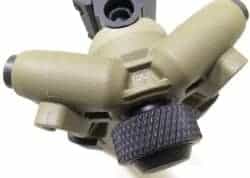 diameter metal button releases the legs to re-stow them. Both legs can be deployed their 90 degree rotation without any button pressing. Because there is no button-press needed to put the Magpul Bipod to work, it’s possible to drag the bipod feet on the ground or other object while bringing the rifle barrel upward. This causes the legs to snap into position and remain there until the release button is pushed.
Control. Alt. Delete!
Just south of that button is an 11/16ths by 9/16ths inch rectangular button that when depressed releases the leg to extend or retract, or stop along its path in 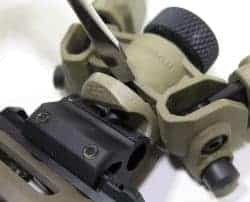 one of the five intermediate detents. Since the release button is on the moving section of leg, the operation can be quickly and efficiently done with one hand. Just push the button and pull the leg out. In contrast, the Harris bipod only had two built-in leg length choices; all in our all out. And worse, the legs were spring loaded into their short position, not locked up by any other means. And since the retraction button is unfortunately on the upper leg segment, combined with the loaded spring of the leg when in the extended position, when the retraction button is pushed whether intentionally or not, the lower leg screams home sliding into the upper section at lightning speed often catching a bit of skin or cloth along the way. Hence “Harris Bite.”
Actually the two-position Harris leg is not quite true. There is a set screw with a knob that holds the leg in place with a turn. However, the leg is still spring loaded with only the set screw holding it 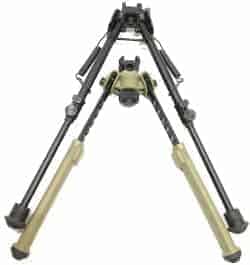 still so the briefest turn of the set screw knob sends the snapping violently home. Further, it requires two hands, one to hold the leg in position against the spring tension, and the other hand to turn the set screw. And pretty much the same mess happens with the overly aggressive springs driving initial leg deployment and retraction. Watch your fingers. So Magpul has done it once again with the Magpul Bipod. By combining its engineering talents and in-house materials science, Magpul has created a rail accessory you can be proud of, and will actually improve your rifle’s performance along with your own. So do yourself and your rifle a favor; BYOD: Bipod Your Offense and Defense.
Visit Sponsors of SurvivalCache.com


The post Survival Gear Review: The Magpul Bipod appeared first on Survival Cache.
from Survival Cache https://survivalcache.com/survival-gear-review-the-magpul-bipod-mag933-mag941-mag951/

 we’d need to secure and increase the supply distance to water, we would obtain a much lower sight, sound, and smell signature if we moved inland. In a long-term bug-out, security was deemed to be more important than a shorter walk to fill the water containers.
  course, between the two of us, we had at least four compasses back at camp. We did know we were on an island so there was no actual danger of being lost – hell, we could follow the shoreline in one direction and find the canoe and camp eventually. However, the ramifications would potentially be serious if we were not so lucky to be island-bound.
 a basic plan for moving forward here if there was a long-term SHTF event. Eventually, boredom set in. I’m sure in a real, long-term bug-out, we could have been preparing defenses, scouting the shore and local camps for people, animals, and local resources. We could have relocated the camp, or been long-term stockpiling resources, caching gear, planning for weeks or months out. But, we got bored. I imagine this would be a real issue in real-deal survival situation, especially if one was successful in bugging out away from people. Soon, though, we had the survival radio going and picked up a local station, and Jarhead Survivor started collecting materials to teach me how to start a fire with a bow drill – something I’d been bugging him about for a few months. (spoiler alert – it’s a hell of a lot more difficult then they make it look in the movies!)
 one fell swoop, we both knew without speaking that this happenstance represented a huge failure on the part of the mighty survivalist’s bug-out planning. “You guys having a fire?”
  trip, we spent an uneventful night in our respective tents and packed up to head home the next morning. The wind was out of our sails; we were departing the scene with hung heads and some lessons learned indeed.
 with, emphasis is definitely on the “
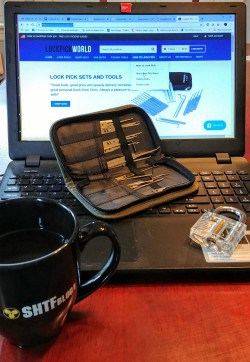 forward 20 years, and that first elation of a bumped lock has blossomed into an extensive online company that offers a huge array of lock picks, bump keys, and other lock picking needs to the entire world.
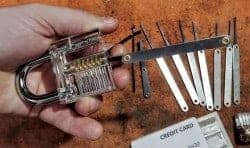 tool bag jam packed FULL of locks, deadbolts, door knobs, and lock pick sets. After he showed me quick basic tricks with combination locks, we got to the nitty gritty with what he called “
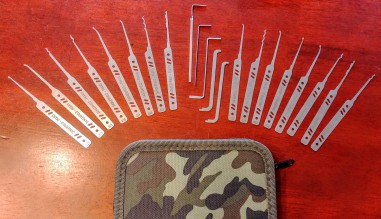
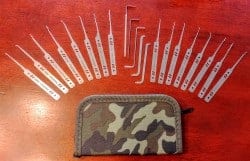
 contains a couple of the aforementioned plastic clear-sided Lokko locks, a black leather case containing an assortment of fifteen different tools, and a “spy case”, which is a rather unconvincing “credit card” plastic case that slides open to reveal a simple lock pick set comprising of a tension tool, a long rake, a hook pick, and a snake rake – good basic tools to have with you everywhere, or to use as a starting point for the hobbyist or even kids. The website shows a “how to” book included in the kit; my kit did not come with the book. The faux credit card container is a little cheesy, but it’s convincing enough at a glance to thrill kids who watch spy movies, or perhaps fool someone who is performing a cursory search.
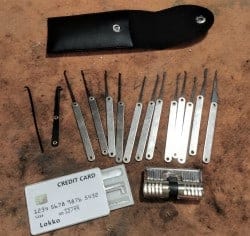 how to act accordingly to open the lock up. These plastic locks were Godsends to help me refine my technique once my instructor departed.