Wednesday 31 August 2016

How To Build The Perfect Pocket Sized Survival Kit

shutterstock_209540866

You can never be too prepared when it comes to wilderness safety, but that doesn’t mean your survival kit should weigh you down. Gone are the days of lugging around an oversized utility bag filled with complicated tools, heavy gear, and unnecessary supplies.

This pocket sized kit is one heck of a backup to your go bag!  They’re quick, simple, and easy to make.  Check out the video below and keep a few on hand at all times!  (One in your gear, one at home, and one in your glove box!) For the full, detailed, step by step, instructions

For the full, detailed, step by step, instructions be sure to check out the information below the video:

Follow these steps to create your own wilderness survival kit that keeps things simple – without sacrificing safety.

01 diy

What you’ll need:

  • Empty Altoids tin
  • 2 rubber bands
  • Small ball of dryer lint
  • Plastic bottle cap
  • Piece of tape
  • 7-10 water purification tablets
  • Mini keychain lighter
  • Mini compass
  • Whistle
  • Mini Swiss Army knife
  • Mini can opener
  • Signaling mirror

How to make it:

Start with an  empty Altoids tin and  two rubber bands to hold the tin shut.

02 diy

Next, add a small ball of  dryer lint to your kit.

As we mentioned in a previous article, dryer lint is extremely flammable and makes an excellent fire starter.

Keep a ball of it in your survival kit for an instant fire. (Pro tip: dipping your dryer lint in Vaseline will make it burn longer.)

03 diy

Next, grab a  plastic bottle cap and fill it with water purification tablets.

06 diy

These tablets are an excellent alternative to carrying around heavy water bottles – each tablet instantly disinfects about one liter of water, ensuring that your water is safe for consumption.

Use a piece of  tape to seal the cap.

04 diy

Next, add a small fire starter to your kit. We recommend a mini keychain lighter, as they are compact, durable, and easy to light in a time-sensitive situation.

07 diy

Next, add these four outdoor essentials to your survival kit: a  mini compass, a  whistle , a  mini Swiss Army knife and a  mini can opener.

These tried and true tools are reliable and uncomplicated – and they’re also incredibly versatile.

08 diy

Lastly, the  signaling mirror is a must have for any wilderness survival kit – especially for the solo traveler.

(Another pro tip: mirrors made with military glass are more reflective than mirrors made with plastic.)

Add this pocket sized mirror to your kit, and you’ll be more than prepared when disaster strikes.

09 diy

Do you have a pocket survival kit of your own? We’d love to hear about it! Leave a comment below and tell us about your survival must-haves!


from SurvivalLife http://survivallife.com/how-to-build-the-perfect-pocket-sized-survival-kit/

Prepping Your Spouse for a Preparedness Lifestyle

shutterstock_318998312

Most preppers are probably familiar with the sideways looks and awkward situations that arise when they tell others of their emergency plans and readiness.

When that skepticism comes from within the immediate family, things become much more complex.  Convincing a stranger or a neighbor of the worthiness of your preparations is one thing, but explaining intents, concerns and reasons to your husband or wife is a totally different task.

Bringing up the subject of prepping and getting a spouse or other immediate family member on board isn’t a simple process.  It takes a delicate hand in order to make sure that your spouse believes in the merits of your concerns and doesn’t think that you’ve “gone off your rocker.”

Here are some suggestions on how to handle the situation, and how to work towards preparing every loved one you care about.

Have a meeting

Planning a meeting is an important part of getting your spouse involved with your emergency plan.  It is vital for both partners to sit down together and create a unified plan that will be a mutual benefit.

Start with the small picture

When talking with your spouse about emergency preparedness, it is important to start off with a short informal meeting that discusses why preparing is an important part of your overall family plan.  Once this meeting comes to an end and your spouse is at least tentatively interested in or accepting of the idea, ask them to come up with ideas for the next meeting on food, water, shelter.  By working together it becomes more about the mutual benefit to each other and less about “your opinion.”

Have you found strength in numbers? https://t.co/A8xDpv8rml pic.twitter.com/vjU3veVpJM

— Survival Life (@SurvivalLF) August 15, 2016

Never use scare tactics

When talking to your spouse avoid being overly vivid about the “What ifs” that are out there. Instead of talking about nuclear fallout or the “zombie apocalypse,” talk about historical events (floods, storms, riots, food shortages, etc.), or even much more close to home instances such as job loss. Using rational circumstances will help to remove doubts and stigmas about prepping. This will help the both of you come up with a sensible plan  regardless of if  your plan is to “Bug Out” or “Bug In.”

Keep it fun

Instead of making your preparations an annoying chore, plan fun activities as a part of your emergency preparation training.  Go on camping trips, plant a garden, take survival oriented classes together, go to your local pistol & rifle range, go hunting, go shopping, or take an emergency medical course together. If you make your preps an activity and not a chore it will not only lighten the mood around prepping, but may also strengthen the bond that you share.

Rest assured

Having both partners fully up to speed with emergency preparations will protect both of you from being ill-prepared should your partner be incapacitated or otherwise unavailable. In a crisis, communications will most likely be the first utility to vanish.  Freeways become parking lots, and reaching your loved ones might become an impossible notion. Having a plan that both spouses know will give you peace of mind knowing that if something goes wrong, your spouse will be able to take charge and know what they need to do and where they need to go in order to be safe.

If you approach your spouse using the above tips you will hopefully be able to convince them that your preparations are not in vain and maintain that you are not crazy (which you are not).  If you have your significant other onboard with you during your preps it will make surviving that much easier.  I would love to hear any other tips that you may have for involving your spouse in your preps!

What have you done to get your spouse and family on board with preparedness? Let us know in the comments!


from SurvivalLife http://survivallife.com/prepping-your-spouse-for-a-preparedness-lifestyle/

The 6 “Unbreakable Laws Of Survival” You Need To Know

shutterstock_391535467

When it comes to being prepared, there are an infinite number of ways to go about it… each and every person has their own needs and wants and there is no “single solution” that solves all your preparedness problems.

But that being said, there are a 6 “Unbreakable laws”  every prepper needs to follow… if they want to survive any crisis. 

(Really, you should consider them guidelines to create your own plan…make them the framework of your survival strategy.)

Learn these laws well and put them to good use and in a crisis, you’ll  have a much easier time than most.  Check out this short video below now…

The 6 “Unbreakable Laws Of Survival” You Need To Know

1. Storing Water

shutterstock_146471507

FACT: Your  body is made up of 60 percent water… even losing a small amount without having the ability to replenish it can quickly become dangerous.  

Water is your #1 priority.

But not just any water, you need clean water… drinking dirty or contaminated fluids isn’t an option you should force yourself to take.  With a little forethought, you’ll never find yourself in that situation.

Imagine this: An earthquake or a massive storm hit your town hard and your water main is damaged or destroyed. Ask yourself, “Have I stored enough potable water to last my family for two weeks?” 

A prepper sees the importance of having a water backup, and the task of storing water entails several considerations. You should have the knowledge, ability, and tools to filter your water. 

Life in an urban or suburban environment does not afford an average Joe the means and opportunity to store as much water as you’ll actually need. Space is a major concern, water can’t be compressed condensed…. which is why planning is so important!

A good start is to identify the exact number of gallons of water you need. Remember that the average person consumes approximately a gallon of water every day. It may be more or less, depending on your activities. Nevertheless, one gallon per person per day a good baseline.


Do you know the difference in heat stroke and heat exhaustion? Find out here: https://t.co/kcNohBpNwm pic.twitter.com/1JubIIHOHV

— Survival Life (@SurvivalLF) August 25, 2016

You might not drink that entire gallon of water, but you will need it for other activities like cleaning, cooking, and sanitation. The rule of thumb dictates that a family of 4 (2 kids and 2 adults) needs at least 4 gallons of water to last a day. This number is enough for your drinking and sanitation needs. You will have enough for flushing the toilet and even for taking care of your pets. The next consideration is the number of days you will likely need an extra water supply. An average person can only last up to 3 days without water. Hence, you should start storing 3-day or 72-hour equivalent of water. You can store more if your finances (and space) allow for it.  A good goal for your Long-term storage is a one month’s supply, but be sure to set milestones so you don’t get overwhelmed. Start small. Try for 72 hours’ worth, then work toward a week, and finally a month. Over time, your stored water may become contaminated with dirt, dust, or worse. Remember, drinking dirty water is almost as bad as not drinking any water at all. Luckily, you can boil, treat, or filter the water and it should be safe. You can extend the life of your water by using preservatives and stabilizers. These chemicals can help your water stay potable for up to 5 years.  Ultimately you want to try and cycle through your water storage once every 6 months just to keep it “fresh”.  You need to also make sure that you use a clean and proper container for your storage. Never use milk or juice containers for long term storage the risk of contamination is too high. Stick to well-cleaned 2-liter bottles, air/water tight containers that have only ever held water in them, pre-bottled water, or drums made specifically for water storage.  Make sure that you keep them out of the sun to avoid bacterial growth! Once your water has sat for a long time, you may also run into an issue with “stale water,” where there is nothing wrong with it other than on “off” taste.  This can be quickly and easily fixed by pouring the water between two glasses to aerate it (add oxygen) and improve the flavor.

2. Storing Food

shutterstock_96866449Compared to water storage, food storage is far simpler and easier. You don’t have to store as much food as much as you need to stock up on water. In addition, the process of preparation in storing food is not as demanding. The trick is to just buy more of the usual food in your pantry. When you go to the grocery store, get some extra pieces of your favorite canned food. If there are food items on sale, seize the opportunity to stock up. Food coupons are also a great way to stock up your storage. In other words, do whatever you can to bulk up your supply. The key to a healthy diet is balance, so when you are working on storing food, be sure to balance these macronutrients: protein, carbohydrates and fat. Don’t limit your food choices to canned fruits. Obviously fruits and vegetables are nutritious, but they don’t have the energy that animal protein can easily provide. Whether you have tuna or chicken in cans, always think of a balanced diet.  

The Far Side never fails to give me a laugh 😀 pic.twitter.com/vILND4ZP1d — Survival Life (@SurvivalLF) August 23, 2016


In the event of a disaster, you will be doing more physical work and the protein found in canned meats will help give you strength to keep going and keep moving. However, you need to be watchful with the sodium because canned meats have plenty of it. Canned soup also has a lot of sodium. You will need to drink more water to counter the effects of too much sodium in the diet. Looking back at storing water, drinking more is not a good thing for your preparedness plan.

Always take your macronutrients (proteins, carbs, and fats) into account when stocking up your food supply. A bottle of peanut butter, for instance, is a great source of fats. Actually, peanut butter can be considered the ultimate prepper food because it is rich in calories and is easy to store. When it comes to carbohydrates, brown rice is a good source.

However, brown rice and peanut butter should not be the only foods in your storage. There are fruits, vegetables, eggs and many more. Remember, balance is key. Avoid focusing your diet on just one macro. Even during downtimes or crises, you still need to ensure proper nutrition.

When the power grid fails during a disaster, you will be faced with the dilemma of which food to consume first. It’s simple — just start with the perishables or those that have a shorter shelf life, spoil or rot easily and are usually stored in your fridge.

In case the gas lines are cut off, you will also need something to cook with. Having a gas grill for example will help a lot, so it’s important to keep some extra tanks if you can.

With all the food and water you’ve decided to store, you will have to find a place to keep them. The idea is to keep the storage items dry and cool in order to prevent them from spoiling. If you don’t have a secret room for your food and water, then look for a dark, cool and strong part of the house. If your home has a staircase, use the space under the stairs for storage. Those who do not have stairs can use closets instead.

3. Having Medical Supplies and Basic Medical Skills

Everyone must have a first aid kit in their supplies. Period. But there’s also one more important factor, and that is the four basic medical skills. Without the following 4 skills, your kit would be useless.

1. Creating an open airway and confirming a heartbeat

You need to know if the person’s heart is still beating and that he or she is breathing. If you think CPR is necessary then perform it.

A tourniquet will be the best solution in case there is heavy bleeding or trauma. A RATS tourniquet is one such medical tool, and it is easy to put on with just one hand. An Israeli bandage or Quickclot combat gauze can also do the job. Add these to your first aid kit because they have plenty of uses. You never know when you’ll need them. They can save a life in times of disaster or emergency, maybe even yours.

2. Treating minor wounds

When you or a loved one suffers a minor wound, use a bandage and apply pressure on the affected area for about 10 minutes. The pressure and the bandage will work together to form a clot, stopping or minimizing the bleeding as a result. Make it a point to use running water to clean the wound. Then dress it with sterile gauze, bandage or Band-Aids. Hygienic treatment is crucial to avoid worsening the scrape or cut. Otherwise, the wound can become a major injury. If you think the wound does not need stitching or hospitalization, you can stop infection with an antibiotic like Neosporin.

3. Treating shock

Shock is experienced when your body does not get enough oxygen. This condition could lead to injury or illness, making immediate treatment crucial. A simple loss of body fluids may cause serious, irreversible damage to the body. Therefore, as part of prepping, make sure you have plenty of clean water to drink.

Shock can also be caused by heart disease, sudden intense emotions, intolerable pain, extreme fear, prolonged inactivity, unpleasant experience, and many others. These causes must be avoided or dealt with as much as possible.

If you observe shock in a family member or loved one, increase the blood flow to the heart, which can be done by elevating the feet.

4. Handling broken bones

Treating broken bones can be difficult and risky. However, when SHTF, paramedics may not be around. This is precisely the reason it is important to invest in first aid training. Do not move the person unless you know which part of their body is broken.

Learning these basic life skills is important. You never know when you need them, so take the time to learn them and commit them to memory. Proper training will not only get you a certificate but also an assurance that you will know what to do when someone gets hurt. 

4. Having Cash on Hand

shutterstock_285474380

Having extra funds is just as important as the other items on this list. When everything collapses, you will still need to buy food, water, medicine and even gas for your car.

Make sure you have enough cash on hand to get you and your family through a week, at least. ATMs and even the internet may be down, so you may not be able to depend on credit cards.

If you live near the border, it would be a good idea to have some cash in the currency of your neighboring country. This way you will have money that’s ready to use in case you have to evacuate and cross the border.

On a side note, it may also be wise to store some gold or silver in case the financial system collapses.

5. Being Able to Secure your Home or Family

shutterstock_244660861

On any ordinary day, people go on with their lives without even noticing what is happening around them. They are generally nice and polite with one another. This situation may change when a disaster takes place. When supplies run out, people get hungry and become desperate.

In the aftermath, law and order will also go out the window. You may no longer rely on law enforcers to keep the peace or deal with an intruder. Things will definitely go out of control. These conditions only mean one thing: you are left to your own devices.

It will be every man for himself, and in a lawless society, you will need to defend your life and those of your loved ones against intruders who want what you have. You must defend your home, life and property from these bad elements.

A confrontation may be the last thing on your mind, but when cornered, you have to be ready to fight. Just like your first aid and medical skills, it is important to learn how to use a firearm responsibly and properly. Having a pistol, a rifle and a shotgun will not be enough. You have to know how to use a gun, shoot with precision and maintain it.

After your firearms training, you will become more proficient and most of all confident that if and when the need arises, you are able to provide safety and security to your home and family.

6. Being Ready to Bug Out

Leaving the safety, security and supplies of home is not an easy thing to do. You and your family will have to go into a real survival scenario. No matter how difficult the future might seem, bugging out could be the only way for you to stay alive. This is the time when your survival skills will be put to the test.

As preppers, we need to learn all the survival skills that we can before any disaster comes. From the basic to the high level ones, you will not regret all the time, money and effort spent trying to learn them all. If possible, have your loved ones or family members get survival training as well.

If your finances permit, invest in a bugout cabin. It doesn’t have to have all the amenities that your home does. Just stock up on the necessary supplies like food, water and meds. This way you’ll have another safe place to stay, a second home. The location would be crucial, among other things so you will need to put a lot of thought and research on a bugout cabin.

The simplest way to make life easier if and when you bug out is to have a go bag. Also known as a go bag, it contains the necessary tools and materials to help you get through 3 days in the wilderness. Try to prepare bug out bags for each member of the family so that all your needs are met.


from SurvivalLife http://survivallife.com/the-6-unbreakable-laws-of-survival/

Tuesday 30 August 2016

Department of Homeland Security Seeking to Take Control of U.S. Elections

Democrats are claiming hackers have breached a number of election databases and are asking the FBI and DHS to take control of election security. DHS is considering taking control of all election infrastructure, claiming the election is an issue of national Security... [...]

The post Department of Homeland Security Seeking to Take Control of U.S. Elections appeared first on Off Grid Survival - Wilderness & Urban Survival Skills.


from Off Grid Survival – Wilderness & Urban Survival Skills http://offgridsurvival.com/department-homeland-security-seeking-take-control-u-s-elections/

Using Sound as a Weapon: How Sound Frequency and Pressure Can Cause Pain or Worse

shutterstock_75556723

As mainstream media and liberals push for more stringent gun control measures including restricting gun magazine sizes and ammunition purchases, I’ve often wondered how we could make this behavior a “non-problem.” Then I got an idea, and I’ve been researching it ever since.

What if we could develop a defensive weapon that wouldn’t require firearms, ammunition, or permits? What if we used a completely different technology—one that isn’t controlled by the government? What if we used sound?

What is Sound?

Sound is all around us and much of it is comforting to humans—the pleasing sound of nice dinner music, a breeze wafting gently through the trees, gurgling water flowing in a brook, or the sounds of children playing—our world is alive with wonderful sound. For most, sound is a welcome reality. But when sound becomes noise, it increases stress and introduces emotional reactions in our lives and relationships. In fact, sound can distract, disorient, frighten, or injure.

Sound is a pressure wave. As such it occurs at a certain frequency. These cycles have amplitude (measured at the peaks) defining the power or intensity of the sound wave. Think of it like “loudness.”

We hear sounds by the frequency of their pressure waves around us. We call this pitch. A high pitch is a high frequency sound wave and a low pitch is a low frequency sound wave.

As shown in Table 1, we can’t hear some frequencies, although some animals can.

A chart comparing the hearing capabilities of humans, dogs, cats and elephants.

Table 1

Sounds between 20 Hz and 20,000 Hz are considered within our normal threshold of hearing. Sounds below 20 Hz are called infrasonic or infrasound. Low frequency infrasound at high dB can cause tremors inside our organs and it hurts! Sounds above 20 KHz—our upper range of hearing—are called ultrasonic. At 500 KHz and higher we label sounds megasonic. We can be affected by these sound frequencies, too. Sounds that occur outside our normal threshold of hearing are felt rather than heard. This presents interesting opportunities for controlling threats.

Table 2 shows some typical frequencies generated by sound sources:

A chart showing the frequency in hertz of various sound sources.

Table 2

As we age, our ability to hear high frequency sound decreases. This is why seniors can’t hear the buzzing of mosquitoes or even some drizzle. Animals can, and this is why many people keep dogs. They can hear and alert on danger long before we become aware.

The intensity or power of sound pressure is measured in decibels (dB). The decibel provides a relative measure of sound intensity. The higher the dB rating, the more volume sound has.

The intensity of a sound wave decreases with increasing distance from the source (inverse square law). The power (intensity) of sound is approximately equal to 1/d2 where d equals the distance from the sound source.  Double the distance, d and sound pressure (dB) drops to half its intensity. A 40 dB sound at 1 meter drops to 20 dB at 2 meters and just 10 dB at 4 meters. At 0 dB—the softest sound—your ears and brain search for something to hear.

Table 3 shows typical dB ratings for various sounds.

Table 52-3 dB Source 300

How loud is sound? The ear’s response to the loudness of sound occurs as a power of 10. It takes about 10 times the power to sound twice as loud. Loudness varies with age and the physiology of the person. Still, more intense sounds will appear loudest.

Sounds that Alert or Warn

Table 4 lists sounds that can stimulate action.

Table 52-4 Sounds that warn 300

Sounds that Calm or Soothe

As shown in Table 5 certain sounds can calm and relax a person (or an animal.)

table 5

There’s a story in the Bible (1 Sam. 16:23) about a young man named David who used sound to calm a belligerent, angry, and discontented King Saul. David would take out his lyre, a small harp, and play for the king. The sounds of this musical instrument soothed Saul’s emotions and he’d chill out.

You can buy sound devices that can produce calming sounds to help you relax and fall asleep.

Sound as a Deterrent

Make a sound that’s irritating to a person and you can deter that person from certain action. Teenagers don’t like sounds around 20,000 Hz and will try to distance themselves from this sound. A 20 kHz hum has been used to move loitering teens off streets or away from school playgrounds at night. Likewise, a high-amplitude sound can be used as a burglar deterrent.

Some frequencies aren’t heard. Sounds below 20 Hz or above 20 kHz can prove effective in warfare.

Generate high intensity sound below 20 Hz and people will feel the effect without hearing it. An ultra-high frequency blast at 19-20 kHz will disperse protesters and rioters—especially the younger ones.

Sound That Destroys Matter

By creating sound at the natural frequency of matter, we can cause various materials to vibrate. At enough energy, we could cause this material to break apart and disintegrate. There are devices that can do this today.

You need a strong sound pressure wave to make this happen, but the frequency of a sound generator equal to the natural vibration frequency of a material causes resonance and the amplitude of vibration of the material increases many-fold until the atoms in the material actually break apart.

In a ‘Walls of Jericho’ scenario, sonic warfare is used to destructively shatter objects and material. It takes a directed concussive effect to vibrate structures to rubble, and infrasonic energy to shatter bones and pulp organs from within. But it could be done. You would need a 240 dB source to get a person’s head to resonate destructively.

These sound waves would have to come from very loud objects, sound waves so powerful they could knock down walls and shake machines to pieces. Several college students showed that low frequencies between 30 and 60 Hz can actually extinguish a small fire using high intensity sound.

It’s possible to shatter glass with sound by producing a note that resonates sympathetically with the glass.

The natural frequency of earth is 7.83 Hz. Gold can vibrate at 1.7 MHz—silver at between 4.047 and 4.652 MHz. Even copper can vibrate at just over 28 MHz. The magnetic field around earth can reduce the resonant frequency of material.  For silver the resonant frequency in the Earth’s magnetic field would be a low audio 80 Hz (not 4+ MHz).

Sound That Injures or Kills

Between 0 dB and 90 dB, sound intensity is normal and typically won’t damage hearing.  But exceed 90 dB and hearing damage can occur if exposure is prolonged. Your body can tolerate 85 dB of sound intensity for eight hours without hearing damage, but at 100 dB, you can only take this for 15 minutes before it affects your health. And at 115 dB you are safe for only 30 seconds. This is why ear protection is recommended for all noisy environments. At 140 dB physical pain can be felt. Go above this and life becomes threatened.

An extremely high-power sound (160 dB) can disrupt or destroy your eardrums and cause severe pain or disorientation. This is usually sufficient to incapacitate a person. Less powerful sound waves can cause you to experience nausea or discomfort.

Loud sounds could also cause a seizure or heart attack. High-intensity (loud) ultrasonic sound (generally anything above 20 KHz) can cause physical damage. When Krakatoa erupted in 1883, it produced a sound that was recorded at 190 dB over 100 miles away. The shock wave ruptured the eardrums of sailors 40 miles away. Sound can be powerful. Theoretically sound could take down a drone.


Learn how red light can enhance your night vision. https://t.co/zkNTXzMdGn pic.twitter.com/6pRYasKTw5

— Survival Life (@SurvivalLF) August 29, 2016

As sound loudness increases, its effect on human beings and material becomes important. Sonolysis uses cavitation sound waves to break molecules apart and form small bubbles with an intense shock wave that can destroy materials. A milder form of cavitation called “lithotripsy” destroys kidney stones during medical procedures.

We’ve all watched the effects of shrill sounds in sci-fi movies, when an entire group of people were made helpless by a loud sound that permeated the area. They held their ears and fell to the ground unconscious. And movie-goers wondered if this really could happen.

Yes it can.

Several years back, a garage inventor created the ability to place sound energy at a specific location while canceling sound in other nearby areas. He could create the sound of rushing water within a narrow circle in a crowd. People in that circle could hear the water, but people a few feet away could not. This concept is used in shopping malls to lure shoppers.

Focused sound technology was successfully used at checkpoints in the Middle East to stop approaching vehicles far back from where guards were stationed. The device deterred suicide bombers or at least gave the checkpoint forewarning that a vehicle was not responding to orders to stop and be searched.

The garage inventor formed a company (LRAD) and designed sonic and ultrasonic weapons that can incapacitate, injure or kill. Their new long range acoustic device (LRAD) is now being used by law enforcement and the military as a directed beam weapon to control crowds and deter pirates or insurgents from attacking ships at sea.

It emits a 2.5 kHz warning tone at 146 dB one meter from the emitter with a maximum range of 300 meters (where the tone is degraded to 90 dB) causing nausea, discomfort, disorientation, reduced sensory motor functions, or severe pain. By transmitting at ultra-high frequency, an LRAD blast can cause eyeballs to vibrate generating unease and visual apparitions.

The LRAD can also produce a 90 dB warning tone that reaches out over three miles. If necessary, it can emit a 146 dB tone (beyond the human threshold of pain) with an upper limit of 190 dB.  People can die from a loud noise between 185 and 200 decibels. At 194 dB a sound wave can become a shock wave blasting the body, shattering the skeleton and tearing internal organs apart, killing the recipient. The LRAD 100X hand held device is effective out to 600 meters. The LRAD 2000X is effective out to 5,500 meters (3.4 miles).

The European Space Agency has a sonic weapon that can generate 154 dB sound energy using four giant acoustic orifices. This device can burst eardrums. Increase the loudness to 185 dB and it could cause an air embolism in the lungs or explode the heart.

Whales produce the loudest low frequency sounds on earth— at around 190 dB (17 to 30 Hz). Close up, the high-intensity calls by blue and fin whales can collapse lungs and cause death to other living creatures.

A car stereo made a world record by pumping out 182 dB of sound that could instantly cause hearing loss. It wasn’t energized for long. Acceptable exposure time was in seconds.

Sound waves can cause internal bleeding and stop a human heart with a frequency that resonates with the organ. Sonar has been used in the oceans to detect and kill hostile divers by destroying organs and bone. Exposure to high intensity (184 dB) ultrasound frequencies from 700 kHz to 3.6 MHz have been proven to cause lung and liver damage. Sound can be a killer.

In the next segment, I’ll explain how you can use sound for threat protection.


from SurvivalLife http://survivallife.com/sound-as-a-weapon/

A Shipping Container Home that you can actually Ship Anywhere in the World

Over the last couple of years shipping container homes have grown in popularity, but many of them lose their primary function when constructed, the ability to move them throughout the world... [...]

The post A Shipping Container Home that you can actually Ship Anywhere in the World appeared first on Off Grid Survival - Wilderness & Urban Survival Skills.


from Off Grid Survival – Wilderness & Urban Survival Skills http://offgridsurvival.com/mobileshippingcontainerhome/

Monday 29 August 2016

Gun Ownership in America hits Record Highs: 44% of All Homes have a Firearm

This week, the Pew Research Center released a shocking poll; over 44% of American homes now have at least 1 firearm... [...]

The post Gun Ownership in America hits Record Highs: 44% of All Homes have a Firearm appeared first on Off Grid Survival - Wilderness & Urban Survival Skills.


from Off Grid Survival – Wilderness & Urban Survival Skills http://offgridsurvival.com/gunownershipamerica-recordhighs/

Sunday 28 August 2016

Best Finishes For Your SHTF Gun

best cerakote paint

We recently had a reader email into the Survival Cache team with a couple suggestions for articles he’s like to seecerakote colors
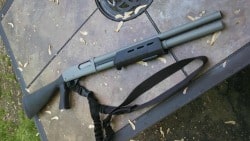
(those types of emails are always welcome, by the way!).   He’d mentioned one specific item he’d like to see gone over.  He wrote, Another article I’d like to see if/when you and your team get the time is something on gun coatings. Like cerakote vs blued finishes etc.”

By Drew, a contributing author of Survival Cache & SHTFBlog

It’s a great question – what firearms finish will work best to protect your gun from corrosion and wear during a long-term SHTF event, or over a long duration of time between cleanings and maintenance?  Well, as someone who was a professional firearms refinisher for many years, with lots of experience in cold bluing, hot tank bluing, nickel plating, and spray-on finishes, I’ll walk you through the differences of some of the most commonly encountered finishes, and the pros and cons of each.  Hopefully this will help some of you decide where to plunk your hard-earned bucks to help preserve your “oh shit” guns when the chips are down.

Why Refinish Your Gun?

Most people that I encountered when I was refinishing firearms brought their guns to me for restoring – they had cerakote rifle finish
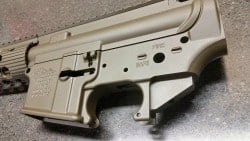
loved and used and/or neglected a firearm to the point of the finish completely wearing off a gun.  Sometimes they’d been in house fires (brutal on firearms, even when they are in safes), or the gun was found in grandpa’s attic and was covered in bat crap, or they’d found a good deal on a gun they’d wanted because the finish was worn.  In any of these cases, the reason to refinish was generally obvious and easily remedied.

These days, gun owners will bring their perfectly good, sometimes brand-new, firearms to a local finisher, looking to achieve a new finish for reasons other than restoring.  Sometimes they’ve seen that sexy-looking camouflaged AR-15 or Glock on their (insert your choice of social media here) feed and GOTTA HAVE that same look…or maybe Multicam and brightly-colored metallic red/blue/green controls and accessories (why do people do that?!? All I can think of when I see those is those vinyled and painted up tuner cars in the early “Fast and the Furious” movies. But I digress.).  Others, such as predator or turkey/waterfowl hunters, need their dedicated hunting gun camo’d up so as not to draw their quarry’s eye.  I know some people who live for duck hunting will bring their shotguns in to be Duracoated or Cerakoted because of the superior resistance to saltwater corrosion.

Also Read: Top SHTF Guns You Haven’t Considered

However, for the purposes of this article, we will be looking at what available finish will help preserve your gun best when you are most likely to neglect the firearm.  We are also assuming you are bringing your firearm in for a refinish (or possibly refinishing yourself); however, a variety of finish options – most of the ones listed here, as a matter of fact – are available on new guns as well.  Remember, a certain finish won’t protect from serious abuse, i.e. hard drops on concrete or banging into rocks or being run over by National Guard tracked vehicles.  What it will do is block moisture, skin oils and salts, sweat, and mud from contacting the metal and components directly.  This effectively combats corrosion and rust – which we all know will screw your gun up and render it inoperable faster than we can say, “Ahh, shit.”

Cold Bluing

I’m not going to dig too deeply into the ins and outs of cold bluing because I wrote an article about it in one of my Rifle Bluing
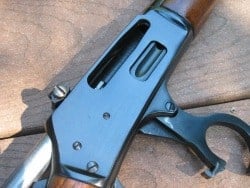
“SHTF Armorer” DIY posts on SHTFblog.com.  You can read the article here.  However, in a nutshell, cold bluing is the easiest way for most of us to restore a blued finish on our carbon steel guns.  (Cold bluing does not work on stainless steel or aluminum.)  It’s as accessible as going to our local gun shop and grabbing a bottle off the shelf or ordering it off Amazon.  I like Brownell’s Oxpho-Blue, and I have had good results with Birchwood Casey’s Perma-Blue as well.  And when applied properly, it can look pretty good and generally protects raw metal acceptably well.  As a counterpoint to all this convenience, cold blue does not hold up well to long-term use and will quickly wear off.  But it never hurts to have a sealed bottle (it evaporates) in the armorer’s box to throw some finish on a worn gun if needed.

Cold Blue Pros:

  • Cheap and accessible – around $10 for a 3 oz. Bottle of Birchwood Casey Perma Blue, available at most gun shops, even Wal-Mart
  • Do-it-yourself compatible – refinish a gun while you watch “Hogan’s Heroes” and “Desperate Housewives” reruns
  • Looks pretty good when applied properly with attention to detail
  • Good for spot touch-ups

Cold Blue Cons:

  • Does not offer very good corrosion protection – but it’s better than nothing
  • Wears very easily under frequent use, necessitating re-applications or a more serious finish
  • Looks awful and splotchy when not done properly or if oils are present when applying

Hot Tank Bluing

Hot tank bluing comes in a couple different forms, but far and away the most commonly used is a Caustic Black finish.  This method involves immersing cleaned and degreased carbon steel parts into a bath of “bluing salts”, which are made up of sodium hydroxide, sodium nitrite, and sodium nitrate (plus other proprietary ingredients, depending on who you source the salts from.).  The salts are mixed with water at certain ratios, then boiled at between 275-315° F.  The chemicals in the boiling bath interact with the steel of the firearm, and convert the exterior surface metal of the firearm to Magnetite, which is also known as “black oxide of iron”.  Magnetite provides a deep, rich blackish-blue color to firearms, and is the most common finish used by many firearms manufacturers due to the ease of consistent finishes in large quantities.  I worked with hot tank bluing for many years, and the chemical composition is corrosive as hell and can burn your skin badly if care is not taken, and specialized equipment, burners, and boiling tanks are required to do the job correctly.

Related: SHTF Guns On A Budget

Hot tank bluing provides very good rust resistance that is made better with the application of a good penetrating gun oil.  Its wear resistance is much better than cold blue, but the finish can still wear over time with daily use – just go into any gun shop and take a gander at any well-used hunting-type rifle.  I bet it’s got use and silver bare metal wear on the high-traffic carrying areas areas.  However, since bluing salts react with the carbon in the steel, hot tank bluing cannot be used on most types of stainless steel – and it definitely cannot be used with aluminum.  Aluminum will usually either get eaten away by the salts or react adversely, possibly causing super heated gas “explosions” in the tank that can cause your boiling hot caustic bath to spray everywhere.  Care must also be taken with firearms like double-barreled shotguns that have a rib between the two barrels.  The rib must be vented with drilled holes, or else the air inside the rib can heat and expand, blowing the barrels apart.  But I digress.

Here is a picture of a rare Marlin “Marauder” in .35 Remington that I reblued probably 12 years ago – it has seen Rifle Finishing
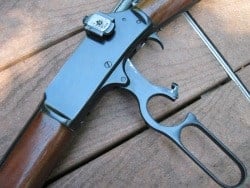
regular hunting use in the Maine woods since then.  The finish is barely worn at the carrying points, showing that hot tank bluing is very attractive durable and when taken care of.

Hot Tank Blue Pros Pros:

  • Provides a beautiful, consistent, deep black finish to steel
  • Long lasting, durable, provides good corrosion resistance – especially when combined with regular maintenance and oiling
  • Pricing to refinish by a professional is usually reasonable
  • Has been used for for decades as the go-to finish for most commercial firearms – so you know it does its job well
  • A great way to go to refinish your steel firearm or if you’re buying new

Hot Tank Blue Cons:

  • Lots of specialized equipment and experience required, large initial investment to get set up to hot tank blue
  • Wears, especially at high points/corners after use
  • Can resist corrosion for time, but if no oil is on the surface of the bluing, it can be compromised quickly by humidity, skin oils and salts, etc.
  • Easily scratched if abrasive contact is made by metal, rocks, sand.

Parkerizing

Parkerizing is a finish commonly encountered on many US military firearms from the immediate pre-World War 2 era through the late 50’s, early 1960’s, I’d guess.  If you’ve seen a WWII era 1911 Colt, Springfield 1903, M1 Carbine, or M1 Garand – even up through the M14/M1A, you’ve seen a parkerized finish.

Parkerizing comes in many forms, but usually involves immersing a steel firearm in a manganese, iron, or zinc phosphate bath.  The bath electrochemically deposits a dark gray coating on the metal that is very tough and useful.  The dark gray can sometimes fade to a green-gray color over time or with the application of certain oils or coatings like Cosmoline.  As a primary finish, parkerizing’s porous surface traps oil beautifully, keeping the firearm from rusting for longer periods of time between maintenance or wipe-downs.

Related: Best Handgun Calibers For Survival

Parkerizing is very commonly used as a base coat for other finishes such as paints or spray-on coatings like DuraCoat or Cerakote, due to its granular surface and phosphates in the finish.  According to Wikipedia, Glock also uses parkerizing over its proprietary Tenifer finish as a tough, matte colored surface coat.  Parkerizing is very durable, and its granular-feeling surface deposit finish can hold oils well, helping to preserve the finish that much more.  If your SHTF gun is parkerized, no need to look any further for a battle-ready, rugged finish – WW2, Korea, and Vietnam proved parkerizing’s ready-to-rumble attributes.

Also Read: Survival Guns – A Beginners Guide

Here is a picture of a Ruger MKI target pistol customized by Angus Arms with lots of goodies including a Clark Parkerizing Gun Coating
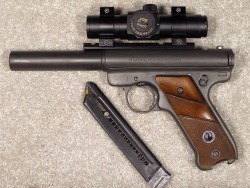
barrel, Ultra Dot red dot, Marvel trigger, and a full parkerized finish.  This finish job ran about $125 or so, according to Angus Arms.

Parkerizing Pros:

  • Attractive, matte low-glare finish
  • Battle-proven durability and long life, especially when maintained and oiled
  • Already the go-to, as-bought finish for many popular SHTF-type guns
  • A fantastic base coat with enhanced “tooth” for spray-on type finishes

Parkerizing cons:

  • A bit of a lost art, fewer and fewer gunsmiths parkerize anymore
  • Can’t be used on aluminum, polymer, and other firearms materials. Steel only.

Sprayed-On Finishes

Over the past ten or so years, sprayed-on finishes  – I’m not talking spray-paint here, by the way – have started to really take the firearms market by storm.  These finishes are a superb way to get colors other than the forever-available blacks, grays, and silvers that have been the norm on guns since firearms were invented.  Though there are many spray-on type finishes to consider, we’re going to look at what are arguably the two most popular: Duracoat and Cerakote.

Duracoat

Duracoat, produced by Lauer Custom Weaponry, is a two-part finish that is comprised of a colored resin and a best diy gun finish
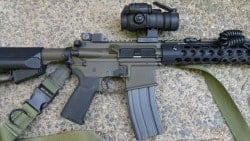
separate hardener.  The two parts are mixed like an epoxy and applied via a spray gun, such as an airbrush (my preferred method) or by HVLP paint guns.  When applied, Duracoat dries to the touch in about 20 minutes, and is fully cured after a few weeks.  However, after drying overnight, you can reassemble your firearms if you’re careful not to scratch the finish.

Duracoat was engineered with the DIY guy/gal at home in mind.  With an airbrush or paint gun, a compressor, some scouring pads and sandpaper, and some acetone, (a respirator, safety glasses, and ventilation is also HEAVILY recommended if you’re spraying indoors), the regular gun guy/gal can apply their own finish with excellent results that are generally easy to attain provided the metal prep work is done properly.  There are also certified Duracoat appliers across the country.

Lauer Custom Weaponry has expanded their product line to offer Duracoat in an aerosol spray-paint can, as well as high-temperature coatings (great for suppressors), camo packs (stencils and Duracoat colors required for specific camouflage patterns), spray-on bluing (I’m interested to see how that works), gun “tattoos” (pre-cut patterns for your gun), as well as many, MANY different color offerings.

Duracoat is permanent, and very tough to remove if it is properly applied.  It has a high elasticity for a finish, allowing it to flex slightly and absorb impacts reasonably well, as well as prevent scratches.  I’ve personally Duracoated many guns, including my personal AR-15, and the finish is very tough once properly cured.  Duracoat is air-cured, meaning you don’t need any special equipment to bake the cure.  This makes it superior for items like optics, or any items with electronics/heat-sensitive components.  According to information I found online, Duracoat resists 100 inch-pounds of direct impact, and has passed a 300 hour salt spray test, which exceeds military requirements for finish.

Duracoat Pros:

  • Relatively easy to apply by the average Joe
  • Very effective at resisting corrosion and mild impacts
  • Has some lubricating properties
  • No expensive special equipment required
  • Much higher on the toughness scale than a rattle-can Krylon finish
  • Huge amounts of attractive color options, plays nice with stencils
  • Can be applied over any metals, plastics, wood.
  • Over 250 colors available, colors can be mixed to make custom colors
  • Banned in NYC – Lauer Custom Weaponry has its own line of “Bloomberg” colors, just to piss off a certain billionaire who thinks he knows how you should run your life.

Duracoat Cons:

  • Susceptible to some solvents like acetone or lacquer thinner
  • Takes a long time to finish curing
  • Not as tough as coatings like Cerakote, but still tougher than most standard firearms finishes

Cerakote

Cerakote is the current king of the hill when it comes to firearms finishes.  A ceramic-polymer compound, it’s specially formulated specifically for high-use, high-abuse-destined firearms.  Several firearms manufacturers offer Cerakote as their standard finish since its wear and lubricating characteristics are excellent.  There are two basic Cerakote offerings: Cerakote “C” are a single-component, air-cure finish.  After it is fully cured, Cerakote “C” will endure temperatures of 1700°F, and and has been tested to withstand 550 hours of salt-spray.  Cerakote “H” is a two-part, thermally cured (heated) system.  The heat levels that Cerakote “H” will withstand are lower (400°) but has been tested for 2,500 hours (!) of salt spray endurance.  Needless to say, Cerakote’s resistance to corrosion is superb.  Cerakote “H” also is practically impervious to solvents like acetone and MEK, and can resist impacts of up to 160 inch-pounds.

Related: 6 Tools To Survive Anything

According to their website, Cerakote now offers over 60 different colors, and can be used with stencils and combines with other colors for camouflage patterns- though I’ve read that Duracoat is a bit easier to use with stencils.

Cerakote requires a bit more attention to surface prep than other spray-on finishes, usually requiring a surface blasting with 120-grit aluminum oxide for a proper rough-up so the finish can properly grab.  Hanging racks and a drying oven are also required for heat curing.  Degreaser soak tank, HVLP spray gun, and a good air compressor for spraying and surface blasting are all required, not to mention the proper eye protection and respirator.  An at-home guy can get set up for Cerakoting, but usually, due to the space and tools required, we leave Cerakoting to the professionals who can finish many guns in one shot.

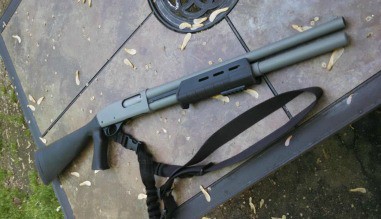
This picture was supplied by Furlong Custom Creations, a local Maine builder/finisher, as an example of cerakoting.
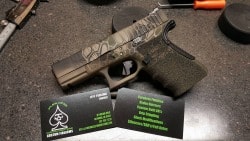
best firearm coating

Cerakote Pros:

  • Tough, tough, tough! Probably the most rugged finish available for your firearm.
  • Impervious to solvents, cleaners
  • Can be applied over metals, polymers, wood
  • Can be used with stencils, camo patterns
  • Over 60 colors to choose from
  • Did I mention it was tough?

Cerakote Cons:

  • Usually needs to be applied by a professional with the appropriate gear; not DIY friendly on a low-quantity basis.
  • Generally expensive to have performed, very labor intensive to do properly
  • Once it has been applied to your gun, best of luck getting it off the gun!

Other Finishes

There are other relative “newcomers” to the finish scene that were originally proprietary to specific firearms, like Sig Sauer’s Nitron finish (actually a DLC – Diamond-Like Carbon– Finish from a company called IonBond…it’s expensive, but extremely hard-wearing), or Glock’s Tenifer and Smith & Wesson’s Melonite – which are the same family of coatings that fall under “Ferritic Nitrocarburizing” or Black Nitride.  I know ATEi is offering Melonite finishes if you’d like to get your steel parts finished in this coating.  Robar’s NP3 is a form of electroless nickel plating that has excellent corrosion and wear resistance, as well as looking pretty cool if you like colors other than black for your gun.  Gun-Kote is another type of spray-on finish that meets or exceeds military and aerospace requirements.

Also Read: 5 Ideas For Fire Tinder

There are many other extremely attractive, rugged finish options out there – and third party finishers are starting to come online to provide these finishes to the general public.  I will hang my head and admit that I’m not terribly familiar with these newer types of gun finishes, so I won’t pretend that I do.  If there is a proprietary coating or finish out there you’ve seen or heard of, the best bet is to do your internet research, talk with people who have that finish on their guns, and call the company who applies the finish, and see what they have to say.  It’s your hard-earned money that you’re plunking down to protect a gun that may well protect you one day, so it’s worth the little bit of extra effort to make sure you get what you want.

Which Do You Choose?

So, there are myriad options out there – which do you choose for your SHTF gun?  Personally, if money was no object, I would gladly bring my firearm to a quality Cerakote finisher – even if you just want a black gun – and plunk down my hard-earned dead presidents, knowing that I’d be giving my gun the most love I could.  Cerakote’s hard-wearing properties and resistance to corrosion really make it a stand-out in the finish world.

However, I’ve personally Duracoated my SHTF guns and couldn’t be happier. I painstakingly prepped the surface to be sprayed, and Duracoat hasn’t let me down in two years.  I’m not a crazy high-volume shooter like many – but I’ll shoot a couple thousand rounds out of my AR, and hunt with it every year.  The only visible damage to the finish has been the end of the brass deflector, where it takes many, many high-velocity empty brass impacts.  I have a Remington 870 I’ve Duracoated as well – and it gets almost zero use, standing vigilant guard as a home defense shotgun.  The 870 receives no maintenance and no oil except for its yearly check-up, and there has been no corrosion, even in high humidity Maine summers in a damp basement.  If I was more the DIY type, I’d go Duracoat and never look back.

As far as the chemical finishes go, I’d look at parkerizing, hot tank bluing, and then cold blue – in that order.  These finishes are excellent to good, but require higher maintenance, especially in high-use and high humidity environments.  I certainly don’t turn my nose up at these finishes – I dearly love a high polish, deep hot tank blue on a classic hunting firearm – but for a SHTF gun that needs to perform in ugly environments, the spray-on finishes are the way to go these day.  That’s my opinion – how about yours?

Photo credits: Drew, Angus Norcross, Jeff Furlong

Survival Cache T-Shirts Now Available

Survivalist T-Shirt


instagram-logo-survivalcache


Support SurvivalCache.com by shopping @ Amazon (Click Here)

Visit Sponsors of SurvivalCache.com


the_survivalist_podcast

Save


from SurvivalCache http://survivalcache.com/best-finishes-for-your-shtf-gun-cerakote-colors-paint-chart-cold-bluing-duracoat-diy/

Saturday 27 August 2016

Protecting a City and Guarding Our Nation

Ethan

Protecting a City and Guarding Our Nation

Ethan Mennen Tells Survival Life What It’s Like to Be a Cop and Army Ranger

Ethan Mennen is a busy guy.

Not only is he a full-time detective for the New York City police department, he also serves as a Lieutenant and instructor in the New York State Army National Guard.

Photo courtesy of Ethan Mennen.

Photo courtesy of Ethan Mennen.

Police Work

nypd police badge                 

Mennen says he joined the police force and, eventually, the military because he was searching for a more fulfilling career after brief stints in television production, advertising and as a pre-school teacher.

“On 9/11 I lived a short distance from the World Trade Center. My roommates and I couldn’t go back to our apartment for about a week afterwards due to no running water,” Mennen said. “Shortly thereafter, I took the NYPD test. I was hired by the NYPD in July of 2003 after about a year and a half of testing. It was my first job in law enforcement.”

Though Mennen has family ties to the NYPD (his paternal grandfather was an NYPD detective from 1939-1954), seeking a career as an officer wasn’t something he planned.

“Becoming a police officer was not something that was a life-long goal. It was just something that happened,” Mennen said. “I took the initial test and then went through over a year of testing. They called me one day and said, ‘If you want to be a police officer, show up on Monday.’ And I did. Once I got on the job, I fell in love with it.”

Mennen began his career in law enforcement as a street cop working the 10th precinct (Manhattan’s Chelsea and Hell’s Kitchen neighborhoods.) But he always had his eyes set on the Intelligence Bureau, knowing how prestigious and well-respected they were in the department. In 2012, that goal was realized when Mennen was accepted to the NYPD Intelligence Unit. In 2014, he was promoted to Detective.

“I loved my time on the street and worked with a great bunch of people. I moved on because I was offered opportunities I couldn’t pass up,” he said.

Photo courtesy of Ethan Mennen.

Photo courtesy of Ethan Mennen.

Though Mennen loves his job, he says it does not come without its hardships. Finding a good balance between work and a personal life is a constant struggle. In recent years, an added burden has been placed on police officers as they find themselves the focus of media scrutiny.

“The last couple years have not been great in terms of how people perceive police officers. There have been times where I hesitated to tell people what I do for a living because I didn’t want them to have a negative first impression of me,” Mennen says.

Mennen believes that much of the criticism leveled at police officers is due to “reporters” on social media taking things out of context.

Tweets by @NYPDnews

“There are people who should not be police officers, but sometimes they get through the hiring process. I do not believe police brutality is the epidemic some people would have you believe. In this age of social media anyone can be an instant reporter. Unfortunately, in many videos, you don’t get the full context of what happened before the camera started. I believe bad cops should be exposed, but you cannot indict the entire profession of policing because of a small number of bad actors,” Mennen said.

Still, he does see some value in the conversations taking place.

“Police officers should be held to a higher standard of behavior. We are the street-level enforcers of the law. Sites like Twitter can provide a great forum for talking about current problems with the institution of law enforcement, but it has to be done responsibly.”

Military Career

NY national guard patch

After seven years on the police force, Mennen was ready to tackle another goal. In 2010, at age 34, Mennen joined the New York State Army National Guard.

Mennen says that his military training was challenging in an entirely different way than being a police officer is, particularly where self-discipline is concerned.

“The Army instilled a sense of discipline that I had never fully developed. Ranger school showed me what is possible when you remove choice from the equation. When you’re in the field in Ranger school, you don’t have the luxury of choice. You know you’re not going to sleep or eat very much, so you stop worrying about those things. Your body adapts and you develop an ability to lead soldiers in the absence of comfort. It proved to me that people are capable of amazing things that they never thought possible. Once choice was removed from the equation, I realized I was capable of things at 35 years old that I never would have even attempted in my early 20’s,” Mennen said.

Though Mennen was older than many of his fellow infantrymen, he says that his age and experience proved to be an advantage and that he was able to look at things through a slightly different lens than his peers.

Tweets by @NationalGuardNY

“I realized that everything our drill sergeants did was for a reason. They really didn’t hate us, they were teaching us through pain. They had to break us down physically and emotionally in order to become good soldiers. Some of the younger guys took it personally and they became angry. I was old enough to know that everything the drill sergeants did had a purpose. That mentality helped me get through all my Army training,” Mennen said.

After completing basic training, Mennen went to Officer Cadet School and commissioned as a Second Lieutenant. He then completed Infantry Officer School. In 2012, he earned the Ranger tab at age 35, then “walked-on” to Airborne School. He has also completed Air Assault School and Mountain Warfare School, and served as an Infantry Platoon Leader and Executive Officer of an Infantry Company.

In January of this year, Mennen became an instructor at the New York State Regional Training Institute Officer Candidate School at Camp Smith in Peekskill, NY.

“My Army experience has helped me in the NYPD. My experience leading soldiers has helped me be a successful Detective. And being a police officer developed my ability to talk to people and read people, which enhances my ability to lead soldiers. Each of my careers complements the other,” Mennen says.

Personal Safety and Self Defense

Naturally, his experience both on the police force and in the army makes Mennen an expert in personal and family protection.

“There are steps you can take to protect yourself from becoming a victim. It mostly has to do with being aware of your surroundings. Trust your instincts. They evolved to keep us safe,” Mennen said.

Tweets by @ethanmennen

He continued, “If you are uncomfortable in a situation, get out of it. If an elevator door opens and you don’t feel safe getting in it because of someone in there, wait for the next one. If someone taps your bumper your first reaction is to pull over and exchange information. Just be aware of your surroundings. Is it dark? Are you alone? Is there someplace you can pull over that has better lighting and more people? If a car not clearly marked as a police car tries to pull you over, drive to a well-lit public area like a gas station parking lot or a restaurant with other people and then pull over. Any cop should understand.”

Here are some more of his tips:

  • If you’re out late at a restaurant or bar, don’t go anywhere alone – not even the bathroom
  • Don’t accept a drink you didn’t see being made
  • If you take a cab home, ask the driver to wait until you get inside your house or building
  • Don’t wait until you are standing at the door to get your keys out of your bag. Have them in your hand before you get out of the car. This will keep you from being vulnerable as you search for them, plus they make a great impromptu weapon if needed.
  • Once inside, make sure the door closes and locks behind you and no one has followed you inside
  • Carry OC spray (also known as pepper spray or mace)
  • Keep the contents of your purse organized so you’re not fishing around for something you need in a hurry
  • Don’t bury your head in your phone while walking
  • Remove your headphones as you approach your door so you can hear if someone is behind you
  • Know where you are (what street you’re on) in case you need to call for help
  • Try to avoid crowded places like diners late at night
  • Drink responsibly – alcohol contributes to a lot of late-night crimes such as assaults and thefts
  • Your mother was right: nothing good happens after midnight

“You learn pretty quickly on this job that you are not going to save the world, but you can make people’s lives a bit better once they have been victimized. And you can try to help them by offering some advice on how to not be a victim in the future,” Mennen said. “When I retire from the NYPD I would like to work to stop either human trafficking or animal abuse. I feel that those two categories of crime deserve more attention than they have gotten in the past.”

To learn more about Ethan Mennen, follow him on Twitter.


At Survival Life, we try to bring you the best and latest survival tips and news. We also want to introduce you to the experts who can help you hone your survival skills, whether you need help with outdoor survival, self defense or anything in between. Check out our previous interview with outdoorsman Inge Solheim to learn about another master survival expert.

And be sure to sign up for our newsletter so you don’t miss anything!


from SurvivalLife http://survivallife.com/ethan-mennen-protecting-a-city-and-guarding-our-nation/