Tuesday 28 February 2017

10 Coconut Oil Survival Uses | Basics For The Savvy Survivalist

In my previous article, 9 Health Benefits of Coconut Oil That You Should Know Now, I talked about the many health benefits of introducing coconut oil into your daily diet. Health benefits of this versatile product include anything from boosting your immune system to fighting inflammation to brain health protection….and much more! Now, I want to focus on coconut oil survival uses as well.

Did you know that there are survival uses for coconut oil? This product is truly beneficial and every survivalist and prepper alike should carry this product in their EDC bag, bug out bag, and in their pantry. One great thing about coconut oil is it does not need refrigeration so it’s the perfect addition to your EDC or bug out bag.

Let’s get started on it’s amazing survival uses!

-This post was originally published on Homesteading.com and has been shared with permission-

10 Coconut Oil Survival Uses | Basics For The Savvy Survivalist

Coconut Oil Survival Uses

Treat Minor Cuts and Abrasions

Coconut oil has antibacterial properties and is perfect for treating minor cuts and abrasions. Apply a thin layer of coconut oil directly to an open wound to prevent infection. Next, cover the wound with an adhesive bandage and you’re good to go!

Heal Cracked Skin and Chapped Lips

If you are suffering symptoms of dehydration, for example, your skin can become cracked and your lips can become severely chapped. Apply coconut oil to cracked skin or chapped lips to keep them moisturized which, in turn, will relieve any pain or discomfort.

10 Coconut Oil Survival Uses | Basics For The Savvy Survivalist

Bug Bite Relief

With nature comes pesky, biting insects! Apply coconut oil directly to insect bites to relieve itching, swelling, and other discomforts. The antibacterial properties of coconut oil will also help heal the insect bites.

Heal Deep Bruising

If you are suffering from deep bruising, apply coconut oil directly to the bruise. Massage into your skin using small circular motions for about 3-4 minutes. This helps heal the damaged tissue associated with deep bruising.

Homemade Salves And Balms

Homemade salves and balms are made with essential oils and a ‘carrier oil’. Coconut oil is an excellent carrier oil. Other great choices for a carrier oil include: jojoba oil, olive oil, rosehip oil, and black seed oil.

Survivalists and homesteaders across the world are making and stockpiling these homemade salves and balms. When SHTF (and before) it’s a great feeling to have an all natural alternative to traditional medicines, which may become obsolete over time during a SHTF situation.

Remove Rust From Knife Blades

Coconut oil is great for removing rust on knife blades. Apply a thick layer (but, not too thick) of coconut oil to your knife blade. Let it sit for 1-2 hours then wipe off. Repeat if necessary.

10 Coconut Oil Survival Uses | Basics For The Savvy Survivalist

Make Candles

Melt coconut oil into liquid form. Next, secure a wick into a glass container. Pour the melted coconut oil into the glass container, making sure the wick stays in place while pouring. Let dry completely and light the wick. Quick and easy!

Soothe Rashes

A coconut oil based salve will relieve the itchiness and redness of a rash. This salve will also promote quicker healing due to the antibacterial and antifungal properties of coconut oil.

Kill Head Lice

Poor sanitation and hygiene after a disaster is to be expected. The downside to that is head lice, for example, will be very common and will spread easily. Coconut oil to the rescue!

Apply warm coconut oil to the scalp and leave in for about 15 mins to kill head lice. You can add a small amount of tea tree oil (about 5 drops) to the coconut oil for better results.

Cure Pink Eye

The antibacterial and antifungal properties of coconut oil make it an excellent remedy for pink eye. Apply coconut oil to a cotton ball and apply across closed eyes. This helps kill the infection and decreases the swelling which, in turn, allows for a much quicker healing process.

**Disclaimer: All content on this site is for informational purposes only. Please read our full disclaimer here.

Do you have any coconut oil survival uses that you would like to share? Tell us in the comment section below.

Up Next: Lactose Survival – How To Do Dairy All By Yourself

Looking to stock up on some coconut oil products? Check out these options:


from SurvivalLife https://survivallife.com/coconut-oil-survival-uses-survival-life/

Lactose Survival – How To Do Dairy All By Yourself

Human beings love dairy. It has been a part of our diet for centuries, and is used in many recipes in many cultures across the globe. Dairy is important to us. In fact, we are actually hardwired to have a weakness for the stuff, genetically programmed to enjoy things like milk and cheese so much they induce a mild opioid effect in the brain. Yeah, you read that right, opioid – we’re literally addicted to the stuff. Casomorphins (protein fragments derived from digesting cheese) are known for their opioid-like effects on the human brain. Cheese addiction is a real thing, and you might be surprised how many of us are affected by it every single day of our lives. So it comes as no surprise that lactose survival may be important in a SHTF scenario. Bear with us on this one.

Lactose Survival – How To Do Dairy

dairy products | Lactose Survival

Could you imagine a world without dairy? No milk for your cookies. Cheeseless pizzas. No butter for your toast. Sounds like hell. A hell that many of us might have to live through someday. Because, consider this: in an extended emergency situation (a plague, nuclear winter, social revolt, etc.) the frivolous parts of life will be the first to go. That is to say, anything not necessary for survival will likely become extremely difficult to come by. Especially if it needs refrigeration…

So what do we do? Continue living like savages in a cheeseless apocalypse? Give up on dairy altogether and just relinquish lasagna and ice cream to history? No! I won’t stand for it. And neither should you.

(Unless you are lactose intolerant, in which case you don’t particularly care – but I urge you to KEEP READING. Because, even if you hate everything dairy with all the fibers of your being, there is still an advantage to knowing what I’m about to divulge. Because dairy products might have a lot of economic potential in a post-order world, a lot of capital weight, if you will.)

Unfortunately, the art of dairy is not so easily mastered. Artisan cheese makers and experienced dairy farmers spend years learning and perfecting their trade. Just like any other exercise, practice makes perfect, and you’ll never master anything from reading just a single online article. Things like this take time to get the hang of, and you will probably fail a number of times before you ever experience the creamy taste of success.

That is not to say you shouldn’t understand the basic concepts behind making dairy products. Because, years from now if SHTF and you have to retreat to and live within the wilderness, understanding the basic concepts of making dairy might enable you to become the lactose king-pin of your region. So read on, study up, and try to remember what you learn – it may change your life someday.

How (and What) to Milk

All things dairy start with milk. Now, it doesn’t really matter what you get your milk from so long as it’s fresh when you get it. That means cows, sheep, deer, mares, goats and any other mammal are all viable sources. Which is bizarre and makes you really realize how freaky it is that we collect and consume and enjoy the mother’s milk of different animal species. No other creature on Earth does that… But put that strange thought in the back of your mind, cover it up and forget about it.  Just note that different animals produce different tasting milks, which will produce different tasting creams and cheeses.

Whatever you find yourself milking, the concept behind the practice is the same. Pardon me if this next bit gets weird, but that’s the nature of dairy.

  1. First, get a female mammal.
  2. Wash your hands.
  3. Locate the mammal’s teat and give it a good wash too (on a cow this is the udder, it is different on other animals but I’m sure you can figure that out on your own).
  4. Snap on your latex gloves (if you’ve got some) and grab hold, gently but firmly of the teat.
  5. Express milk from the teats into a container, making sure you milk each teat evenly.
  6. Ideally, disinfect the teats when finished. But if you don’t have any teat disinfectant laying around, soft soap and water should do.

And you’re done! You’ve got a container full of mammal milk and you are ready to move along to the next step.

The Next Step: Making Dairy Products

cheesemaking | Lactose Survival

Cheese

  1. Start with fresh, warm milk.
  2. Acidify the milk: this is the first decision you have to make. Because there are two distinct ways to acidify milk and they both produce different types of cheese. You could use direct acidification and pour vinegar or citric acid directly into the milk – this will result in cheeses like ricotta and mascarpone. Or you could use cultures or bacteria, to acidify the milk – these cultures will eat up the lactose in the milk and produce lactic acid.
  3. Add a coagulant: Coagulate is a funny word – it means, “to change to a solid or semi-solid state”. Which is the next thing you need to achieve in your cheese making endeavors. Coagulants can be a number of things, it just needs to have the enzyme “rennet” in it. This can come from within animal stomachs, it can come from the sap of fig trees or milk thistle, or it can come from fungi. You have a number of options here, and while it may seem gross to add the inner mucosa of the fourth stomach chamber of young mammals to your cheese, it is how things need to be done. I’d prefer using fig tree sap, but alas, I do not know where to find fig trees…
  4. Give it time to congeal. Test the “doneness” by pressing a clean hand against the curd. When it has transformed from a liquid into a gel, it is ready.
  5. Cut the curd down from one gigantic blob into a number of smaller cubes using a knife. The smaller you make these cubes the drier, and more ageable your cheese will end up. So if you want a very dry cheese that will last a very long time, make a bunch of very fine cubes.
  6. Stir the curds in the vat for up to an hour. Gently heat the vat as you do so. The longer you stir the drier your cheese will be
  7. Drain the curds with cheesecloth. Use the porous fabric to strain the cheese of the liquid that has separated from the curds. Let them drain over a colander or sink for 10 minutes and then press the curds to force out any excess fluid.
  8. Start extracting cheese chunks from the vat. This step is somewhat time sensitive because if you move too slowly the cheese will cool and won’t dry into a wheel properly, likely falling apart. Press the still-warm cheese into wheels (or whatever shape you feel like).
  9. When the curds have been separated from the whey, you can add salt. At this point you can either choose to eat the cheese right away, or save it to age it.

Cultured Dairy

Cultured dairy produces things like yogurt, cottage cheese and sour cream. Dairies that are cultured are some of my favorites and often contain a lot of probiotics, so knowing how to make these is healthy knowledge.

  • Yogurt: This dairy product is relatively unique from other cultured dairy products because it requires a constant source of heat to culture. Culturing is achieved by adding heat and a number of different lactic acid producing thermophilic bacteria – like lactobacillus bulgaricus. Add the starter culture and keep a constant source of heat on the yogurt.
  • Cottage cheese:
    • Start with raw milk and scrape the cream off the top with a turkey baster (or something similar) and save it in a jar in a cool place for later.
    • Pour the skimmed milk into a container and cover with a cheesecloth. Leave this to sit for about 2 days, or until it has achieved a jello-like consistency and there is no watery whey on top. The culture should exhibit signs of whey and curd separation.
    • Skim off any leftover cream.
    • Take the thickened milk and dump it into a large pot. Put it on a low heat for 5-10 minutes until you can actually see the curds and whey separating.
    • Find a bowl and place a CLEAN dishcloth over it, pour the curds onto the cloth and allow them to strain for up to 5 hours.
    • When finished, take curds off of the cloth and place into a bowl. Add salt to taste, and pour ¼ of the leftover cream over the top and mix well.

melting butter | Lactose Survival

Butter

Ohhhh, ho ho, butter. If dog’s weren’t already man’s best friend, you surely would be. Butter goes well with just about everything, and is one of the greatest treats one can have in a survival situation. Here is a quick version of the old churning method:

  1. Scrape the cream off the top of fresh milk and pour it into a jar, which you can screw a lid onto.
  2. Shake the jar vigorously until butter starts to form from the cream into a soft lump, separated from the liquid buttermilk.
  3. Pour the contents into a fine mesh strainer to get rid of the unwanted buttermilk. You will be left with solid butter, which can be salted to taste and refrigerated for later use.

A Dairy Economy

Today if you want milk or butter or ice cream or cheese you just go to the grocery store and buy it. But that kind of easy access to dairy won’t always be so readily available to us. If things start to go really south to the point where electricity is out for extended periods of time, or to the point where grocery delivery trucks stop delivering, or dairy farmers stop farming dairy, dairy products are going to become a rarity. Their value will elevate to become an exceptionally precious resource for trade and cooperation. And they taste good, which is also very nice.

Maybe someday you become the dairy tycoon of a post-apocalyptic world. Maybe not. Either way, understanding how to make something humans have such a severe weakness for is valuable knowledge. So know how to do dairy. It isn’t rocket science, humans have been doing it for thousands of years with less equipment and technology than you’ll probably ever have.

That isn’t to say it’s easy. Making dairy products like those described above all on your own will be an endeavor of trial and error and effort – just like anything worthwhile. But mastering the art of dairy will feed the dairy addiction within you and those around you. And who knows, maybe you use it to become the post-apocalyptic champion of cheese commerce. What more could anyone really want?

Up Next: Emergency Survival Kit From Everyday Household Items

Did you enjoy our post on Lactose Survival? Let us know in the comment section below!

For awesome survival gear you can’t make at home, check out the Survival Life Store!

Check out Lactose Survival - How To Do Dairy All By Yourself at https://survivallife.com/lactose-survival/

Looking for some basic cheese making supplies? Check out these options:


from SurvivalLife https://survivallife.com/lactose-survival/

Emergency Survival Kit From Everyday Household Items

Monday 27 February 2017

Roadside Emergency Kit You Need In Your Vehicle

Your Survival Library

survival_library_books

wilderness_book_survival_educateWe all know that knowledge is power; but when it really comes down to an emergency, the right kind of knowledge could be the difference between life and death. We take a look at some of the best survival books for your library or Kindle. The books in this collection were chosen because they truly make life easier. Why make stupid mistakes when you can learn from the mistakes from others?

By Alex Coyne, a contributing author of Survival Cache & SHTFBlog

The books on this list serve as a cornerstone of good survival habits and practices. Any competent survivalist will understand the information conveyed in these materials.

The Ultimate Guide to Wilderness Living

Also known as the Naked Wilderness Survival Guide, this book’s slightly longer title tells you every you need to know about it: Surviving with nothing but your bare hands and what you find in the woods. John and Geri McPherson are well-known in survivalist circles, and have been instructing people in the art of wilderness survival for decades.

Read Also: Survival Books for Your Bunker

Fire Skills: Methods for Starting Fires Without Matches

A collaborative project by David and Victoria Aman, this book teaches you more about how to make fire in the field – fire is one of the most primitive human skills, and in a situation where you’re fighting for survival, knowing how to make, use, and control fire will be one of your most critical skills.

A Field Guide to Western Medicinal Plants and Herbs

This one’s part of the Peterson Field Guide series; check out the rest if you want to broaden your nature library. This one applies to western medicinal plants and herbs: What you’ll encounter in the wild and what to do with it. Knowledge of plants, it goes without saying, is essential if you don’t want to die from eating or applying the wrong thing.

The Complete Book of Knots

By Geoffrey Budworth, this book really is the complete book of knots. Knot-making can get you out of a lot of tight situations: You might need to tie together a knot to keep your gear or shelter in one place, and that’s just two examples. Knots are useful. Learn how.

First-Aid WikiBooks

WikiBooks is a great resource for information, and this one is specifically geared towards basic First-Aid. You won’t find much of survival info in here, but at the end of reading this one you should know what to do in a medical emergency at the very least, which makes it worth a look.

Related: 3 Types of Books you Should Read and Why

The American Red Cross First-Aid and Safety Handbook

First-Aid is vital, so here’s another take on the First-Aid straight from the American Red Cross. You know the information you’re getting in here is accurate, so make sure you’ve got this one standing on your bookshelf, or hanging around on your Kindle device.

US Air Force Survival Handbook

Also known as The Portable and Essential Guide to Staying Alive, the US Air Force Survival Handbook is surprisingly available for order off of Amazon. Get your copy and learn how to stay alive from the experts.

The Complete Survival Shelters Handbook

survival_book_complete_survival_shelters_handbookBy Anthonio Akkermans, The Complete Survival Shelters Handbook contains guides on how to build shelters for almost any environment and climate using materials you’ll find around you in such a situation.  According to the book’s description, you can expect to find out more about everything from a Yurt to a Debris Hut and Scandinavian Lavvu. In any survival situation, crafting adequate shelter is crucial. Having multiple ways to construct shelter is A worthy inclusion to anyone’s library!

The Bushcraft Field Guide to Trapping, Gathering and Cooking in the Wild

Food: Even outside of a survival situation, you’re screwed without it. Here’s the field guide to trapping, gathering and cooking in the wild. It goes without saying that you shouldn’t take this one on the road if you’re just planning a camping trip at a nearby game reserve; that being said, it’s essential info for the serious survivalist.

A Field Guide to Edible Wild Plants: Eastern and Central North America

This one is also part of the Peterson Field Guide series – see, we told you to go look! This one is geared towards Eastern and Central North America. Even if travelling there isn’t in your plans, familiarize yourself with the area’s plants and their uses. As we all know, survival situations rarely stick to a plan.

Survive! Essential Skills and Tactics to Get You Out of Anywhere – Alive

Written by the guy behind the TV show Survivalman, this book comes highly recommended by many survival experts. The book promises a no-BS look at survival, and that’s pretty much exactly what you get. It covers everything from shelters to survival kits as well as “why the notion of hunting and tracking large game is largely a pipe dream” in a wilderness situation.

The Ultimate Survival Manual: 333 Skills That Will Get You Out Alive

The Ultimate Survival Manual is certainly comprehensive; the book offers a run-down of skills that you absolutely cannot afford to be without.

The US Army Survival Manual

Know the ins and outs of survival like a real soldier: It could be the difference between life and death.  This one goes well with the US Air Force Manual (recommended further up), and it teaches you not only what to do in a survival situation, but how to prepare yourself for anything you might encounter mentally. Things like first-aid and health are also covered at length.

Bushcraft 101: A Field Guide to the Art of Wilderness Survival

Dave Canterbury is well-known in survival circles, and there are a couple books that add to the Bushcraft series: This is only one of them, and focuses purely on the art of survival in the wilderness. Also take a look at Advanced Bush Craft once you’ve read your way through the rest.

Visit Sponsors of SurvivalCache.com

300-x-250-hope-for-the-best


the_survivalist_podcast

Save

Save

Save

Save


from SurvivalCache http://survivalcache.com/your-survival-library-field-manuals-top-survival-books/

Sunday 26 February 2017

Do You Have A Ferro Rod In Your Survival Kit? Here Are 9 Reasons You Should!

We all agree that being able to start a fire during any emergency situation is imperative. A fire can help to provide nourishment, warmth, security, illumination, rescue, serenity and a plethora of other viable benefits. But just like any other skill, fire building must be continuously practiced. Read on to learn why a ferro rod is a must!

You may have to build a fire in a wet environment, which will be a completely different experience than fire building in a dry climate. You may need to build a large teepee fire for signaling or to build a simple crossfire if the mission is food preparation. These are just a couple of the scenarios that you may encounter when emergency and survival scenarios occur.

Why You Need A Ferro Rod In Your Survival Kit

You need to be flexible and experienced in as many fire building techniques as possible. The more options and skills that you possess, the better that you will fare when SHTF. You may not only need to produce for yourself, but also for your loved ones.

Failure is NOT an option.

There are three critical components to a fire…and if one of them is taken away, you will no longer have a fire. Those 3 components are:

  1. Ignition Source
  2. Oxygen
  3. Fuel

For the purpose of this post, I would like to focus on #1, the ignition source. If you think about it… We actually need a “fire” to start a fire. Luckily, there are many ways to accomplish this. These are just some of the options we can use to start a fire:

  • A Lighter (Zippo, Bic, etc.)
  • Battery & Steel Wool
  • Bow & Drill
  • Natural Flint & Steel
  • Magnifying Glass
  • Matches
  • Ferrocerium (Ferro Rod)

I have started countless fires with each of the options listed above. My go to igniter is a Bic lighter but if I had to pick just one ignition source for any SHTF scenario… It would have to be a ferro rod.

Do You Have A Ferro Rod In Your Survival Kit? You Should!

There seems to be an ongoing debate on which fire igniting source is the best. Some may choose a Bic lighter while others prefer the ferro rod. I have to admit that I carry various Bic lighters in my go bags. Their convenience, lightweight, and ease of use make its simplicity very desirable for fire starting. But if you -held me to the fire- and I had to pick just one fire starting tool as I headed off to “zombieland”… It would have to be a quality ferro rod.

What I would like to share with you are my 9 reasons why a ferro rod should be included in everyone’s survival kit:

1. Durability:

Ferro rods are composed of mainly Iron, lanthanum and cerium. For convenience, there is usually a handle attached to the ferro rod made of wood, plastic or other material. When this rod is scraped with a piece of steel, the sparks that are sent to your bundle of tinder can reach temperatures in excess of 5,430F (°3000C). This is possible because of the oxidation that occurs during the scraping or striking process.

Ferro rods also have a long lifespan. I have ferro rods that can be struck up to 12,000 times. I also have “beefier” ½” ferro rods that can be struck over 20,000 times. Keep in mind that it will be difficult to get your first strike to start your tinder; Multiple strikes are usually needed. But with some good practice, you can get your tinder started in 3 strikes or less.

Do You Have A Ferro Rod In Your Survival Kit? You Should!

Since the ferro rod is constructed of alloy materials, it makes it quite durable. It is a piece of gear that you can place in your pack and forget about it. There are no moving parts to concern yourself with and there is no fear of rendering it unserviceable from various tumbles you or your gear may take. It doesn’t require any special containers or housing like my lighters and matches do. I keep one strapped to the molle setup inside of my pack and it is always ready when I need it.

2. Weatherproof:

A ferro rod will work in virtually any weather situation. It can be soaked from the rain or it can be stuck in the mud. Just wipe it down, scrape it with some steel and you have seriously hot sparks flying at your tinder.

I also prefer my ferro rod in windy conditions. Matches and lighters tend to not bode very well in the wind. But a ferro rod will place hot molten metal on whatever tinder that you are trying to ignite, even in the wind.

Do You Have A Ferro Rod In Your Survival Kit? You Should!

If you are in snow or other freezing conditions, your ferro rod will still operate flawlessly. Keep in mind that the same principles apply to tinder regardless of your ignition source. If your tinder isn’t good to go, it really doesn’t matter what you are using as a starter.

Tinder Isn’t weatherproof… That’s an obvious statement but some still have trouble grasping it. Just realize that by having a tool that can send “fire” or sparks in any weather condition is only half the battle. You need to have dry tinder, kept away from the elements, in order to have a good chance of getting your fire started. Sending countless sparks into wet or damp tinder will only waste your ferro rod or lighter for that matter.

3. Dependability:

The fact that the ferro rod is weatherproof and durable makes it a tool that you can depend on. I have had countless lighters break on me over the years. I have also gotten my matches soaked from downpours, spilled drinks and taking the occasional swim without fully clearing out my pockets.

Granted, these were all in recreational scenarios but my lighters and matches didn’t know that we were just having fun. So if those instances rendered my ignitors useless… what would make me think that they would function differently in an emergency situation?

Do You Have A Ferro Rod In Your Survival Kit? You Should!

Knowing that I have a fire starting method that I can depend on gives me greater peace of mind. This mindset is not only for SHTF situations but also while I am out in a recreational or work related capacity.

4. Convenient:

Ferro rods are very convenient. They are streamlined, compact and lightweight. Many quality ferro rods even come with a steel scraping tool. These steel tools have a 90 degree edge that is ideal for sending the sparks to a targeted location. Some of my ferro rod scrapers even have additional features such as a small ruler, flathead screwdriver, paracord lanyard attachment, bottle opener and a can opener. Those can be useful tools in a pinch.

In a cold environment, it is extremely convenient not having to shed my gloves in order to strike my lighter. Usually in the colder, freezing situations, a lighter tends to not work well causing multiple strikes to be needed. When my hands are frozen and nearly frostbitten… That is not something that I would enjoy – EVER AGAIN! 😉

Do You Have A Ferro Rod In Your Survival Kit? You Should!

I have other ferro rods that come in the form of a necklace. They are not only cool looking jewelry, if that is your preference, but they also work like a charm! They are a bit trickier to operate but with the right amount of practice, they function really well.

5. Can Travel On A Plane:

When I travel overseas I keep a ferro rod necklace in my Airport Go Bag. It basically looks like a keychain strapped to the interior of my pack. After countless miles in the air, I have yet to be questioned by security about my ferro rod. Unfortunately, that is something that will never happen with my lighters and or matches. They would have to be discarded way before I ever contemplate entering the plane. Damn Shoe-bomber…

Do You Have A Ferro Rod In Your Survival Kit? You Should!

I don’t anticipate a Tom Hanks Castaway moment in my flight travel plans, but we are either prepared or we are not. If I can add an extra measure of security for that – just in case moment- then I’m all in!

6. Inexpensive:

Ferro rods are relatively inexpensive for what you get. Since so many have jumped on the “survival bandwagon” as of late, there seems to be new options being offered on the market almost daily. I mentioned necklaces earlier but you can find them contained in various paracord devices and many other gadgets.

Since there is more popularity and manufacturers, there is more competition in the marketplace. What that means to us is cheaper prices!

Do You Have A Ferro Rod In Your Survival Kit? You Should!

I have quality fire starters that cost me less than $9. My ½” thick ferro rod was just under $20 and will probably outlast my lifespan. As far as blowing your budget, it’s definitely not a factor when it comes to ferro rods.

7. Versatile:

Ferro rods work great for getting your tinder bundle started but it also comes in handy for igniting other sources. Backpacking stoves can be annoying at times to ignite. The angle on which these stoves need to be lit can be awkward on some models. Being able to spray some sparks from the ferro rod can be quite effective for getting these portable stoves lit.

Do You Have A Ferro Rod In Your Survival Kit? You Should!

I use my ferro rods to get my backyard firepit going. I also use them for igniting my wood burning grill. It makes it convenient for me on windy days but also gives me the continual practice needed to hone in and maintain the skill. Take any opportunity that you can to practice. Once you become more proficient with your ferro rod, you will find yourself using it a lot more.

8. Can Be Used In High Altitudes:

I can refer back to my cigarette smoking days for this one… While training at the Mountain Warfare Training Center as an active duty United States Marine, we were training at over 10,000 feet in elevation for over a month. When we tried to use our Bic lighters to light our cigarettes, there always seemed to be an issue. We had to resort to matches to get our “fix” in while the Smoking Lantern was on.

Do You Have A Ferro Rod In Your Survival Kit? You Should!

Now, I’m not suggesting to light your cigarette or cigar with a ferro rod. I am giving an example of why I’d prefer my ferro rod over my Bic lighter if I had to fire build in high elevation. A spark from a ferro rod will have the same intensity, regardless of the elevation.

9. Gives You The Bushcraft Feel:

I have to admit that starting a fire with a ferro rod certainly has that…cool factor. There is a degree of skill required to operate the ferro rod as opposed to just, striking the wheel on a Bic. It brings a bit of the bushcraft feel to the fire building experience. It’s not the same as starting it with a bow and drill but still cool nonetheless.

Do You Have A Ferro Rod In Your Survival Kit? You Should!

When I hand out ferro rods to my Boy Scout troop members, the excitement is almost instant. I see some of them become a bit nervous but that is a temporary effect. Once they learn to move the ferro rod, not the actual scraping tool… And get that tinder bundle going, they walk away from the experience looking as if they had just won the lottery.

Bottom Line:

It is always best to be redundant and carry various ignition sources. Just like most things in life, balance is key. If you can carry a Bic lighter, waterproof matches and a quality ferro rod… Then you are definitely good to go.

We never want to make things more difficult than we have to. This statement expands exponentially in an emergency scenario. Expand your skills and options whenever possible. Store as many ignition sources as you can for emergency use. If you are not familiar with a ferro rod, get one and start practicing. Get your family involved and practice together. You may need to rely on them for fire building in an emergency.

Right now we have the ability to choose our preferred methods and options. When SHTF… We may not be so fortunate.

Up Next: Review of the Ãœberleben Leicht Ferro Rod Necklace

For awesome survival gear you can’t make at home, check out the Survival Life Store!

Check out Do You Have A Ferro Rod In Your Survival Kit? Here Are 9 Reasons You Should! at https://survivallife.com/ferro-rod-survival-kit/

In need of a few other sire starting products? Check out these options:


from SurvivalLife https://survivallife.com/ferro-rod-survival-kit/

Saturday 25 February 2017

Wilderness Emergency Medicine | In-The-Field First Aid In A Pinch

It is difficult to characterize the importance of knowing first aid protocol. It’s like knowing how to run emergency auto repairs – except instead of cars and motorcycles, you’re working on human bodies. Potentially the bodies of your friends and family and perhaps even yourself. And since we are constantly piloting our bodies, understanding how to repair, maintain, and transport broken or compromised human beings is vital knowledge. Therefore, a working knowledge of wilderness emergency medicine is a must.

Wilderness Emergency Medicine

Paramedics, firefighters and doctors won’t always be at the ready, waiting to swoop in and take care of medical crisis on a moment’s notice. Maybe because you are out in the wilderness backpacking with some friends or backcountry skiing. Maybe because a nuclear winter has shut down all federal emergency services.

Whatever the reason, it is more than likely that at some point, you will find yourself in a situation where you need to know some medical basics. Even the most basic, rudimentary knowledge can make the difference between life and death. Of course, the more advanced your understanding and knowledge, the safer you and those around you will be.

Wilderness Emergency Medicine | In-The-Field First Aid In A Pinch medical supplies

What follows is a very fundamental first aid guide – BUT BE WARNED: by no means is this a substitute for an actual, legitimate first aid course, CPR class, wilderness first aid course, EMT certification, or medical degree. There is a lot of good information in here, but not nearly enough to qualify you as an expert.

*Disclaimer: All content on this site is for informational purposes only. Please read our full disclaimer here.

Safety First

This is sort of an obligatory opening note, but an important one nonetheless: prevention is the best solution. By keeping yourself and those around you safe and out of harm’s way, you avoid the need to use any emergency medical knowledge. Of course, it is still a very useful skillset, but it’s one of those things you hope you never have to actually use – like a fire extinguisher, or earthquake insurance.

Anyway, the point is, stay as safe as possible and you’ll minimize medical emergencies. But unfortunately, shit happens. And it isn’t possible to stay safe all the time, nor would it be agreeable – danger can be fun (in moderation), knowing how to deal with the consequences of danger is the real trick.

Primary Survey and Patient Assessment

This is the first step in addressing any medical situation. Survey and assess. When you come across an emergency, whether it is your friend who trips and breaks her wrist, or a stranger passed out in the woods, you must always check and make sure that the scene is safe. You don’t want to go rushing into harm’s way yourself just to help someone else out. Make sure everything is safe before approaching the scene.

Identify what the problem is if you can. What created the danger? Is the injury life threatening? In order to answer these questions you are going to have to recognize which of the 3 main body systems is being affected:

  • Nervous System – What is their level of consciousness, responsiveness? Is there a mechanism for a spinal injury?
  • Circulatory System – Do they have a pulse?
  • Respiratory system – Are the breathing? How quickly? How deeply?

If you perceive the injury at hand to be life threatening, stabilize the system and do what you can for extraction and/or evacuation. If, however, you do not perceive the injury to be life threatening, move on to a secondary assessment and evaluate patient’s:

  • Blood pressure
  • Lung sounds
  • Pupil dilation

Wounds

Be able to identify low risk wounds from high risk wounds. Wound contamination, crushing wounds, animal bites and open joint spaces are all examples of high risk wounds, whereas a low risk wound might be something like a lacerated finger.

Initiate treatment by controlling the bleeding with strategic and direct applied pressure. Clean the wound as best you can, removing debris and rinsing with saline or clean water. Maintaining pressure, disinfect and bandage the wound to the best of your ability with clean bandages or gauze. Replace the bandages when they start to become dirty to minimize risk of infection, and to speed up the healing process.

Broken Bones

Breaks come in all different shapes and severities. Some are so minor you won’t even notice them – did you know people break their toes multiple times a year without ever realizing it? Other breaks are more conspicuous, and can look absolutely horrifying. So the first step in dealing with a broken bone is to discern how bad it is… Here are a few indicators that it is a very serious bad break:

  • The broken bone is either the spine, pelvis or a femur.
  • The fracture is open – meaning that you can see the bone protruding from the skin.
  • You can visibly see bones are unstable – bent, of track, hanging.

For a stable broken injury, splint and use the R.I.C.E. treatment: Rest, Ice, Compression, and Elevation.

For unstable injuries, use gentle traction to pull the broken limb into position and then splint it in place. This will hold the broken bone from moving around, and allow it to heal at the proper angle. If the injury is still unusable and unstable, do what you can to evacuate the patient.

Burns

Some burns are shallow and others are deep – needless to say, the deep ones are the ones you really need to be worried about. When examining a burn, you must first try and evaluate the depth, extent, and whether any high risk areas were burned (genitals, face/neck, or palms/soles of feet). Cool the burn with cool water or ice and protect it with a cool, wet, clean bandage. Continue to cool the injury and replace bandage as necessary.

Wilderness Emergency Medicine | In-The-Field First Aid In A Pinch burn

Hypothermia

The big thing to be able to identify. Here is the difference between mild and severe hypothermia:

  • Symptoms of Mild Hypothermia: shivering, dizziness, increased heart rate, fatigue, lack of coordination, trouble speaking, faster breathing, and nausea
  • Symptoms of Severe Hypothermia: NO shivering (severely hypothermic patients won’t shiver), weak pulse, shallow breath, clumsiness and lack of coordination, slurred speech/mumbling, and drowsiness and low energy.

To treat a patient suffering from mild hypothermia, give them oral fluids like water, orange juice, or tea. Give them food for calories (and thereby interior heat). And protect them as best you can from the environment – this might mean wrapping them in blankets and moving them closer to the fire, or building an ice cave to escape freezing winds.

Severe hypothermia is very dangerous. Patients must be wrapped in insulation as best as possible to prevent further heat loss (space blankets are the best material for this, but anything will do in a pinch). Handle the patient very carefully, and begin extraction – without appropriate professional treatment death is a high possibility. So act fast.

Heat Illness

In really hot climates, people suffer from heat exhaustion and dehydration all the time – especially when they are doing something strenuous like hiking or building something. The important thing to do first, is administer fluids and electrolytes (a bottle of powerade or gatorade is perfect for this, but plain old water will do just fine.) Do what you can to cool the person down with external fluids and shade. If the problem progresses to heat stroke, treat with immediate and very aggressive cooling and work on an evacuation plan.

Allergic Reactions/Anaphylaxis

Allergic reactions can be really mundane, really un-worrisome – but they can also spell near-instantaneous death. Local, non-serious allergic reactions can be treated with cool compression, and topical allergy cream. If the reaction is mild, try oral allergy medication. And if it escalates to anaphylaxis (symptoms: Trouble breathing, tight throat, hives and swelling, nausea, abdominal pain, diarrhea, dizziness, fainting, low-blood pressure, rapid heart beat, feelings of doom, cardiac arrest) you should administer epinephrine (AKA an epi-pen) and oral allergy medications.

Wilderness Emergency Medicine | In-The-Field First Aid In A Pinch allergic reaction

The First Aid Kit

First aid kits are man’s medical best friends. I keep one in my backpacking backpack, my car, my kitchen, my bug-out-bag, and even in my desk. Not every first aid kit has to be totally comprehensive – most of mine are just your basic disinfectants, antibiotic creams, bandages, gauze, etc. that come in the first aid kit’s you’ll find at Wal-Mart or Target.

But having one really good, really refined first aid or medical kit is essential. The generic ones are great, but they leave a lot to be desired – especially on the personal front. I recommend building your own medical/first-aid kit from scratch so you can tailor the size, scope, and details to fit you and your loved ones. Include your personal prescription meds, epinephrine if you have allergies, extra of your prescription glasses, special medical notes or reminders, personal vitamins, whatever! Just make sure that you have at least one medical bag that is extensive and personalized.

Keep in mind that this is the first line of defense in any medical situation. If you are caught out in the wilderness without a first aid kit on hand and have to deal with an emergency, you will be in  a very tricky spot. That is where improvised medicine comes into play – which is a dangerous game. Better to just be prepared in the first place and keep a good, reliable medical/first-aid kit on hand.

Unaided First Aid

None of us ever want to find ourselves in a situation where we are dealing with a serious medical emergency. Because that likely means either you or someone close to you got hurt – and even if it doesn’t, it means you have to deal with helping a stranger through a medical situation. It’s never a good time.

But understanding basic medical concepts, principles and technique can be the difference between life and death. Knowing first aid, and understanding how to treat injuries and evacuate patients from bad scenarios is an invaluable skill.

But, as mentioned, this article is by no means a substitute for a real first aid course, but at least it serves to offer a general overview of what you can do in the face of a medical emergency. And if there is no one else around to help, no cops, no firemen, no EMT’s or paramedics, then you are the primary caregiver. You are responsible for treating and caring for your patient.

Up Next: Unusual Weapons From Around The World And How To Use Them

For awesome survival gear you can’t make at home, check out the Survival Life Store!

Check out Wilderness Emergency Medicine | In-The-Field First Aid In A Pinch at https://survivallife.com/wilderness-emergency-medicine/

If you’re looking for other wilderness emergency medicine products, check out these options:


from SurvivalLife https://survivallife.com/wilderness-emergency-medicine/

Friday 24 February 2017

Unusual Weapons From Around The World And How To Use Them

Weapons are my business – you name it and I’ve seen it, or used it or seen it used. Much of my life has been spent familiarizing myself with such tools of destruction: bombs, guns, knives, projectiles and blades of all kinds, bashers, bangers, swatters, whips, clubs, flames… If it serves to destroy, I probably know about it. It’s an evil specialty, but a decisive one – one that has saved my dastardly ass on multiple occasions. As such, I shouldn’t have been surprised when I was approached and asked to write this article on unusual weapons. I should have seen it coming. At first I refused – what if this deadly, dark information got into the wrong hands? What if this guide served to enable evil and enact terror?

Well, it still may. I’ve come to terms with that. The way I see it: if I didn’t write it, someone else would, and better the resident expert of deadly devices write an article on strange and obscure weapons than some chump who doesn’t know half about the subject. Right?

Right. So I accepted, begrudgingly, and here I am: writing a guide for anonymous masses of the Internet, about odd, unusual weapons and how to use them. Perhaps I have too much faith in you people. Regardless, at this point, all I can do is implore you to use this knowledge for good instead of evil. Refrain from engaging in any tonfa whooping sprees, or katar massacres as best you can. Such aggressive endeavors are severely frowned upon, and I don’t want any part in them.

With that in mind, let’s dive in.

Unusual Weapons and how to Use Them

The Weapons

If you have ever watched someone twirling a pair of nun chucks – swinging them in rapid orbits that twist and spin around their waist, arms and hands like rings of death – you might have wondered: how in the hell do those things work? You aren’t alone. Nun chucks, and other weapons of similar strangeness, have been confusing people for centuries. Most people are honestly more likely to hurt themselves using such tools, as they are to injure their assailants.

But that is what this article is here to address. Obviously, you won’t be mastering anything just from reading a paragraph about the weapon – many of these take years to successfully learn to use, so if you find yourself struggling to get the hang of Kpinga throwing, don’t get too down on your luck. Practice makes perfect.

nun chucks | Unusual Weapons and How to Use Them

Nun chucks:

These are the classic martial arts movie weapons, made famous by fighters like Bruce Lee, who was a true master of nun chucks. The weapon itself is relatively simple: two wooden handles connected by a string or chain. By whipping the nun chucks in half and full circle swings you can turn yourself into an unapproachable wielder of pain. And they are painful. Being struck with a real pair of hardwood nun chucks is enough to drop a full-grown man to his ass. They come in a variety of sizes and shapes, colors and styles, but generally the simpler the design, the better.

Nun chucks are supposed to be gripped high up, close to the chain/string that links the two handles together. The first basic strike taught to most students is to hold one handle in your hand, and the other in your armpit, flick the nun chuck out of your armpit with a quick jerk of the wrist. The handle held beneath your arm should flip out and downwards in an arc that will whip the nun chuck back up and into your armpit – essentially reloading with every strike. I wouldn’t recommend getting too much fancier than that, lest the inexperienced nun chucker injure themselves. Here is a good video that covers more technical ways to use nun chucks.

Tonfa:

You might recognize the shape of this club-like weapon, because the modern police baton looks very similar. Police adopted the handle club because of its versatility and utility – it can be used as a restraint, a club, a prod, extended reach, a strong block or amplified striker.

There are a few basic strikes with tonfa, the first of which is to hold the handle loosely and swing the tonfa downwards in a big semi-circle so that the long end whips downwards like a club, striking your target and returning to your arm. Another is to simply hold the grip, and straight punch. The extra inch or two of wood makes any strike hurt a lot more. Here is a guide to some more basic tonfa strikes. Tonfa are usually used in pairs (one in each hand) but if your prefer to keep one hand free, using one works just as effectively. They also are wonderful for reinforcing blocks, if you are defending yourself.

Bullwhip:

They aren’t the most common weapon you’ll find laying around, but Indiana Jones sure made his work wonders, so maybe there’s something to them. Use extreme cautions though: whips strike with more than enough power to lay flesh wide open, so try a couple practice strikes before going full throttle 100%.
bullwhip | Unusual Weapons and How to Use Them

The crack made by a whip is actually a small explosion caused by the sound barrier breaking – like when jets exceed the speed of sound and cause blasts big enough to break windows. The basic concept behind using a bullwhip is to change the direction of the tip fast enough to break the speed of sound and create that small break in the sound barrier.

So most of whip strikes involve swinging the whip in one direction and then very quickly snapping that movement in reverse to change the direction of the whip tip. It takes some practice to get good at this, but once you have the concept down, you can successfully apply that to many different whip striking techniques. This (Adam Winrich) is the internet’s bullwhip-master, and in his videos he demonstrates several different ways to use one.

Sling:

Slings are one of the oldest weapons in human history, and in their simplicity there is great functionality. As the name implies, slings were designed to sling blunt projectiles with tremendous force. They basically consist of two lengths of rope or cord with a pouch tied between the two (the same thing can be accomplished with one length of cord and a pouch tied along it).

Load the projectile into the pouch so it sits snugly, and grip both end of the sling in one hand. Twirl the sling with increasing speed above your head and when you are ready, release one end of the sling (while maintaining your grip on the other end) and the projectile will be released. It will likely take some practice to find the correct release timing for proper aim, but once you get the hang of this simple weapon it can be very deadly.

Macuahuitl:

This bladed paddle was popular amongst the civilizations of the Americas (ie Mayans, Inca, Aztecs). It is essentially a long wooden paddle fixed with short obsidian blades at intervals along the edges of the paddle. The weapon was used much like a sword or an axe, and swung at enemies with the intention of ripping through flesh. Obsidian, for those who don’t know, is one of the sharpest substances on earth, so sharp, in fact, it slices through different materials on a molecular level – that’s why they are popular in the medical field.

Boomerang:

Most of us have heard of boomerangs, and even tested them. This ancient form of projectile technology was developed by the aboriginals of Australia as a means for hunting. While boomerangs are famous for their ability to “come back” to the thrower – typically when aboriginals hunted for animals with boomerangs, they would aim their shots so the boomerang flew outwards and upwards, and would come back to strike down upon the unsuspecting animal.

boomerang | Unusual Weapons and How to Use Them

You can also just chuck them straight at your target and do some damage, if you aren’t feeling real fancy. Boomerangs are surprisingly effective weapons for self defense too – if thrown at an assailant they can strike with enough force to break the skin, and if used as a club they can be deadly.

Emeici:

The Chinese are famous for strange weapons. Kung fu is full of oddly shaped, strangely designed weapons that look like great ways to hurt yourself. Emeici are one of those. Basically these pointed rods are attached to your hands via rings. The rods can then be spun and manipulated in wildly complex patterns and techniques. Here is a video of someone using them… I’m not even going to try and explain how to use these – just jab your attacker and try not to harm yourself.

Katar:

This is a very old form of push dagger, characterized by its H-shaped handle. These were unique to South Asia (India especially) and were used for both combat and ceremonial worship. Just from looking at this age-old fighting knife, one can kind of tell how it is meant to be used. It’s pretty simple actually: hold the handle, stab your enemy. The bonus to using one of these is they are easily concealable.

Man Catcher:

I don’t ever want to run into someone wielding one of these awful, nightmarish weapons. If you’ve seen dog catchers use those long rods with a loop on the end, to snare dogs by the neck and keep them away at a safe distance, then you understand the concept behind the “man-catcher”. Except instead of a harmless loop at the end, this weapon has a ring of hooks, meant to tear and cut and stab into the neck of whoever might be unfortunate to get “caught.” Just imagining being stuck in one of these is enough to send shivers down my spine – but if you’re on the delivering end of a man-catcher, you will probably be just fine.

Chakram:

Imagine a frisbee that is ringed with a razor sharp edge. That is the idea behind a chakram. It was the weapon used by Xena the Warrior Princess, and Odd Job from James Bond (sort of – in hat form). Usually these are circular disks that can be hurled across great distances to cleave into a target a long ways off. Just throw it like a Frisbee, stand back, and watch the carnage ensue.

A Note on Creative Weapon Uses

Here’s the thing when it comes to using weapons in an emergency situation, you might not always get to fight with your favorite weapon. Likely, you will be forced into combat unexpectedly and you’ll have to use whatever resources are laying around at your disposal. That might mean using a strange and unknown weapon you’ve never seen before. That might also mean improvising and using something weapon-like as a weapon.

And that is the real point of this article: knowing about a diversity of different types of weapons, and understanding what kinds of objects might work as a tool of self defense. This is an extremely important skill – something any survivor should be keen to hone.

So keep that in mind moving forward. It’s not that you need to master every weapon ever devised, but understanding the concepts behind different weapons might enable you to think outside of the box when threatened – and that can make the difference between life and death.

It also doesn’t hurt to simply be familiar with a lot of different weapons. Even if you avidly practice your marksmanship or swordsmanship, if you neglect to understand how other weapons work you aren’t doing yourself any favors. The more you know the better, and the more you know about weapon use the better prepared you’ll be to protect yourself in a dangerous situation.

Did you find this post of unusual weapons useful? Let us know in the comment section below.

Check out Unusual Weapons From Around The World And How To Use Them at https://survivallife.com/unusual-weapons-uses/

If you’re looking for useful survival gear that you can’t make at home, check out the Survival Life Store!

In need of a few products to practice honing your skills? Check out these options:


from SurvivalLife https://survivallife.com/unusual-weapons-uses/

Frostbite Treatment | How To Administer First Aid For Frostbite

Back to Basics: The KISS AR-15

SHTFblog_survival_cache-best-ar-15-dissipator-windham-weaponry-magpul-blue-force-gear-vickers-2

KISS_SHTFblog-survival-cache-tactical-magpul-aimpoint-comp-ml3-fenix-pd35-troy-magpul-dissipator-stramlight-tlr-1I admit it – like most gun culture involved individuals in America, I also got way too caught up in building an “ultimate” AR-15.  While I didn’t go as wild as some, I definitely spent way more money buying and trying different setups until I settled on my current “Goldilocks”configuration. I use and shoot the hell out of that AR – it’s my SHTF “gotta go!” rifle – but I’ve figured out with actual use that the rifle just has a lot going on for occasional range use, training, and scouting/small game hunting.  It’s heavy for an AR, to boot.

By Drew, a contributing author of Survival Cache & SHTFBlog

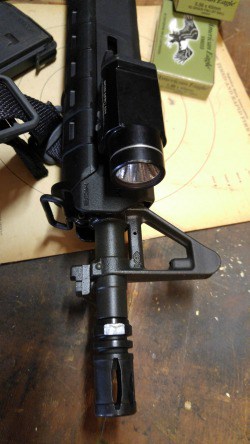
The basic rifle uses a Windham Weaponry 16” heavy barrel SRC upper, modified with a Troy low-profile gas block, 13” Troy Alpha rail and aluminum Sig Sauer flip-up BUIS.  The lower has a Magpul MOE grip and a Magpul ACS stock, both stuffed to the gills with extra springs and pins, small sample tube of CLP, a spare firing pin, and a full complement of CR123 batteries for the 1000-lumen Fenix PD35 TAC light.  With the rubber-armored Aimpoint Comp ML3 red dot optic and steel LaRue M68 QD mount, the rifle weighs over nine pounds with a full 30 round magazine and BDS sling.  It’s set to go for a SHTF event and is a very capable, reliable, great-shooting rifle.  You could ask almost anyone and probably get the reply that it has everything one might need on an out-the-door grab-and-go SHTF AR platform.

But does this AR have things I don’t absolutely need (besides weight)?  Since building that SHTF rifle, my mind has been drifting occasionally to a “KISS” (Keep It Simple, Stupid!), rifle that is lighter, has no frills, and just works for a variety of uses and missions.  I recently assisted my father with assembling a rifle that he dubbed his “ULWC” (Ultra LightWeight Carbine) that utilized a lot of really high-end lightweight parts and a dash of simplicity to create a nice, functional AR that tips the scales at under 7 pounds with a micro red dot optic and 20-round P-Mag.  I wanted to straddle the line between the weight of my father’s ULWC, the utility and mission of Doc Montana’s “Katrina Rifle”, and what I had built already.  Nothing battery-powered, (though retaining the capability of mounting a light)  just tried and true simplicity.

Opportunity Provided By Colt

I’ve had a Colt Match Target Sporter HBAR for years, and I never really shoot the rifle anymore due to its competition-designed setup: it is a standard AR-15A2 configuration, with a 20” very heavy barrel, non-removable rear “carrying handle” adjustable sight, and fixed rear stock with added weights. The rifle shoots great, but its 1:7 rifling rate of twist means that it doesn’t group my preferred 55-grain bullet handloads very well – the 1:7 twist spins the fast-moving little pills too quickly, and the rifle grouped badly with 55-grainers as a consequence.  I didn’t want to stockpile another bullet in the 69-75 grain range and develop another handload for a rifle that didn’t have the capability to mount an optic optimally, so the rifle sat in the safe and gathered dust for a long time.

However, one day I was talking with my brother about possible upcoming AR builds, and he said, “why don’t you just throw a collapsible stock on your Colt?”  A light bulb went off.  I have built up a cadre of friends and local shops who were very capable of excellent AR builds and had all the tools I hadn’t accrued yet….so indeed, why not modify the Colt?  It possesses all the basic upper and lower receiver ingredients for a great KISS rifle – it just needed a different barrel and stock configuration.  I rooted through the couch cushions for extra change and set to work once I had the funds.

The configuration I knew I’d go to was one I’d had in mind for years: Dissipator, baby.

Dissa-whaaaaat?

KISS_SHTFblog-tactical-survival-cache-dissipator-colt-ar15-streamlight-TLR-1sI remember being quite young – probably before my teens – and perusing through the many stacks and stacks of gun magazines my father had accrued: my earliest firearms education.  I remember seeing an a picture of an AR-15 that still sticks with me – it looked like a mean-looking chopped-off standard AR-15A2; and really, that’s what it was.  Later in life, I found that the then-Maine-based company, Bushmaster Firearms, had put a name to the design that Colt had pioneered years ago: The “Dissipator.” A classic Dissipator is a standard AR-15A1/A2 with the barrel –  usually 20” on a standard A1/A2 – lopped off to a handier 16” length.  The flash suppressor sat just beyond the fixed tower front sight and full-length rifle handguards, giving a stubby, businesslike appearance.  But even in my now long-gone younger ages, I knew that the rifle had a longer sighting radius for better accuracy, while boasting the handier CAR-15 shorter overall length.

Original Dissipators had issues with reliability; they had a full-length rifle gas system on a carbine-length barrel.  Gas impulses and resulting short dwell time were funky and the guns had a habit of not cycling properly unless the gas ports were opened up significantly.  Modern Dissipators usually utilize M4-pattern barrels and carbine-length low-profile gas systems under full-length rifle handguards, with the fixed tower front sight not being utilized as a gas block, as per the usual.

Today, things have come full circle.  After the A3/M4 AR variant reared its head, sprouting its myriad spawn and video game experts, shooters started to realize that the extra handguard length meant more rail room for more goodies and sling mounts.  It also lead to a longer sight radius for any attached sights, and with the modern arm-extended “C” clamp method of holding the rifle, more space to muckle onto the forward end of the rifle and not get your phalanges cooked medium rare.  You’ll see many modern builds are actually de facto Dissipators – short barrels with full-length handguards/rails growing around them, and sights that are placed almost to the muzzle.  Hey, if it works, people will figure it out eventually, right?

But I’d figured out long ago that it looked purposeful and damned cool.  And I was gonna get one, dammit. Or, y’know, in this case I’d build one.

Putting the Puzzle Together

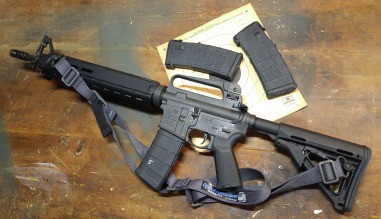
Okay, so I had a Colt rifle and the entire interwebs to help me figure the best way to modify it.  Really all I needed was a barrel, appropriately-lengthed gas tube, and a collapsible buttstock.  I’d had the receiver extension, end plate, buffer spring, and carbine buffer kicking around already, waiting for a build.  I sourced a black milspec Magpul CTR stock from the local Cabela’s, and converted the lower from a fixed A2 stock to a 6-position telescoping rear stock one evening after dinner.  Mission one complete.

Related: Theory and Practical Application of the Walking Around Rifle

KISS_SHTFblog-survival-cache-best-ar-15-colt-dissipator-streamlight-magpul-MOE-tlr-1SNow for the upper receiver modifications, which were going to require more digging to make sure I did things right.  I searched the catacombs of online sources for a couple days, looking for the proper barrel for my build.  I definitely did not desire another heavy barrel; nor did I want a flyweight barrel and its walking groups.  Finally, I found that my local boys at Windham Weaponry do indeed offer Dissipator setups – I could have bought an entire completed Dissipator upper receiver, but settled on just the barrel and gas tube to replace the 20” heavy barrel that was on the Colt.  In the Dissipator models, Windham Weaponry offers a heavy barrel setup, as well as a stepped, lighter M4-pattern barrel.  I opted for the latter, and was 100% confident I’d have a great barrel; I’ve personally toured the Windham Weaponry facility, and their quality control is second to none.  Every person who works there is fiercely proud of their product and what they represent.  As stated before, my other AR build has a W-W upper, and with a good field rest, that rifle will keep 4-5” groups at 200 yards with no issues if I do my part behind the Aimpoint.

Windham Weaponry offers the ability to purchase directly through their website and I could have installed all the hardware, but I wanted to support another local business.  I called on an old schoolmate, Jeff Furlong at Furlong Custom Creations in Raymond, Maine, to order the parts and assemble them to my upper.  I’d had a custom kydex holster made by Jeff years ago, but had never had any rifle work performed.  He has a stellar reputation for his builds here in the area, so I called on him to help with the build.  Jeff helped me sort out what I wanted and needed, and he got to ordering the barrel and necessary accoutrements from Windham Weaponry.  While he was at it, I asked him to source a set of black rifle-length MOE MLOK handguards from Magpul, and a new charging handle.  He had a BCM Mod 4 charging handle in stock, so we threw that on the pile of parts.

I dropped the upper off at Furlong Custom Creations, and less than a week later, I got the message that the parts had arrived and the new parts were assembled on the upper.

And the Survey Says….

Huzzah! I buzzed up to Furlong Custom Creations to collect my upper.  Jeff remarked that it looked “badass” with the Magpul handguards, and I was inclined to agree.  Though aesthetics aren’t exactly the only thing we aim for with our ARs, you know we all smirk inwardly with unabashed satisfaction when another gun guy tells us our rifle looks “badass”, or some variation thereof. I probably would have skipped back to my truck if it wasn’t for the icy driveway.

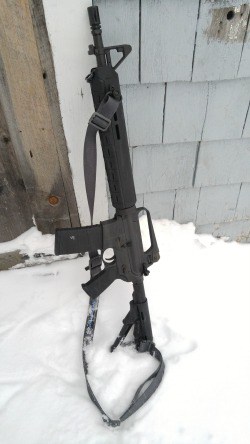
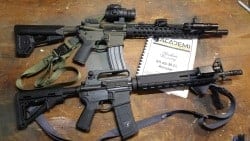
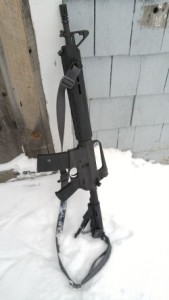
Once home, I reunited the old receiver mates and assembled the newly transformed upper onto the Match Sporter lower.  The end result was, in my eyes and hands, delightful.  The weight sits just a bit further forward than a standard M4, and the handling qualities are excellent.  The initial handling time I got with the rifle, comparing it to its fully decked-out brother, made me like the Dissipator more and more – maybe there really was something to this simple, lightweight thing.

The first range trip was short – I barely got it on paper at 50 yards before the Maine 4th Keyboard Commando Brigade showed up at the pit with their AKs and .45 Glocks and started performing breathtaking 7.62 drum dumps and even occasionally hitting their Bin Laden targets.  I packed up and headed home before the cops showed up.

I finally got a few minutes to do some accuracy work while on my lunch last week, and the results were very good.  With Federal 55-grain FMJBT ammunition, I was able to keep 5-shot groups to 1” or so at 50 yards offhand.  Benched groups at 100 yards with the same Federal load hovered in the 2”-3” range – adequate for the purposes I need. I’ll try a few different factory loads and also try a handload – but for all intents and purposes, I’m happy with groups this size from an open-sighted rifle.  My old Winchester Model 54 in .30-06 shoots 2-3” groups at 100 yards with open sights, but will cloverleaf three rounds at the same range when scoped – so I know that the larger groups at long range are due to my aging Mark 1 eyeball’s capability, and I’m fine with that.  I accept it, anyway.

Though I’ve only run about 300 rounds through the rifle thus far, I have been very happy with the package and the performance.  Reliability has been flawless – though one really can’t gauge long-term results from just a few rounds downrange.

A Couple Additions

I didn’t want – or really, need – to add a bunch of crap to this rifle; I wanted to maintain the KISS principle to the best of my abilities.  Light weight and no-frills are the core concepts in this build. In my mind’s eye, I only needed two accessories: a good sling, and the ability to mount (and dismount) a light.

For the sling, I ordered a Magpul MLOK-compatible QD sling mount, and attached the circular mount at the 10 o’clock position, as far forward as I could place it.  The Magpul CTR stock already had a quick-detach sling swivel mount built in, so I sourced a pair of Midwest Industries Heavy Duty QD sling swivels from Amazon.  The space in between the swivels was filled with an adjustable Wolf Grey Blue Force Gear Vickers Combat Application sling to keep the whole rig in place on my body.  For those of you who haven’t tried a Blue Force Gear Vickers sling, they are phenomenal and highly recommended.

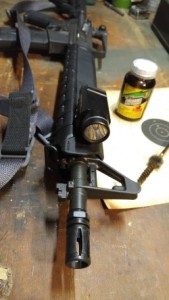
For illumination, I obtained a 3-slot MLOK picatinny rail attachment point, which I mounted at the 2 o’clock position, also as far forward as was allowable.  The small, simple rail is just the right size to mount a Streamlight TLR-1, which can be activated by my support hand fingers without adjusting my grip.  Simple, easy, tough…and with enough illumination power for what I expect to use the rifle for.

Possible future upgrades that are not necessary for this rifle to complete is mission, but are desireable to help improve user-friendliness:

  • a three-dot tritium sight set to replace to stock A2 adjustable sights, as budget allows – but with the Streamlight mounted, the need for the illuminated sights is negated mostly.  If I don’t go with tritium sights, a finer post front sight will find its way on the rifle.
  • An Odin Works extended magazine release is definitely on the list; they are a vast improvement over the stock magazine release, and I install them on all of my AR platform rifles.
  • A Magpul MOE Enhanced Trigger Guard will also be installed in the future to allow for improved access to the trigger with gloved hands.  They are more smoothly contoured as well, and don’t have a tendency to shave skin on my fingers as badly as the stock sharp-edged metal one.  I saw a screaming deal for a BCM extended trigger guard, so that was ordered and installed on the rifle instead of the Magpul part.

Defining the Mission for my KISS Rifle

While some may say the need for this rifle may be vague or non-existent, it fills a very vacant hole in my lineup.  I’m very fond of running guns that are sans optics unless I need them; I like the lighter weight and better handling qualities…a good aperture sight setup is all I need for 90% of my rifle use.  I’m comfortable and pretty quick on target using the built-in, non-removable sights.  For a few bucks, I can always drop some cake on a new flat top upper and have the Dissipator parts swapped on, once my eyes finally give out (I’m fighting it as long as I can, dammit) and I require an optic to keep my rounds heading in the right direction with anything resembling a modicum of precision.

KISS_shtfblog-tactical-survival-cache-KISS-rifle-dissipator-blue-force-gear-vickers-snowBut, what will I do with this rifle?  I’m glad you asked.  Like the aforementioned Katrina Rifle engineered by Doc Montana (check out his article here for a similar rifle concept that is different in execution), I built a rifle around an idea that requires a simple, light, rugged, and above all, reliable rifle that is capable of security detail/protection, hunting, and scouting.  Light weight is essential so that the rifle can be on my person perpetually if the situation demands it.  In a true disaster or SHTF event, having a lightweight rifle as a force multiplier may be the difference between life and death – and if the rifle is so heavy or obtrusive that you leave it at home standing in the corner, it is of no benefit.  This KISS rifle is also a second primary rifle, so that I may outfit my teenaged-but-larger-than-me son with an effective rifle in case of severe emergency and extra security is required.

I also wanted a platform for my KISS rifle that was easily serviceable, with parts readily available, either aftermarket or from salvaging “found” guns if needed – the Colt fit the bill flawlessly in that department.  However, since the Colt is an older “pre-ban” (is that still a bragging point anymore?) rifle, it has larger .169” trigger/hammer pins, not the Milspec standard .154” pins.  This necessitates a couple spares taped to the inside of the Magpul MOE grip….just in case.  A complement of easily-lost detents, springs, and pins also reside in the grip cavity along with a shortened 1/16” hardened steel pin punch and a small sample tube of CLP.  I like being able to effect small repairs and lubrication in the field if necessary, but big parts replacement, if required, and deep cleaning can be carried out at the home/BOL armorer’s bench.

Read Also: The AR-15 Bolt Carrier Group

The rifle will likely stay at the homestead, but remain ready to fulfill its duties with a ready complement of four loaded (and regularly rotated) and ready-to-rumble Magpul P-mags for immediate danger work, or a couple five-round magazines with a small-game/varmint handload in case I don’t feel like taking my Walking Around Rifle for a jaunt in the woods.

This KISS Dissipator (KISSipator?) fulfills all the basic requirements I was looking for when I started building the gun in my head.  I got the Dissipator I’d been dreaming of for 20 years, and was able to tailor the long lusted-after rifle and its few accessories to fill a hole in the SHTF arsenal, all while not overloading the rifle with gadgets and battery-powered weights. Mission accomplished.

The Sum of its Parts

The Dissipator configuration is a great choice if you’d like the longer handguards for mounting and grasping real estate, but without the added cost and/or hassle of free-floating rails.  Really, if I didn’t want to retain the capability of mounting a light to the gun, I could have left the standard A2-style handguards on the rifle, mounted the sling to the standard swivels, and had a great rifle for even less money.  As it stands, the cost for the barrel and gas tube assembled to the Colt upper, BCM charging handle, Magpul MOE rifle-length handguards, Magpul CTR rear stock, Blue Force sling and mounts, and the MLOK attachments is $407.00 – much less than the cost of a new, high-quality rifle (with no accessories!), even in this heyday of the AR rifle and aftermarket parts glut.

Check Out: Windham Weaponry

And keeping it simple?  That’s a personal choice.  I like having a rifle that is 100% effective at its intended job without any additional tactical detritus that weighs the rifle down and requires a larger stockpile of batteries.  I was pleasantly surprised at the utility of this rifle, even without all the gadgetry installed.  The fixed rear sight A2 platform is the ultimate in platform simplicity and ruggedness, and may even be the direction you want to go in if you’re looking for these same qualities in a SHTF rifle.

What are your thoughts on this setup?  A waste of a good Colt, or the right direction to go in? Sound off in the comments with your thoughts if you have a minute to share.

Visit Sponsors of SurvivalCache.com

300-x-250-hope-for-the-best


the_survivalist_podcast

Save

Save

Save

Save


from SurvivalCache http://survivalcache.com/back-to-basics-the-kiss-ar-15-keep-it-simple-stupid-survival/